Table of Contents
Advertisement
Quick Links
See also:
Owner's Manual
• In households with small children, an adult should
provide supervision until the child is capable of
following all the rules essential for the safe opera-
tion of the unit.
.........................................................................................................
• Protect the unit from strong impact.
(Do not drop it!)
.........................................................................................................
• Do not force the unit's power-supply cord to share
an outlet with an unreasonable number of other
devices. Be especially careful when using exten-
sion cords—the total power used by all devices
you have connected to the extension cord's outlet
must
never
exceed
(watts/amperes) for the extension cord. Excessive
loads can cause the insulation on the cord to heat
up and eventually melt through.
.........................................................................................................
• Before using the unit in a foreign country, consult
with your dealer, or qualified Roland service per-
sonnel.
.........................................................................................................
• Since the GR-30's sound source is designed to
achieve a wide range of tone changes, depending
on the setting, sound levels may change greatly.
Particularly when using the wah effect, or when
adjusting certain tones, in order to prevent damage
to your hearing, amps, speakers, and/or the like
due to large or sudden changes in output, be care-
ful not to set volume levels too high.
.........................................................................................................
the
power
rating
• The unit and the AC adaptor should be located so
their location or position does not interfere with
their proper ventilation.
.........................................................................................................
• Whenever the unit is to remain unused for an
extended period of time, disconnect the AC adap-
tor.
.........................................................................................................
• Try to prevent cords and cables from becoming
entangled. Also, all cords and cables should be
placed so they are out of the reach of children.
.........................................................................................................
• Never climb on top of, nor place heavy objects on
the unit.
.........................................................................................................
• Never handle the AC adaptor body, or its plugs,
with wet hands when plugging into, or unplug-
ging from, an outlet or this unit.
.........................................................................................................
• Before moving the unit, disconnect the AC adaptor
and all cords coming from external devices.
.........................................................................................................
• Before cleaning the unit, turn off the power and
unplug the AC adaptor from the outlet (p. 6).
.........................................................................................................
• Whenever you suspect the possibility of lightning
in your area, disconnect the AC adaptor from the
outlet.
.........................................................................................................
3
Advertisement
Table of Contents

Related Manuals for Roland GR-30


Summary of Contents for Roland GR-30
- Page 1 ..........................................• Since the GR-30's sound source is designed to • Before cleaning the unit, turn off the power and achieve a wide range of tone changes, depending unplug the AC adaptor from the outlet (p. 6).
-
Page 2: Table Of Contents
Saving Patches ..........30 Assigning Patches Before Saving (WRITE TO...).....30 Chapter 1: Producing Sounds Cautions When Saving ..............30 Saving Patches From the GR-30 to Sequencers or What You Need..........11 Other MIDI Devices (Bulk Dump) ......31 Installing the GK-2A ..............11 Making Connections ........12 (1ST/2ND TONE) Necessary Steps—From Powering Up to... - Page 3 To Add Effects ................49 Changing Patch and Other Parameters by Transmitting To Switch Effects (EXP PEDAL)..........49 MIDI Messages from the GR-30 (PG CHNG #) ..72 When You Want to Have Separate Sounds Programmed for Different Strings.......73 Chapter 8: The Arpeggiator Function Selection of More Than 128 Tones About Arpeggiator ..........51...
-
Page 4: Important Notes
Otherwise, you will need to use equivalent packaging we regret that it may not be possible to restore the data, materials. and Roland assumes no liability concerning such loss of data. • Use only the specified expression pedal (EV-5; sold sepa- rately). -
Page 5: Starting Out
Starting Out About the Guitar Synthesizer The GR-30 guitar synthesizer, though small and com- With these points in mind, the guitar synthesizer was pact, is big on functions and high-quality sounds. developed as an instrument that, while played like a guitar, could be used for sound generation much like Say “synthesizer,”... -
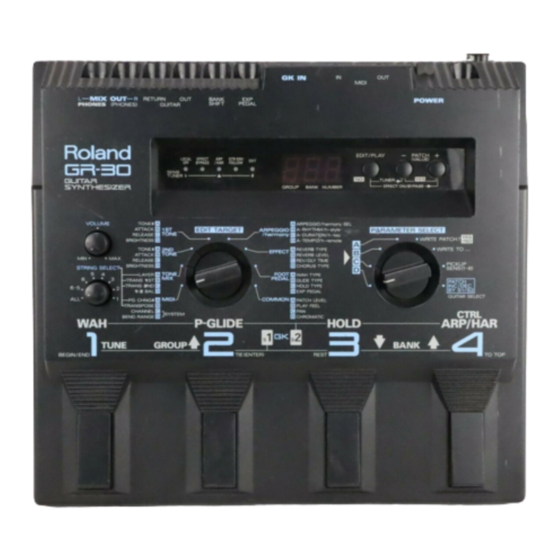
Page 6: Panel Descriptions
Pressing the button while you are in the Play mode amp or mixer. switches the GR-30 to the Edit mode, enabling each dial to select various settings, and allowing you to The output level from the GUITAR OUT jack is con- create and save sounds, adjust sensitivity, and so on. - Page 7 PATCH (VALUE) Button [+] / [-] Five-light Indicator In the Play mode (status at start-up), press these but- This illuminated indicator consists of five LEDs. For tons to go through the different patches (tones) in the Tuner function (p. 15) and sensitivity adjustment sequence.
- Page 8 AC Adaptor Jack/Cord Hook the guitar. The AC adaptor included with the GR-30 plugs in GUITAR OUT Jack here. Additionally, hanging the adaptor cord on the cord hook can help prevent the cord from accidentally Use this jack when you wish the guitar output to be being pulled out of the jack while you are playing.
-
Page 9: Chapter 1: Producing Sounds
Chapter 1: Producing Sounds What You Need The following items are necessary for getting sounds from your GR-30: GR-30 base module, with included accessories (AC adapter, 13-pin cable) Amplifier, speakers, and cables (stereo system wholly preferred); alternatively, stereo headphones GK-2A synthesizer driver... -
Page 10: Making Connections
GR-compatible guitar To AUX, LINE IN Guitar amp/ guitar effects processors When plugging in Monaural Amps or Headphones, turn on the power to the GR-30 while holding down pedal 1 (Monaural Output). See p. 19 AC Adapter (included) See p. 49 p. -
Page 11: Necessary Steps - From Powering Up To Performance
Patches that came with the GR-30 when you pur- exactly in the same way as you would if the guitar chased it, it is important to connect your setup to a were not connected to the GR-30. -
Page 12: Setting Input Sensitivity
Guitar Equipped with the GK-2A SENS (1—6) — the sensitivity settings for strings 1 to 6. With the GR-30, you can make four different string The sensitivity setting function is called up, and sensitivity settings, which can be called up to the following appears in the display window: match the guitar you are currently using. -
Page 13: Guitar Tuning (Tuner Function)
The tuner function is called up, and the following The master tuning (basic pitch) set at the factory for appears in the display window: the GR-30’s sounds and internal tuner is A = 440.0 Hz. <<fig. 1-4>> When you need to match the pitch of another instru-... -
Page 14: Playing The Internal Synth Sounds With The Guitar
(The guitar sound output of the GUITAR OUT jack is not affected. Guitar volume also unchanged when you 4. Set the VOLUME on the GR-30 to the center mark- use the GK-2A’s SYNTH VOL knob.) ing. -
Page 15: Chapter 2: Selecting And Playing Sounds (Patches)
Chapter 2: Selecting and Playing Sounds (Patches) What Is a Patch? “Patch” is the term for the GR-30’s tones that can be Rewritable Patches (User Patches) called up at any time with a foot switch or other device. There are 256 patches stored in the GR-30. -
Page 16: Selecting Patches: Four Methods
Different Group or Bank> <Using the Pedal> Used together with the GK-2A’s [S1] button, you can With the GR-30 in the state just described, you can get use the pedal function to switch patches. various pedal effects (explained later). For example hold, pitch glide, and the like can be obtaind, by step- 1. -
Page 17: Using The Base Module Plus An External Footswitch To Select Patches
While holding down S1 Using the Base Module plus an External Footswitch to Select Patches 2. After selecting the desired bank, release the S1 switch, and you now will be able to select a patch from the four patches in that bank, using each of By plugging a foot switch into the BANK SHIFT jack the four pedals. -
Page 18: Selecting Patches With An External Midi Foot Controller
4. Set the PARAMETER SELECT dial to PATCH INC/DEC BY S1/S2. 5. Set the MIDI send channel of the MIDI foot con- troller to match the channel of the GR-30 (p. 71; the factory setting is channel 11). 6. Use the MIDI foot controller to switch patches externally, operating the controller according to the instructions in the user’s manual. -
Page 19: Changing The Patch Order
Changing the Patch Order When sequencing patches while performing a piece, <Changing the Patch Order> or while you are on stage, if the patches are from the Example: To change the contents of A21 and B62 same group/bank (for example A11 to A14), you can switch patches very smoothly by using the pedals on First, to prevent the contents of patch A21 from being the base module. -
Page 20: Chapter 3: Controlling Functions And Effects With The Base Module Pedals
Chapter 3: Controlling Functions and Effects with the Base Module Pedals “Pedal Effect Mode”: What It Is, and How to Call It Up By pressing the four pedals after changing modes, Press either [S1] or [S2] on the GK-2A to return to the you can turn on and off the Arpeggiator (and Play mode. -
Page 21: Turning On/Off The Arpeggiator And Harmonist Functions
Arpeggiator and Harmonist are selected in the GR-30, when the patch is turned on, However, when the “h-style” “dim” (diminish) set- the color of the light on the ARP/HAR indicator shows ting is selected, then “diM,”... -
Page 22: Changing Sounds With The Pedals
Changing Sounds with the Pedals In the Play mode, you can get different effects by Changing Pitch Dynamically pressing each of the pedals 1 to 4 in the follow way. (Pitch Glide) Let’s actually go into Pedal Effect mode by pressing the [S2] button on the GK-2A, and try these effects on Press pedal 2 (P-GLIDE) to get a pitch glide effect. -
Page 23: Calling Up The Tuner Function With A Pedal
Calling Up the Tuner Function with a Pedal 1. In the Play mode, set the PARAMETER SELECT dial to any position other than “PATCH INC/DEC BY S1/S2,” then holding down [S1] on the GK-2A and press the pedal furthest to the left (TUNER). The tuner function is called up, and the following appears in the display. -
Page 24: Chapter 4: Three Basic Modes
Chapter 4: Three Basic Modes The three main modes of the GR-30 allow you to: • select tones and perform (Play mode) • get effects such as wah or hold using the pedal on the base module (Pedal Effect mode) •... -
Page 25: Pedal Effect Mode
Pedal Effect Mode In Pedal Effect mode, buttons and dials work as fol- External Bank Shift Pedal (Bank Up) lows. This is used for Arpeggiator’s Tap Tempo (p. 57). Also used to toggle between major and minor in Additionally, you can change detail of the effects that Harmonist (p. -
Page 26: Edit Mode: What It Means, How It Works
Edit Mode: What It Means, How It Works While in either Play mode or Pedal Effect mode, STRING SELECT pressing the [EDIT/PLAY] button once puts you into Used to select a string which is to have settings the Edit mode, and the green EDIT light at the right applied to it (however many that is). -
Page 27: Chapter 5: Adjusting Sounds (Patches)
• How effects are applied (p. 42) patches that came with your GR-30 at the time you purchased it. You can also create and save your own • Arpeggiator patterns and related settings (p. 51) original patterns. -
Page 28: Saving Patches
(The green EDIT indicator light now 5. After pressing the [+] and [-] buttons, “don.” flashes.) (done) appears in the display, and the GR-30 auto- 4. Turn the PARAMETER SELECT dial to “WRITE matically revert to the Play mode. -
Page 29: Saving Patches From The Gr-30 To Sequencers Or
Only when sending a single patch, one from A11 to d84 bulk librarian function. You can also send/receive as described in step 4 above, back to the GR-30 is it nec- data directly with another GR-30 by connecting the essary to carry out the patch write procedure (p. 30). -
Page 30: 1St/2Nd Tone
1ST/2ND TONE Selecting and Creating Synth Sounds You can select from the 384 sounds that are the basic To select the second tone, at step 2, set the EDIT TAR- material for patches, choosing a “1st tone” (first tone) GET dial to 2ND TONE instead of 1ST TONE, and and a “2nd tone”... -
Page 31: Changing Tone Release (Release)
To change the attack for the second tone, in step 2, set The release setting is a method of adjusting a tone’s the EDIT TARGET dial to 2ND TONE instead of 1ST characteristic peculiarities. Accordingly, the width of TONE, and change the attack in the same manner as the change varies with the selected tone. -
Page 32: Tone Mix
The first (left) place of the dis- play shows the string number, and “A” for “All” is Ordinarily, with the GR-30, the pitch of the synth shown here. sound is the same as the guitar’s. When the need aris- <<fig. -
Page 33: Choosing Different Settings For Different Strings (String Select)
When used in combination with the STRING SELECT When making settings for each string individually, use the [+] and [-] buttons to change settings val- dial, you can make settings for each string individually. ues, switch the STRING SELECT dial to any of the First, using the following procedure, let’s change the set- string numbers 6 to 1. -
Page 34: What To Do When A Tone Is Supposed To Sound, But Doesn't
4. When you get it set to sound the way you like, All or one of the strings is set to “1” (first tone only) or “2” (second tone only), in LAYER (p. 34). switch the PARAMETER SELECT dial to “WRITE PATCH?”, and press the [+] and [-] buttons simul- 1:2 BAL (p. -
Page 35: Changing The Feel Of A Performance (Play Feel)
Changing the Feel of a Performance (PLAY FEEL) Guitars differ from keyboards and other instruments Hrd (hard picking) in that the part of the instrument that actually vibrates This setting is for those who pick rather hard, and (i.e. the string) is touched directly, allowing subtle the sensitivity is a little lower than with normal control of the power with which it is played. -
Page 36: Following The Guitar Sound Shape (Envelope Follow)
Of the preset patches, only E13 has Accelerator turned FEEL “EF2” Setting> on (although this is also true for A13 when the GR-30 is 1. Let’s select the Synth Lead tone F82. purchased). Thus, when carrying out changes to tones based on this patch, make sure there is no popping noise, 2. -
Page 37: Changing Sound Placement (Pan)
Changing Sound Placement o-E, E-o (odd, Even) This setting separates odd- and even-numbered (PAN) strings, and places the left and right. With o-E, the odd-numbered strings (1, 3, and 5) are panned left, You can give the first and second tones different audi- and the even-numbered strings (2, 4, and 6) tory placement, for example placing the two tones left panned right. -
Page 38: Dividing Continuous Pitch Changes Into Semitones
Dividing Continuous Pitch Changes into Semitones (CHROMATIC) The GR-30 faithfully reproduces the slight pitch Chromatic Settings and Available Effects changes and in-between tones you get from pressing oFF (Chromatic Off) the strings. For guitar bending and vibrato, with this setting,... -
Page 39: When You Want To Make A Chord Resonate Beautifully
When You Want to Make a When You Want to Chord Resonate Beautifully Reproduce Piano-like Pitch Changes With patches using long notes, then because of the subtle pitch changes from the way each string is In patches assuming instruments that cannot express pressed, reverberation of the chords may end up pitch changes smaller than a semitone, switching on sounding muddy. -
Page 40: Chapter 6: Using The Built-In Effects
(p. 13). Adjusting the Effects (EFFECT) With the GR-30 you can pick one of eighteen different When saving to another patch number, before step 4, preset reverb types, and then freely make your own turn the PARAMETER SELECT dial to “WRITE... -
Page 41: Selecting Reverb Levels And Times
(CHORUS TYPE) the number of repeats increasing as you change from 1 to 6. The GR-30’s built-in chorus features 25 variations of Pd1 to Pd6 (Panning Delay 1 to 6) chorus types, where the effect of parameters such as This is a special delay effect, where the output of sweep depth and speed differ with each type. -
Page 42: Temporarily Turning Off Effects (Effect Bypass)
FL1 to FL3 (Flanger 1 to 3) Sd1 to 6 (Short Delay 1 to 6) A shallow flange effect. The speed of the waver- An extremely short delay. There are six settings, ing increases as settings go from 1 to 3. each with different delay times and repeats. -
Page 43: Chapter 7: Setting And Changing The Way Pedal Effects Work
Chapter 7: Setting and Changing the Way Pedal Effects Work FOOT PEDAL By switching into Pedal Effect mode, or while in the There are numerous variations in the way these Play mode setting the PARAMETER SELECT dial to effects work, so you can freely choose the ones that PATCH INC/DEC BY S1/S2, you can add effects like suit your own purpose, taste, or otherwise to match hold, pitch bend, wah pedal, and the like to the synth... -
Page 44: Selecting Pitch Glide Type (Glide Type)
nU1 to nU5 (Narrow Wah) Mod (Modulation) This compresses the tone difference from stepping When you select this setting, as you step on the on and releasing the pedal to half the range of the pedal, then rather than a wah-type effect, a deep normal wah (UA1 to 5). -
Page 45: Selecting Hold Type (Hold Type)
uP4 (dn4) uP8 (dn8) When the pedal is pressed, the pitch changes con- The pitch change in this effect is two octaves, but tinuously by one octave. Release the pedal to both the pitch change and the return are extremely return to the original pitch. - Page 46 String Hold/Str S.-2 You can apply this hold effect to the strings of This sostenuto hold works only on the second your choice. As with “SoS” above, the synth internal sound generator. sound being played at the instant you press the S.-b pedal is sustained, and continues even if the string This sostenuto hold works on both the first and...
-
Page 47: Using External Expression Pedals (Ev-5)
Using External Expression Pedals (EV-5) By connecting an external expression pedal (EXP To Switch Effects pedal), you can use the pedal in adding various (EXP PEDAL) effects to synth sounds. You can choose from fifteen effects that can be controlled with the EXP pedal, <Selecting the Expression Pedal Effect Type>... - Page 48 bAL (Balance) tp2 (Tempo Type 2) Changes the balance of the first and second tones. Changes arpeggio tempo. When the pedal is With the pedal all the way open (return position), pressed forward, the tempo becomes extremely only the first tone is heard, and when pressed fast, and with the pedal all the way back, the completely down, only the second tone plays.
-
Page 49: Chapter 8: The Arpeggiator Function
(root) are used play a substitute string and generate an arpeggio. On the GR-30, this sequence of played strings (“5, 4, 3, 4...”) is called an “arpeggio pattern,” or sometimes simply “pattern.”... -
Page 50: Arpeggiator Application Examples
Arpeggiator Application Examples Let’s choose some of the preset patches (E11 through Reproducing Tremolo Effects H84) to hear some actual examples of Arpeggiator’s effects. Patch H32 plays marimba tones. First, in the Play mode, set the PARAMETER SELECT Arpeggiator is turned off when this patch is called up, dial to “PATCH INC/DEC BY S1/S2,”... -
Page 51: Effective Use Of The Hold Function During Arpeggios
Arpeggiator’s backing pattern while plucking out the melody with other synth sounds (tones). 3. Play one open string to start the Arpeggiator The GR-30 also has a latch hold that can be used to rhythm. continue arpeggios even after the pedal is released 4. - Page 52 “Lt.B” is also like “Lt.A” in that ends it. On the GR-30, a latch hold is available nothing you play while the hold is in progress only when using Arpeggiator.
-
Page 53: Changing The Sounding Of Arpeggios
Changing the Sounding of Arpeggios Selecting Tones to Be TO TOP Grid Arpeggiated (ARPEGGIO SEL) 30 31 32 The setting “ARPEGGIO/harmony SEL” (Arpeggio/ Harmony select) for each patch determines whether the first tone, the second tone, or an external sound generator is arpeggiated by Arpeggiator. -
Page 54: Setting Tempo And Synching Tempo To The External Device (A-Tempo)
MIDI OUT connector on an external MIDI sequencer tination patch number for the write operation. (such as the Roland MC-303) to MIDI IN on the GR- 30, you can synchronize the arpeggios to the perfor- mance temperature of the external device. -
Page 55: Tap Tempo
Tap Tempo Some preset patches, such as E11, set the value of A- TEMPO to a multiple of the actual tempo in order to achieve a fine tremolo. This special setting means that Pedal 4 is normally used to turn arpeggios on and off the interpretation of the tempo may be somewhat unnat- when the EDIT TARGET dial has been set to ural with the Tap Tempo or when synching to an exter-... -
Page 56: Selecting Notes And Rhythm (A-Rhythm)
2. Press [EDIT/PLAY] to enter the Edit mode, then Grid set the EDIT TARGET dial to “ARPEGGIO/har- mony” and the PARAMETER SELECT dial to “B” (A-RHYTHM). 3. The current value of “16._” (one grid mark = one sixteenth note) is displayed. Play the guitar and listen to the arpeggio rhythm that is actually DURATION sounded. -
Page 57: Copying Other Patch Arpeggio Patterns
Copying Other Patch Arpeggio Patterns The steps explained below can be used to copy arpeg- When a pattern is copied, the “A-RHYTHM,” “A- gio patterns from one patch to another. DURATION,” and “A-TEMPO” settings of the origi- Since all preset patches come with arpeggio patterns, nal patch are also automatically copied. -
Page 58: Creating An Arpeggio Pattern
Creating an Arpeggio Pattern A number of arpeggio patterns equal to the number 3. Press pedal 1 (BEGIN) to make the display of preset patches is available (128), but it’s also possi- changes to “toP” (top) and start step input. (If “C” ble to create new patterns for different tunes and pur- or “D”... -
Page 59: The Feel Of Tape Recording: The "Real Time" Method
8. Press pedal 4 (TO TOP) to return the display grid The Feel of Tape Recording: to the top (“toP”). Then continue by inputting the The “Real Time” Method patterns for strings 1 to 3. <<fig. 8-8>> Another handy pattern-input method is the “real time”... -
Page 60: Inputting With A Computer Or Sequencer
6. When you’ve finished playing, press pedal 1 As you do this, don’t forget that the GR-30 cannot play back notes with timing information more (END) to stop the metronome and return to the exact than the metronome’s clicks. Also, be sure normal Edit mode. -
Page 61: What To Do If You Have Difficulty Producing Patterns
9. The arpeggio pattern is part of the patch, so to save it, go into the Edit mode, set the PARAME- TER SELECT dial to “WRITE PATCH?”, and press [+] and [-] simultaneously to write the patch. What to do If You Have Difficulty Producing Patterns If the grid numbers don’t advance as expected during step input, you may have played the sound for a grid... -
Page 62: Chapter 9: Adding Harmonies In A Specific Key (The Synth Harmonist)
Chapter 9: Adding Harmonies in a Specific Key (The Synth Harmonist) The GR-30 lets you use the “TRANS 1ST (2ND)” set- This is achieved by the GR-30’s Synth Harmonist ting (p. 34) to shift the pitch of the first and second function, also known as “Harmonist.”... -
Page 63: What You Can Do With The Harmonist
GK-2A to In contrast to this, the GR-30 Synth Harmonist lets “SYNTH.” you take the guitar sounds you normally use and Let’s call up patch E12, for which Harmonist is on. -
Page 64: Selecting Harmony Tones (Harmony Sel)
“h.-b” (both: both tones are harmony). Set tination patch number for the write operation. the GK-2A switch to “MIX” and play along with the guitar sound, and hear how the sounds from the GR-30 become the harmony for the guitar Setting Harmonic Intervals sound (melody). (h-style) Other values for Harmonist that can be chosen with [+] and [-] are as follows. -
Page 65: Setting Transpose And "H-Style
4. Use [+] and [-] to select the desired interval, turn To save to another patch number, then before step 4, turn the PARAMETER SELECT dial to “WRITE the PARAMETER SELECT dial to “WRITE TO...”, and use the [+] and [-] buttons to designate a PATCH?”, and press [+] and [-] simultaneously to patch number as the destination. -
Page 66: Setting The Key (H-Key)
Setting the Key (h-key) <About the Key Display> The key set for a patch for which Harmonist is on can The “ARPEGGIO/harmony” setting which is used to be checked without examining “h-key” in the Edit make the patch setting for key of the melody played, mode. -
Page 67: Changing The Key From External Pedal Or Other Device With Midi Note Messages (H-Remote)
GR-30’s MIDI IN connector. 2. Set the MIDI send channel on the external device to the same MIDI channel as the GR-30 (p. 71). On some patches, the selected “h-style” setting may 3. Call up the patch for which you wish to use the be “diM”... -
Page 68: Chapter 10: Connecting To External Sound Generators And Sequencers
MIDI Controlling an External MIDI Sound Device Connecting to an External MIDI Sound Device Follow the figure below to connect the GR-30 to an external MIDI sound device. <<fig. 10-1>> MIDI OUT MIDI IN... -
Page 69: The Flow Of A Midi Messages, And Necessary Settings (Channel, Bend Range)
Change messages, just as with the pitch bender on a keyboard. This means that the setting called Bend If the sending Bend Range on the GR-30 is set to “0,” an Range must be matched up on the sending and effect similar to setting COMMON “CHROMATIC”... -
Page 70: Transmitting In Mono Mode Or Poly Mode
This enables control even for sound generators which cannot receive simultaneously on six channels. 7 from MIDI OUT on the GR-30. (The receiving However, it should be noted that when two or more instrument should be set to recognize Control Change strings are playing, Bend messages are not sent and message No. -
Page 71: When You Want To Have Separate Sounds
Program Change numbers received by the GR-30 and When calling up the “12-str.Gt” variation tone of the GR-30 patches called up by these numbers. The At “Steel-str.Gt” with what is known as a GS-format the time of purchase, Program Change numbers 1 sound generator... - Page 72 256 patches in the SELECT dial to “WRITE PATCH?”, and press [+] unit when this setting is on and the GR-30 is receiving. and [-] simultaneously to write the patch. Preset patches (E11 through H84) can be called up with When you call up a patch for which the settings Control Change No.
-
Page 73: How To Apply The Arpeggiator Or Harmonist Using An External Sound Device
External MIDI Devices “hAr” or “h.-E” The GR-30’s built-in pedal effects and some expan- The GR-30 sound is the melodic line, and the external sion pedal effects can also be applied to an external sound generator is used to create the harmony. -
Page 74: Sound Generator (Transpose)
• Make sure the volume on the GK-2A or the expres- sion pedal has not been turned down too low. • Make sure that a sound generator which cannot simultaneously receive six MIDI channels is receiv- ing data from the GR-30 in the Mono mode (p. 72). -
Page 75: Using The Gr-30 As An External Sequencer Input Tool
5. If you also wish to use the GR-30’s sound genera- tor in the song, make the connections shown in the figure above, and also connect MIDI THRU on the external sound generator to MIDI IN on the GR-30. -
Page 76: About "Local Control Off
While the GR-30’s internal sound generator and gui- tar controller are connected together, it is set to “Local Using the GR-30 to input parts for guitars and similar On.” In contrast to this, “Local Off” is when the GR- string instruments, including harps, koto, and others, makes it possible to achieve voicing and an expressive 30’s internal sound generator and guitar controller are... -
Page 77: Reducing The Size Of A Midi Pitch Bend Message
To call up the Pitch Bend Data Thin function, switch the method described for Example 2 can be used to on the power to the GR-30 while holding down the [-] recording and playback. button. When this is done, “b” (bend data thin) appears as the second character in the display before It’s also possible to carry out recording with the GR-... -
Page 78: Practical Use Of Midi Channels
Also, when also adding the GR-30’s sound generator Poly Mode ch2 to the ensemble, the use of Poly mode for receiving as well as sending lets the GR-30’s parts use just one MIDIch channel, leaving the remaining 15 channels for use by 9 10 11 12 13 14 15 16 the multitimbral sound generator. -
Page 79: Chapter 11: Other Convenient Functions
Chapter 11: Other Convenient Functions Restoring the Settings to Their Defaults (Initializing) At the time of purchase, the GR-30’s user patches Recordering the Program (A11 to d84) have been same content as preset patches Change Numbers from the E11 to H84. These settings, as well as system settings... -
Page 80: Using The Gr-30 As An Expansion Sound Device For Keyboards Or Other Midi Devices (Poly Mode Reception)
(that is, the setting is not saved call up the “Polyphonic Receive” function when using in memory). the GR-30. This lets you use the GR-30 as a poly- phonic MIDI sound generator using only one MIDI • The Polyphonic Receive function cannot be used channel. -
Page 81: Terminating Transmission Of The Midi Controller No. 7 (Volume)
[+] at this screen.) This is a point that requires attention, because when 3. Press [EDIT/PLAY] to return to normal operation the GR-30 has been hooked up with MIDI cables for (the Play mode). the use as an external effects processor for guitar This stops the transmission of Control Change No. -
Page 82: Terminating Transmission Of The Bend Range Request Message
Each time the GR-30 changes patches, the external MIDI device is informed of the Bend Range setting on the GR-30, and a message requesting change is sent. The messages used here are MIDI RPN (Registered Parameter Number) “Pitch Bend Sensitivity” mes- sages —... -
Page 83: Chapter 12: Appendices
(p. 46). Is the Polyphonic Receive function (p. 82) being used? → In this case, the GR-30 is unconditionally set to The sound change produced by an “local control off” and stops producing sounds expression pedal varies from one in the normal manner. - Page 84 Pitch “50” (or “-50”)? → Change the setting to a value closer to “0” and Shift function, but it is not a defect. The GR-30 is designed to minimize such noise during guitar check operation.
- Page 85 Bypass function. ment to the first matching channel, even when Is “REVERB TYPE” set to “oFF” (off)? the GR-30 is set up to receive data on six chan- → Choose a type other than “oFF” (off). nels. Arpeggiator doesn’t work →...
- Page 86 (some strings can’t be by setting the sending Bend Range to “0.” heard) Is the GR-30 using the Mono mode to send data to a sound generator which cannot simultaneously receive data on six MIDI channels? → For such sound generators, send data in the Poly mode (p.
-
Page 87: Specifications
Specifications Guitar Synthesizer GR-30 Weight 1.6 kg 3 lbs 9 oz (excluding the AC Adaptor) sound generator 1 Part (Mono mode M=6/Poly mode switch- Accessories able) Owner's Manual AC Adaptor Maximum Polyphony GK Connecting Cable (C-13A, 5 m) 28 voices... -
Page 88: Roland Exclusive Messages
•One-way transfer procedure (See Section 3 for details.) Roland’s MIDI implementation uses the following data format for all Exclusive messages (type IV): This procedure is suited to the transfer of a small amount of data. It sends out an Exclusive message completely independent of the receiving device's status. - Page 89 The MIDI standards inhibit non real-time messages from interrupting an Exclusive one. This fact is inconvenient for devices that support a “soft-thru” function. To maintain compatibility with such devices, Roland has limited the DT1 to 256 bytes so that an excessively long message is sent out in separate 'segments'.
-
Page 90: Midi Implementation
* Can be received only through the Basic channel. STATUS SECOND THIRD * Having received this massage, the GR-30 acts as if the onboard WAH (foot switch) is operated. n=MIDI Channel Number :0H - FH (0 - 15) 0=ch.1 15=ch.16... - Page 91 : EOX (End of Exclusive) n=MIDI Channel Number :0H - FH (0 - 15) 0=ch.1 15=ch.16 * Refer to Section 3, 4, and the pages of “Roland Exclusive Message” for more detailed * Can be received only through the Basic channel. information.
- Page 92 :00H - 7FH (0 - 127) STATUS SECOND THIRD * When the Expression Pedal is operated, the GR-30 sends this as the operation (except some noted setting of the “EXP PEDAL” parameter). n=MIDI Channel Number :0H - FH (0 - 15) 0=ch.1 15=ch.16...
- Page 93 :00H-7FH (0-127) :EOX (End of Exclusive/System Common Massage) 1. F0H is the exclusive status. * Refer to Section 3, 4, and the pages of “Roland Exclusive Message” for more detailed 2. 41H is the Roland*s manufacturer ID. information. 3. This is the device ID. (Fixed at 10H for GR-30.) 4.
- Page 94 / Example using RQ1 / | 00 00 40 | 00 - 00 | not use To extract all the system parameters from the GR-30, send the following message to the |—————————————————————————————————————————————————————————-———-| | 00 00 41 | 00 - 7F...
- Page 95 To extract the all parameters’ value of the patch “A12”, send the following message to the 06H || 26H || 46H || 66H | 07H || 27H || 47H || 67H | GR-30. 08H || 28H || 48H || 68H | 09H || 29H || 49H || 69H |...
-
Page 96: Midi Implementation Chart
GUITAR SYNTHESIZER Date : Oct. 04, 1996 MIDI Implementation Chart Model GR-30 Version : 1.00 Transmitted Recognized Remarks Function... Basic Default 1 — 16 1 — 16 Channel Changed 1 — 16 1 — 16 Default Mode 3, 4 (M=6) -
Page 97: Parameter List (Blank Chart)
Parameter List (Blank Chart) You may photocopy this page and use it to make notes as you edit patches. PATCH parameters PATCH = TONE MIX 1ST TONE STRINGS (1—384) TONE# = (-50—0—50) ATTACK = LAYER= mute mute mute mute mute mute mute RELEASE =... -
Page 98: Index (Words/Panel Print)
Index (WORDS/PANEL PRINT) INDEX (WORDS) Copy ~ Arpeggio Pattern ............59 ~ Patch (Assigning Patches before Saving) ....30 Cord Hook ..................12 Acceleration Function.................38 Adaptor (AC ~ )................10 , 12 Alternate (PAN)...................39 Damper (~ Hold) .................47 Arpeggiator ..................51 Default Setting ..................81 Turning the ~ On/Off ...........55 Delay ..................42, 43 Creating Patterns............60... - Page 99 Control via Expression Pedal ........49 Panning Delay..................42 Latch ( ~ Hold)..................54 Parameter List..................99 Level (Volume) Patch ................17, 29, 108 GR-30 ~ ................16 User ~................17 Patch Volume..............36 Preset ~ ................17 Adjust 1st Tone to 2nd Tone Volume Balance...35 Write ................30 Reverb Level Setting............43 Select ................18...
- Page 100 Remote (harmonist Key ~ ) ..............69 Rest (Input Pattern)................60 Reverb ..................42 Room ( ~ Reverb)................42 Velocity ................92, 94, 98 Vibrate (Modulation) ................46 Volume (Total Volume)..............16 Patch Level ..............36 1st Tone/2nd Tone Volume Balance......35 Reverb (Delay) Level .............43 Save (Patch ~ )..................34 Expression Pedal ............49 Sequencer (External MIDI ~ ) ............77 Connect to ~..............77...
- Page 101 COMMON ......................36 PICK UP SENS(1-6) .....................14 PATCH LEVEL ................36 POWER ....................10, 13 PLAY FEEL...................37 PAN ....................39 CHROMATIC................40 REST ......................60 Roland ...............106 (SERVICE SPOT) EDIT TARGET......................10 EDIT/PLAY ....................8, 28 EFFECT ......................42 REVERB TYPE ................42 SENS ......................14 REVERB LEVEL................43 STRING SELECT....................9, 35 REV/DLY TIME ................43...
-
Page 102: Tone List
Tone List Name Name Name Name <PIANO TYPE> ORGAN 6 <BASSES> SICU +TRON JUNO ORGAN SICU PIPE A.PIANO1 FULL ORGAN UPRIGHT BASS ZAMPONA SA PIANO PIPE ORGAN 1 ACOUSTIC BASS OCARINA A.PIANO2 PIPE ORGAN 2 FRETNOT BASS ZAMPONA +TRI E.GRAND FRETLESS 1 ZANP +BREATH HONKYTONK... - Page 103 Name Name Name Name TRUMPET+SAX OB LEAD <STRINGS> DIGI BOW TBONE + SAX SYNTH LEAD BOWED GLASS HYBRID BRS TWEETY SOLO VIOLIN 1 GR HEAVEN HYBRID SAX WHISTLE SOLO VIOLIN 2 UTOPIA ALTO + TPT WHISTLE LEAD FIDDLE VECTOR VOX TPT + TBONE MG TRIANGLE ERHU...
-
Page 104: Information
Information When you need repair service, call your nearest Roland Service Center or authorized Roland distributor in your country as shown below. ARGENTINA INDIA LEBANON AUSTRIA PORTUGAL Rivera Traders Pvt. Ltd. A. Chahine & Fils E. Dematte &Co. Caius - Tecnologias Audio e Instrumentos Musicales S.A.
Need help?
Do you have a question about the GR-30 and is the answer not in the manual?
Questions and answers
I cannot get the gr30 to give sny dynth combinations..all I get are the guitar am I hooked up wrong..using guitar out to the amp...gk2 13 pin the input...set to mix on the gk2