Sailmon E4 Installation Manual
Hide thumbs
Also See for E4:
- Installation manual (53 pages) ,
- Installation manual (50 pages) ,
- Installation manual (10 pages)
Table of Contents
Advertisement
Quick Links
Download this manual
See also:
Installation Manual
Advertisement
Table of Contents

Related Manuals for Sailmon E4


Summary of Contents for Sailmon E4
- Page 1 SAILMON Installation Manual version 3.2.0 June 2019 Installation Manual version 3.2.0 Sailmon © 2019 15/06/2019...
-
Page 2: Table Of Contents
YSTEM ARCHITECTURE CHAPTER 2 INSTALLATION ..........................11 2.1 NMEA2000 ..............................11 2.2 E4 ............................. 12 INSTALLATION 2.2.1 E4 port connections ..........................13 2.2.2 LED Status ............................13 2.2.3 Sensor connecting ..........................13 2.2.4 Protocols ............................. 15 2.3 S ............................ 15 AILMON COMPONENTS 2.3.1 Snet connector ............................ - Page 3 Element 7 Mounting Template........................40 Element 10 Mounting Template ........................41 Element 7 ..............................42 Element 10 ..............................43 CHAPTER 7 EXISTING SYSTEM UPGRADES TO SAILMON ................44 7.1 B&G H3000 ..............................44 7.2 H5000 ................................. 45 7.3 G ............................ 46...
-
Page 4: Disclaimer
It is the user’s obligation and responsibility to comply with the standards of safe boat handling. Sailmon B.V. disclaims all liabilities for any use of this product in a way that may cause accidents, damage or that may violate the law. -
Page 5: About This Manual
All Sailmon processors should be installed below decks in a dry location protected from water and moisture. Power Off Disclaimer When in standby mode, the E4 still consumes a little power. If you leave it for too long without shore power, it could drain the battery. Caution: Cleaning When cleaning this product: ... -
Page 6: Introduction
The heart of the Sailmon network is the E4 processor. This small but powerful central processor unit provides all the navigation information that is needed. With more than six data compatibilities, it is the smartest and most advanced CPU on the market. -
Page 7: Sailmon System Example
USB wifi dongle or on board access point. Due to its number of data ports, the E4 can be connected to almost any network or can be set up as a standalone CPU to run your Sailmon equipment. -
Page 8: Instrument Integration
Distance To Waypoint (BTP & DTP) from tactical racing software on NMEA interfaces. 1.2 Instrument Integration The E4 system can use a wide range of sensors based on NMEA, B&G, Nexus or Raymarine protocols. Sailmon can provide support for various other sensors via optional Sailmon boxes such as WindBox, LoadcellBox and LinearBox. -
Page 9: Technical Specifiactions E4
1.6 System architecture The system architecture varies in practice on each boat. It is very important to have a clear overview of the architecture in which the E4 system is placed. Multiple examples can be found on the website. Installation Manual version 3.2.0 Sailmon ©... - Page 10 Wind calculation flow chart Installation Manual version 3.2.0 Sailmon © 2019 15/06/2019...
-
Page 11: Chapter 2 Installation
If the NMEA2000 backbone malfunctions multiple methods of troubleshooting are available. See par 5.2.1 Connect a NMEA 2000 drop cable with a standard female NMEA 2000 connector to the E4. The port is a NMEA 2000 node and does not power the bus. -
Page 12: E4 Installation
Make sure the E4 is mounted in a dry and well ventilated area., the E4 is not designed to be watertight and should therefore not be in contact with water. Securely mount the E4 in the desired location and mount with four screws. -
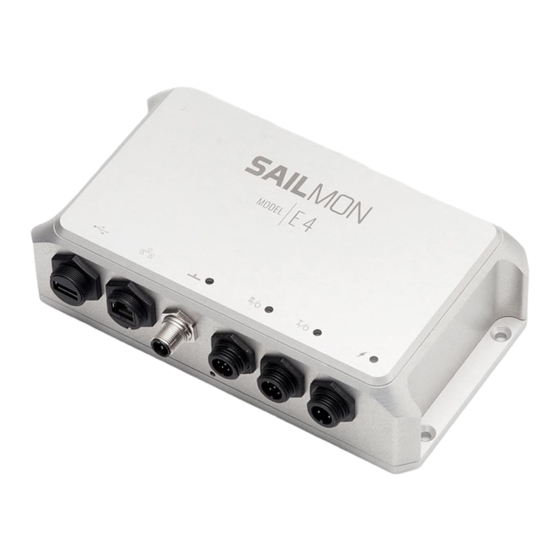
Page 13: E4 Port Connections
2.2.3 Sensor connecting Port 1 & 2 are set in a NMEA0183 mode when the E4 is delivered. Each model E4 port must be set during commissioning using the NavDesk tool. Connect a PC to the E4 for setting the correct port option before connecting the cable to the port. - Page 14 Green Bridge to pin 4 Yellow Bridge to pin 3 White Fastnet Red Brown Fastnet White Purple Fastnet Green Black NMEA in - Fastnet Blk Note: No power output supplied in connector Installation Manual version 3.2.0 Sailmon © 2019 15/06/2019...
-
Page 15: Protocols
2.2.4 Protocols Fastnet: Connect Fastnet sensors and networks through port II on your E4 using the 8 pin NMEA Fastnet cable, partnumber SME4P2Fastnet_Cable. E4 data will be mapped to the custom channels on the B&G display. The Fastnet bus must be installed and configured using the correct B&G Fastnetbus topology with resistors at each and of the bus. - Page 16 Self build: On one side of the Snet cable, a female connector is already attached. The male connector is provided to be mounted by the customer. Please note that for this, a special crimp tool is needed, which can be purchased from Sailmon. Important: Connectors should never be forced together due to the keyway in the male connector.
-
Page 17: Sailethernet
2.3.2 SAILethernet This box is connected to the ethernet port of the E4 and the ship's power supply. The SAILethernet powers and establishes a connection between your display and model E4 over ethernet. This connection can be achieved by adding both devices to an existing network or connecting them directly together. -
Page 18: Recommended Fuse Rating
Pull a power cable from the power supply location to the SAILethernet location. Pull a network Cable from the E4 (or network switch) to the SAILethernet location. The SNET cable is supplied with the outside stripped 70mm. This is the ideal length to mount it in the SAILethernet, do not shorten this. -
Page 19: Windbox
2.3.4 Windbox The Sailmon WindBox offers an interface for the B&G 213MHU wind sensor to the NMEA 2000 backbone and in turn connection to the E4 processor. The NMEA 2000 interface cable is preïnstalled. For overvoltage and electrostatic discharge protection the WindBox is galvanically isolated. - Page 20 In case of sensor failure or incorrect connection, the blue status LED will blink 5 Times / second. The Wind Box is designed to be integrated into a Sailmon system. It does not provide direct offset features since Sailmon uses advanced calibration which is done in other parts of the system.
-
Page 21: Linearbox
NMEA 2000 backbone. Up to 16 LinearBoxes can be connected to a single E4 Processor. The linear box provides overvoltage and electrostatic protection by means of galvanic isolation. The E4 will measure linear inputs with an update rate of 4Hz allowing monitoring and logging of all channels Installation The box is designed to be installed inside the boat. - Page 22 Resistive sensors Resistive sensors can be standard positioning sensors, rudder angle sensors, rotation sensors etc. Active sensors Installation Manual version 3.2.0 Sailmon © 2019 15/06/2019...
-
Page 23: Loadcell Box
It will measure tension or compression with an update rate of 4Hz, allowing monitoring and logging of all loads. With the Sailmon System, the actual force can be displayed in N (Newton), kg, or % of pin rated load. The Loadcell box can supply 5V to loadcells, loadcells that need 12V power need to be powered from a separate 12V powersupply. - Page 24 4 Wire loadcells Installation Manual version 3.2.0 Sailmon © 2019 15/06/2019...
- Page 25 Ambient Temperature Range: 0°C to 50°C, 32°F to 122°F Power Supply: NMEA 2000 compatible, 9-16V Isolation: Galvanic Isolation of Load Cell NMEA 2000: PGNs Supplied: 64221 (0x0FADD) Sailmon proprietary Installation Manual version 3.2.0 Sailmon © 2019 15/06/2019...
- Page 26 This connects the box to a supply power and provides the contacts for the button inputs. All grounds are common throughout the system. This is the same as the E4 I/O port 2 cable and replacements can be supplied separately . (PN...
- Page 27 External channels. Sailmon supports to reception of up to 256 external channels. The external channels are available inside Sailmon, and the description text can be changed by the user to fit the interface. The data from the external channels must be sent to the following network interface:...
- Page 28 Channel ID; Channel Type;Channel Data 2.3.9 WTP3 Fastout protocol Sailmon can receive data from a B&G WTP3 usig the B&G fastout protocol and a serial to Ethernet device like the Moxa Nport 5110. The file fastout.d specfiies the B&G variable to be transmitted, with a single character as identifier and baudrate.
- Page 29 16 J 5 0 169 ] 1 0 Where the first number is the variable in WTP3, character is the identifier used by Sailmon, third number the reserved places, fourth number amount of decimals. The last line 169 ] 1 0 is always needed as last in the file as it is a stripdelimeter for the packets that are sent.
-
Page 30: Chapter 3 Network Installation
3.1 To connect the the E4 to the boatnetwork. It is vital for good communication that all network cables are of good quality and are being used as designed . Ensure that all non Sailmon products are in good condition and are fit for purpose. -
Page 31: Wireless /4G Router
Ofcourse you can still connect the onboard PC to the boat network with a network cable. With a wifi router or access point a wireless system can be setup so tablets and computers can connect to the E4 either wired or wireless. Installation Manual version 3.2.0 Sailmon ©... -
Page 32: Router
DHCP server and not interfere with other devices or services. Sailmon can be deployed as a standalone as well, without a DHCP server on the network. In this case Zeroconf addressing is used. The Model E4 processor can be configured to provide a DHCP server, or act as simple Wifi access-point for convenience. -
Page 33: Complex Network Installations
UDP multicast or broadcast packets must be able to reach every participant 3.2.2 Complex network installations All Sailmon devices are required to share the same network. However, it is possible to run Sailmon applications from a remote network, given they are connected by layer 2 (switches, Wifi APs) or layer 3-4 (routers). - Page 34 URLs and IP addresses Hardcoded IPv4 addresses 239.255.83.77 Sailmon Multicast Group (used instead of broadcasts) 192.168.4.1 E4 wired ethernet when DHCP server is enabled 192.168.5.1 E4 wireless interface when used as Access Point Installation Manual version 3.2.0 Sailmon © 2019...
-
Page 35: Chapter 4 Commissioning
In the calibration section you find the standard variables like boatspeed, wind and GPS listed. To calibrate the wind sensor, automated calibration runs and a help section are available. See the Calibration and Data Reference Manual for an extensive paragraph on wind calibration. Installation Manual version 3.2.0 Sailmon © 2019 05/06/2019... -
Page 36: Miscellaneous Sensors
Here you select the relevant linear box and linear channel. If it is a non-standard variable you want to assign, select “linear channel only” and a dialog box opens where the description,title and correction table can be entered. Installation Manual version 3.2.0 Sailmon © 2019 05/06/2019... -
Page 37: Chapter 5 Software
5.3 Using software to connect to E4 You have now successfully installed the Sailmon model E4 Instrument system. If you power up then the model E4 will automatically select available sensors. If there is more than one sensor you need to select a sensor in Navdesk. -
Page 38: Chapter 6 Displays
Casings are different shown by the Sailmon logo position. When installing a display it will need to be connected to the ethernet port of the E4. The SAILethernet is needed to combine both the data and power from the power supply and E4 to the display. -
Page 39: Display Settings
Each display has 10 presets that, once changed, keep these setting for each individual display.. In the presets tab a different preset can be quickly selected. This setting will be activated on all displays. Installation Manual version 3.2.0 Sailmon © 2019 05/06/2019... -
Page 40: Technical Specifications
6.4 Technical specifications Element 7 Mounting Template Installation Manual version 3.2.0 Sailmon © 2019 05/06/2019... -
Page 41: Element 10 Mounting Template
Element 10 Mounting Template Installation Manual version 3.2.0 Sailmon © 2019 05/06/2019... -
Page 42: Element 7
Max brightness: min 0,3 / max 1000 nits Viewing angle: -85 + 85 degrees Maximum digit size: 9 cm Weight 1.08 kg Power consumption 15W at max Brightness Installation Manual version 3.2.0 Sailmon © 2019 05/06/2019... - Page 43 Max brightness: min 0,3 / max 1000 nits Viewing angle: -85 + 89 degrees Maximum digit size: 12 cm Weight 1.55 kg Power consumption 20W at max brightness Installation Manual version 3.2.0 Sailmon © 2019 05/06/2019...
-
Page 44: Chapter 7 Existing System Upgrades To Sailmon
A H3000 CPU and Fastnet network can easily be upgraded to an E4 processor. With the E4 one can connect to the Fastnet installation and retain the B&G Displays. A wind box will be needed and analog transducers will need to be connected with the use of a DST-2 to the E4 port 2 which is set to receive NMEA 0183. -
Page 45: H5000
The Schematic shows how the E4 can replace the H3000 CPU and still retain 20/20 displays and through-hull transducers. Upgrade benefits: Reuse of existing transducers with use of an Actisense DST – 2. Reuse of existing displays. ... -
Page 46: Garmin Gnx Displays
Seatalkng to NMEA 2000 adapter Raymarine SeaTalk ng Due to the SeaTalk NG’s use of the NMEA 2000 data format, the E4 is a simple upgrade, gaining greater usability and connectivity. All exciting system sensors can be connected directly to the NMEA 2000 backbone. Calibration and configuration is all completed through... -
Page 47: Chapter 8 Troubleshooting
Chapter 8 Troubleshooting 8.1 General If the E4 works but the displays keep displaying “connecting to server” the displays,E4 and controlling device (PC) are not connected to the same DHCP server. Also check the SAILethernet connections and connections in the junction box are correct. - Page 48 12 VDC between pins 2 (Red) and 3 (Black) of all available open connectors. Next, turn the network power off on the NMEA 2000 network. Keep all devices disconnected, and verify the following resistance measurements: Installation Manual version 3.2.0 Sailmon © 2019 05/06/2019...
-
Page 49: Fastnet Bus
(NOTE: there must always be at least two components in a NMEA 2000 network (or any CAN network) in order for data communication to take place. 8.3 Fastnet bus No signal on the Fastnet bus or no light on the E4: Make sure that the Fastnetbus is wired correctly using the Fastnetbus topology. -
Page 50: N Onetwork Detected
SAILethernet And no network is detected on smart devices. Take the router out of the network. Then connect the SAILethernet to the E4 and check if the displays work. If so, Sailmon works and the problem lies somewhere in the router.
Need help?
Do you have a question about the E4 and is the answer not in the manual?
Questions and answers