Dogtra PATHFINDER Owner's Manual
Hide thumbs
Also See for PATHFINDER:
- Owner's manual (206 pages) ,
- User manual (39 pages) ,
- Code setting manual (13 pages)
Table of Contents
Advertisement
Quick Links
Download this manual
See also:
User Manual
Advertisement
Table of Contents

Related Manuals for Dogtra PATHFINDER


Summary of Contents for Dogtra PATHFINDER
- Page 1 PATHFINDER AVAILABLE IN GPS-ONLY SYSTEM: PATHFINDER TRX Owner's Manual Please read this manual thoroughly before operating the Dogtra PATHFINDER.
- Page 2 Fit and Wear Dogtra products contain electrical and magnetic components that emit low Proper fit and wear of your Dogtra product is important for the comfort of level electromagnetic waves and radio frequencies. These electromagnetic your dog as well as the functioning of your product. Dogtra collars should fit...
-
Page 3: Table Of Contents
LIST OF CONNECTED DEVICES ..............OVERVIEW ....................... DEVICE LIST OPTIONS ................... DEVICE SHARING AND RECEIVING A DEVICE ........UNDERSTANDING YOUR TRAINING SYSTEM DEVICE DETAILS ....................TURNING THE PATHFINDER ON/OFF ............BUTTON FUNCTION ..................HISTORY CHARGING THE PATHFINDER ..............HISTORY FILES ....................LED INDICATOR .................... -
Page 4: Package Contents
2-Second GPS Offline Maps Update Rate Precise and Tracking Only Mode Up-to-Date Maps GPS Connector PATHFINDER: GPS E-Collar Battery Charger PATHFINDER TRX: GPS Collar 9-Mile 9-Mile Range Geo-Fence Option Expandable to Fully Waterproof 21 Dogs Splitter Cable Owner’s Manual Belt Clip 3.5-Hour Rapid... -
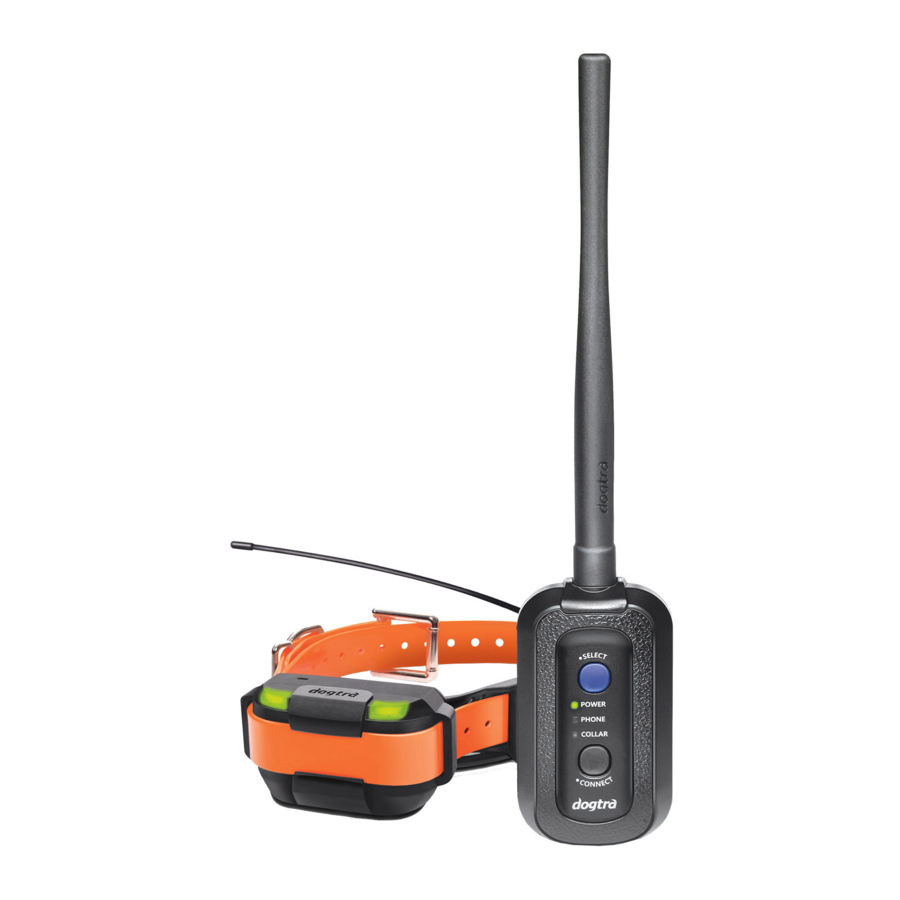
Page 5: Overview
OVERVIEW Battery Charging Receptacle Contact Points Antenna Power Button GPS Antenna Mic. Sensor Black Antenna Casing Power & Select Button Connect Button Collar Strap Battery Charging LED Indicator Light Receptacle PATHFINDER PATHFINDER GPS Connector GPS E-Collar... -
Page 6: Understanding Your Training System
UNDERSTANDING YOUR TRAINING SYSTEM Battery Charging 1. TURNING THE PATHFINDER ON/OFF Receptacle GPS Connector • To turn on the GPS Connector, press the blue Select button until the LED turns on. • To turn off the GPS Connector, press the blue Select button until the red LED shows. -
Page 7: Button Function
• When the LED is red on the GPS Connector or GPS Collar. Press and hold down the Connect • When the PATHFINDER app displays a low battery percentage for the GPS button until the LED blinks rapidly. Connector or GPS Collar. -
Page 8: Led Indicator
2) Android: Android 4.3 and above Samsung Galaxy S4 and above, Note 2 and above, and LG G3 Downloading the App Search for Dogtra PATHFINDER in the App Store or in Google Play. 4. LED INDICATOR GPS Connector Power: The Power LED blinks every 2 seconds while turned on. -
Page 9: Pairing
Pairing Additional GPS Collars Pair the GPS Connector and GPS Collar in close proximity to each other. You can use the PATHFINDER app to check if the GPS Collar is properly paired. 1) Turn the GPS Connector on. 2) Check that the GPS Collar is turned off. -
Page 10: Collar Fitting
Remove the screw holding the antenna in place to replace the antenna. Finding the Right Stimulation (Not included with TRX) • Open the PATHFINDER app to the E-Collar tab and select your dog and stimulation level. • The stimulation levels are from 1 (lowest) to 100 (highest). -
Page 11: Maximizing The Distance
USING THE TEST LIGHT (Not included with TRX) • The PATHFINDER has a 9-mile line of sight range. 1) Turn on the GPS Collar and place the • To get the greatest range, hold the GPS Connector away from your body and test light over the contact points. -
Page 12: Trx Collar
* Devices that are offline or hidden will not be displayed on the map. PATHFINDER and PATHFINDER TRX can be used together in a multi-dog set up. * The GPS Collar name and color can be edited from Menu/Device List/ Device/Edit. -
Page 13: Dog Alerts
Long press anywhere on the map to open up the Marker Ruler Menu. The markers can be used to mark important locations. The PATHFINDER Map tab has multiple map features to help make finding your way around easier. The marker will be stored in the history file. When starting a new Tracking History, the previous marker will still be on the map. -
Page 14: History Record Button
6. HISTORY RECORD BUTTON End Marker Start Marker Ruler Directions Ruler When you press the 'Start Rec' button to record the Tracking History, the The distance ruler can measure the distance between multiple points. When Start Marker will be created. When you press the 'Stop Rec' button to stop the finished, click "... -
Page 15: Compass Tab
COMPASS TAB E-COLLAR TAB (Not included with TRX) Direction Faced North Dog Direction Marker Direction Selected View All Button Dog Selected View the direction and distance of dogs, or a selected marker and hunter at Map View List View a glance. Select dogs and hunters from the list to display them on the 1. -
Page 16: E-Collar Buttons
DEVICE LIST 2. E-COLLAR BUTTONS List/Map View 1. LIST OF CONNECTED DEVICES Dogs can be selected using the dog list or in map view. List view displays dogs in a list along with their distance from you. The List view is recommended when training multiple dogs. -
Page 17: Device List Options
Press the more options button ( ... ) to bring up the options to hide or reorder Device Sharing devices. Press the share button to share and receive GPS Connector/Collar devices. Both sharing and receiving PATHFINDER users must use the device sharing feature within close proximity to each other. Sharing a Device Hide Hidden devices do not show up in the Map, Compass, and E-Collar tabs. -
Page 18: Device Details
Receiving a Device 4. DEVICE DETAILS As another PATHFINDER user is sending a device, press the share button and Press a device from the Device List to go to the device details page. receive from the pop up menu. A pop up will appear when a device has been The device details displays the total distance traveled, current speed, ID, GPS successfully received. -
Page 19: History Files
Device Info Edit Rescue Mode Turning on Rescue Mode activates when the GPS Collar battery life is at 25% or less. The device is placed in sleep mode, and the update rate is changed to 120 seconds to reduce power consumption. The rescue mode setting cannot be changed for devices that are shared with you. -
Page 20: History Detail
MAP MANAGEMENT 2. HISTORY DETAIL 1. MAP SELECT Play Button The history file displays the track movement of dogs and people. Use the play button to view the movement from start to finish, or use the slider to jump to a specific time. -
Page 21: Offline Map
2. OFFLINE MAP The offline map is displayed when cellular data/Wi-Fi is unavailable. Offline maps should be downloaded before entering areas with limited data. Using zip code to download maps 1) Select the type of map you are going to download. 2) Press the Zip Code button and enter the zip code of the area you want to download. -
Page 22: Creating Custom Map
Users can save and share portions of the map in Mbtiles file format. Here you 2) Unzip the file and run the installation program. can see how to create and upload Mbtiles files for use in the PATHFINDER app. - Window : Execution Mobile_Atlas_Creator.exe Creating Mbtiles Files - Mac or linux : Execution Mobile_Atlas_Creator.jar... - Page 23 (2) Select the desired area on the map using Drag and Drop. (4) You can change the name of the file in Atlas Content by right-clicking the title and selecting Rename. (3) Select the Zoom level to save. (5) Add the selected area to the map in Atlas Content. First, enter a name in the Name field.
- Page 24 Click the Add Selection button to add the selected region to Atlas Content. (7) Select the Mbtiles SQLite file format. (6) Click on Atlas in the upper left corner to open the menu and select Convert (8) Click the Create Atlas button to start creating Mbtiles. Atlas format.
- Page 25 (9) When the creation process is completed, you can check the completed file Installing Maperitive on your Computer by pressing the Open Atlas Folder button. Window: Compatible with Windows XP SP3 and newer with Microsoft.NET 4 installed. Download the latest zip file from 'http://maperitive.net/'. Unzip the file and run maperitive.exe.
- Page 26 (2) Select the desired map style through Tools -> Add Web Map (4) Select Map -> Download OSM Data. Wait for the download to complete. (3) Select Map -> Set Geometry Bounds to select the area to save. (5) To create Mbtiles, enter the zoom level range (minimum and maximum) * After selecting an area, zoom out to review the selected area.
-
Page 27: Uploading Maps To Your Smartphone
Mbtiles created. Uploading Mbtiles files For detailed explanations please refer to 'http://maperitive.net/docs/ To use the created Mbtiles files in the PATHFINDER app, they must be placed in TenMinutesIntro.html#Using%20The%20Map'. a specific repository on your smartphone. You can upload it directly to your smartphone or upload it to a cloud service and download it via the PATHFINDER app. - Page 28 Notes: When saving to internal storage, save Mbtiles in the PATHFINDER / CustomMaps folder to skip importing from the PATHFINDER app. If the CustomMaps folder is missing, create a new folder directly in the PATHFINDER folder and rename it to CustomMaps. Mbtiles can be copied to the newly created CustomMaps folder.
- Page 29 (3) Select File Sharing from the left menu. (5) When the Document tab of the PATHFINDER opens, add the Mbtiles by Drag & Drop or the Add button. (6) You can see that the Mbtiles files have been added. (4) Select PATHFINDER from the File Sharing list.
-
Page 30: Uploading Files
5. UPLOADING FILES (3) Upload Mbtiles files using one of the following methods. (3-1) Drag & drop the Mbtiles file to iCloud Drive. Uploading to iCloud - iPhone (1) Log in using 'https://www.icloud.com/'. For detailed login instructions, please visit 'https://support.apple.com/en-us/ HT204174/'. - Page 31 * If you click the icon, the following window appears. Uploading to Dropbox Select the desired Mbtiles file and click [Choose] to add the file to iCloud. Add files from the desktop app. (1) Install the Dropbox desktop app. The latest version can be downloaded from 'https://www.dropbox.com/install'. (4) When the upload is complete, you can see that the file has been added.
- Page 32 (3) Move the desired Mbtiles file to the Dropbox folder. (2) Click the [Upload File] button on the top right corner. Adding files from a web page (3) Select the desired Mbtiles file to upload and click [Open] to add them to (1) Log in to Dropbox.com.
- Page 33 (4) You can also add the files by dragging and dropping them directly into the Uploading to Google Drive web browser. (1) Navigate to drive.google.com and sign in with your Google account. Google accounts can be created at 'https://accounts.google.com/signup'. (2) Click the [New] button in the top left corner, then select the Upload File or Folder button.
-
Page 34: Geo-Fence
GEO-FENCE (3) Select the folder containing the Mbtiles file or the Mbtiles file you want to upload and click [Open] or [OK] to add it to your Google Drive. A Geo-fence can be created for a specified area and will be displayed on the Map tab. -
Page 35: App Settings
• All Collars: if you do not select a collar, the alarm will sound for all collars. The PATHFINDER comes equipped with standard 5/8” contact points that can • The options for alerts are pop up, vibration, and sound, which can be turned be replaced with the non-stimulation contacts to disable the e-collar hardware. -
Page 36: Basic Maintenance
• Charge the unit fully once a month while in storage or before use. • Do not keep the unit exposed to extreme climates. • Dogtra may include updates and improvements to the PATHFINDER app which can be downloaded through the App Store and Google Play. -
Page 37: Troubleshooting Guide
- The battery may be low. Check the LED indicator lights or the app for battery life. Radio Frequency Radiation Exposure 3. The PATHFINDER has no range or the stimulation is weaker when my dog is This device is a mobile transmitter and receiver that uses an external antenna farther away. -
Page 38: Warranty And Repair Information
30 days from an authorized dealer must be addressed to the dealer directly. If the products purchased from an authorized dealer are after 30 days from the date of purchase, please send the units to Dogtra for Send repair units to Dogtra Company / Repairs service and repair.
Need help?
Do you have a question about the PATHFINDER and is the answer not in the manual?
Questions and answers