Table of Contents
Advertisement
Quick Links
DR-WING HD
USER MANUAL
Share your vision
Thank you for choosing a PNJ product. This manual describes how to prepare and use your product. It's also
providing information about the utilization and safety precautions, the regulations, compliance and technical
specifications of the device. Please read completely, carefully and regularly before use, become familiar
with all the feature of the device and ensure safety use of your drone to enjoy fully with it. Keep this manual
for future use. The manual is also available on our website www.pnj.fr under the heading «User manuals».
Advertisement
Table of Contents

Related Manuals for PNJ DR-Wing HD


Summary of Contents for PNJ DR-Wing HD
- Page 1 USER MANUAL Share your vision Thank you for choosing a PNJ product. This manual describes how to prepare and use your product. It’s also providing information about the utilization and safety precautions, the regulations, compliance and technical specifications of the device. Please read completely, carefully and regularly before use, become familiar with all the feature of the device and ensure safety use of your drone to enjoy fully with it.
-
Page 2: Table Of Contents
Table of contents Table of contents ............................1 Li-po battery ..............................1 ATTENTION / WARNING / WAARCHUWING .....................2 Precautions for use .............................2 Warning ..............................3 Flight Environment ............................3 Download the app ............................3 Included in the pack ............................3 Drone parts..............................4 2.4GHZ Radiocontroller ..........................4 How to install and charge the battery ......................5 Warning ..............................6 How to Install propellers and propellers guards ....................6 Start to fly ..............................7... -
Page 3: Attention / Warning / Waarchuwing
ATTENTION / WARNING / WAARCHUWING Veuillez lire le “Mode d’Emploi” entièrement et attentivement avant toute utilisation Le manuel mis à jour est disponible sur notre site: www.pnj.fr/modes-demploi/ ATTENTION: Toutes les précautions d’utilisation concernant les batteries Li-Po doivent être suivies rigoureuse- ment. -
Page 4: Warning
PNJ assumes no liability for damage resulting directly or indirectly from the use of the product, any part of this product or this manual. PNJ cannot be held responsible for any accident, injury, death, loss or other claim of any nature whatsoever related to or resulting from the use of this product. -
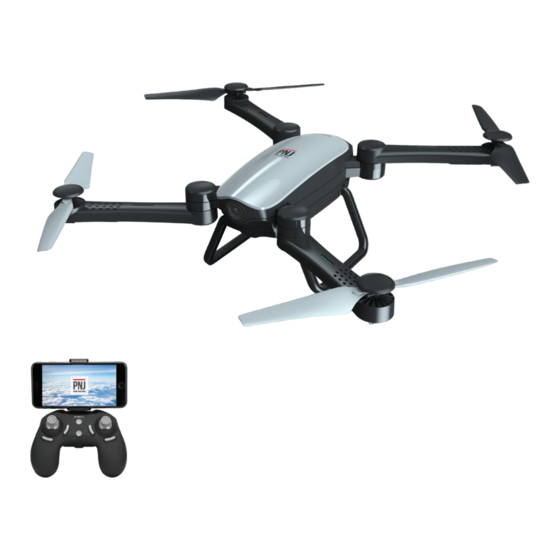
Page 5: Drone Parts
DRONE PARTS Front Battery cover Camera SD card port Landing gear Battery compartiment Propellers Lock On/Off button Back 1x Smartphone holder 4x Spare propellers 4x Propellers protection 2x Batteries Li-Po 3.7V 550mah 4x Batteries 1.5V AAA 1x USB charger 1x Screwdriver 2.4GHZ radiocontroller Frequency: 2416 MHz - 2475 MHz Maximum power: -1.93dbm... -
Page 6: How To Install And Charge The Battery
How to install / remove smartphone support: The expandable radio remote control bracket adjusts to different smartphone sizes (Figure 2). To safely install or remove the radio control holder, please refer to the diagrams below. 1. Install the stand: Insert the stand on the top of the remote control (in stop). 2. -
Page 7: Warning
Warning 1. Assurez-vous que le voltage requis pour le chargement USB correspond à la source de courant utilisée: 5V / 0.75A max 2. Si la prise de chargement ou la batterie surchauffe pendant la charge, interrompez immédiatement la charge. 3. Ne jamais laisser la batterie charger sans surveillance. 4. -
Page 8: Start To Fly
10. Battery: When the lights on the drone start flashing quickly: land and charge the battery. Note: Please always keep your drone on view. In case of low battery level or loss of signals with the radio control, the drone will land automatically. PNJ does not guarantee the loss of your drone. Figure 1: Pairing... -
Page 9: Automatic Take Off And Landing
Automatic take off and landing Takeoff Landing The drone rises 2m regardless of its starting altitude. 1. Take-off: After the automatic take-off / landing button has been pressed for a long time, the drone rises and stabilizes at an altitude of 2m above its starting position. 2. -
Page 10: Return Button
(so South). The DR-Wing HD is not equipped with a GPS function, so it is necessary to regain control in order to land it at the desired location. -
Page 11: Speed Selector
360˚Flip 360˚ Flip (short press) Your DR-Wing HD is able to perform acrobatics like Flip 360˚. To make a Flip 360˚ please: 1. Check the surroundings (large spaces required) then take off. 2. Press the "Flip 360˚" button on the remote control (short press). -
Page 12: How To Use Joysticks
How to use joysticks ELEVATION Elevation • LEFT JOYSTICK - Tilt up to ride - Tilt down to go down Note: Always handle the elevation Descent joystick with caution. Rotate to Rotate to the left the right ROTATION • LEFT JOYSTICK - Tilt left to turn left - Tilt right to turn right Front... -
Page 13: Flight Adjustments
Flight adjustments Trim / correction button operation: The trim / correction buttons allow you to rebalance the drone by adjusting the power delivered by each of the motors. The trims have several levels / intensity of correction, each time you press a trim / correction button you will increase the power delivered by one of the motors of 1. -
Page 14: Photos & Videos
1. Radio control: Press the photo / video button on the remote control to take a photo or video. 2. Mobile App (AIR PNJ): Touch the 2 or 3 icons to take a photo or video (circled in red). Photo: Upward Vidéo: Downward... -
Page 15: App - Control Interface
8. CF Mode: Enables / Disables CF Mode. Refer to "CF Mode" on page 9. 9. VR Mode - Immersion Control: Touch this button to split the screen in half to use the PNJ CVR360 headset. Touch the icon again to exit. -
Page 16: How To Use Virtual Joysticks
- Touch to the right to fly to the right Tip: Instructions for using the "PNJ AIR" application are also available in the help menu of the app. To access the help menu, go to the main menu and then touch the question mark: "?". -
Page 17: App - Flight Adjustments
App - Flight adjustments The drone turns on its left: Press the trim / correction right rotation. The drone turns on its right: Press the trim / correction left rotation. The drone drifts backwards: Press the trim / correction forward movement to adjust the drone. -
Page 18: Gyroscopic Control
It is not recommended to change the engine or the motherboard on your own. - Use only accessories specified by the manufacturer. - Find all our products and accessories on our website www.pnj.fr -17-... -
Page 19: Warranty
PNJ. - Defects caused by parts not supplied by PNJ, including a battery not approved by PNJ. All products found to be defec tive after analysis will be returned to the shipper at their expense. -
Page 20: Recycling
Consult local authorities or your dealer for recycling advice. Declaration of conformity SAS PNJ, 110, Esplanade du Général de Gaulle 92400 Courbevoie, France, declares under its sole responsi- bility that the product described in this manual complies with the requirements of the RED 2014/53/EU et RoHS 2011/65/EU. -
Page 21: Trademarks
SAS PNJ can not be held responsible directly or indirectly for any prejudice or loss of data resulting from an error or omission in this document. SAS PNJ reserves the right to modify the product and its operating instructions without any restriction or obligation to inform the user. -
Page 22: Notebook
Notebook _ _ _ _ _ _ _ _ _ _ _ _ _ _ _ _ _ _ _ _ _ _ _ _ _ _ _ _ _ _ _ _ _ _ _ _ _ _ _ _ _ _ _ _ _ _ _ _ _ _ _ _ _ _ _ _ _ _ _ _ _ _ _ _ _ _ _ _ _ _ _ _ _ _ _ _ _ _ _ _ _ _ _ _ _ _ _ _ _ _ _ _ _ _ _ _ _ _ _ _ _ _ _ _ _ _ _ _ _ _ _ _ _ _ _ _ _ _ _ _ _ _ _ _ _ _ _ _ _ _ _ _ _ _ _ _ _ _ _ _ _ _ _ _ _ _ _ _ _ _ _ _ _ _ _ _ _ _ _ _ _ _ _ _ _ _ _ _ _ _ _ _ _ _ _ _ _ _ _ _ _ _ _ _ _ _ _ _ _ _ _ _ _ _ _ _ _ _ _ _ _ _ _ _ _ _ _ _ _ _ _ _ _ _ _ _ _ _ _ _ _ _ _ _ _ _ _ _ _ _ _ _ _ _ _ _ _ _ _ _ _ _ _ _ _ _ _ _ _ _ _ _ _ _ _ _ _ _ _ _ _ _ _ _ _ _ _ _ _ _ _ _ _ _ _ _ _ _ _ _ _ _ _ _ _ _ _ _ _ _ _ _ _ _ _ _ _ _ _ _... -
Page 23: Notebook
Notebook _ _ _ _ _ _ _ _ _ _ _ _ _ _ _ _ _ _ _ _ _ _ _ _ _ _ _ _ _ _ _ _ _ _ _ _ _ _ _ _ _ _ _ _ _ _ _ _ _ _ _ _ _ _ _ _ _ _ _ _ _ _ _ _ _ _ _ _ _ _ _ _ _ _ _ _ _ _ _ _ _ _ _ _ _ _ _ _ _ _ _ _ _ _ _ _ _ _ _ _ _ _ _ _ _ _ _ _ _ _ _ _ _ _ _ _ _ _ _ _ _ _ _ _ _ _ _ _ _ _ _ _ _ _ _ _ _ _ _ _ _ _ _ _ _ _ _ _ _ _ _ _ _ _ _ _ _ _ _ _ _ _ _ _ _ _ _ _ _ _ _ _ _ _ _ _ _ _ _ _ _ _ _ _ _ _ _ _ _ _ _ _ _ _ _ _ _ _ _ _ _ _ _ _ _ _ _ _ _ _ _ _ _ _ _ _ _ _ _ _ _ _ _ _ _ _ _ _ _ _ _ _ _ _ _ _ _ _ _ _ _ _ _ _ _ _ _ _ _ _ _ _ _ _ _ _ _ _ _ _ _ _ _ _ _ _ _ _ _ _ _ _ _ _ _ _ _ _ _ _ _ _ _ _ _ _ _ _ _ _ _ _ _ _ _ _ _ _ _ _...
Need help?
Do you have a question about the DR-Wing HD and is the answer not in the manual?
Questions and answers