Advertisement
Quick Links
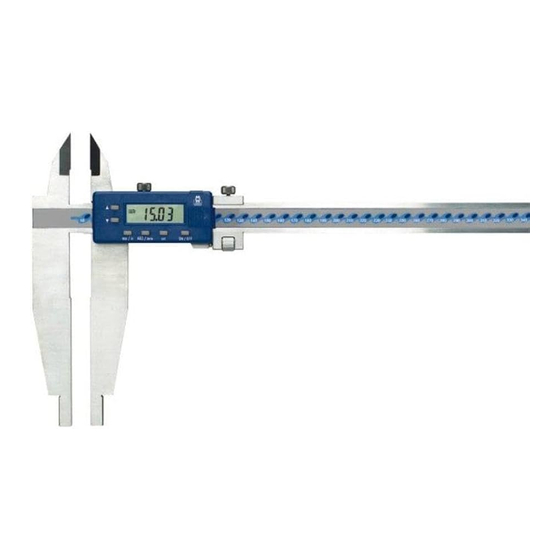
Large Digitronic Workshop Caliper 150 Series
Please carefully review these instructions to ensure proper and accurate use of your new Digitronic Caliper.
Electronics
Instructions
•
Operating Condition:
Temperature:
Relative Humidity:
•
Prevent any liquid from contacting the protective sticker
•
Never apply voltage (e.g. Engraving with an electrograph) on any part of this Caliper for fear of damaging the circuit
•
Preset a starting point of measurement correctly (please refer to Operations).
Unless presetting, do not press the "SET" button purposely for fear of measurement error
Technical Specifications
•
Resolution:
•
Repeatability:
•
Accuracy:
•
Maximum measuring speed:
•
Battery:
Instructions of Data Output
•
Preset zero and metric/inch system
•
Connect the end of the interface cable to the computer. The other to the data output port of this Caliper
•
Start this Caliper and software
•
Move the slider to the position you want and press the button on control box for data output
•
Battery life: approx. 1 year
Battery Replacement
Once display begins flashing or even no display, slide the cover open as the arrow shows and replace with a new battery (CR 2032)
Note:
•
The positive pole of the battery must face out
•
Please preset the starting point over again after battery replacement
For more information visit
Locking
Data
Screw
Output
Slider
Battery
Cover
External Measuring Faces
Internal Measuring Faces
5-40°C
≤80%
0.01mm / 0.0005"
0.01mm / 0.0005"
0-600mm: +/-0.07mm
3m per second
CR 2032 3V Lithium Battery
www.moore-and-wright.com
CALIPER INSTRUCTIONS
Fine Adjustment
Slider
Function
ON/OFF: Power on/off switch
ABS/INC: Relative/absolute measurement
ZERO: Zero setting button
mm/in: metric/inch conversion
SET: presetting button
HOLD: data hold button
Scale
Partners in Precision
Advertisement

Related Manuals for Moore & Wright 150 Series


Summary of Contents for Moore & Wright 150 Series
-
Page 1: Technical Specifications
CALIPER INSTRUCTIONS Large Digitronic Workshop Caliper 150 Series Please carefully review these instructions to ensure proper and accurate use of your new Digitronic Caliper. Locking Data Fine Adjustment Electronics Screw Output Slider Scale Function Slider Battery ON/OFF: Power on/off switch... - Page 2 CALIPER INSTRUCTIONS Operations ON/OFF button • Press ON/OFF button at any position when the power is off, this Caliper will be ready to work and display the measuring value • Press ON/OFF at any position when the power is on, this Caliper will switch off ABS/INC button •...
Need help?
Do you have a question about the 150 Series and is the answer not in the manual?
Questions and answers
can you adjust a vernier when the reading is inacurate
Yes, the Moore & Wright 150 Series Digitronic Caliper can be adjusted for inaccurate readings. The ZERO button allows resetting the measurement to zero in relative mode or to a preset value in absolute mode. The SET button can also be used to preset a starting point, ensuring accurate measurements.
This answer is automatically generated