
Related Manuals for Hi-Target Qbox Series


Summary of Contents for Hi-Target Qbox Series
- Page 1 Qbox Series User Guide Hi-Target Surveying Instrument Co., Ltd. All Rights Reserved...
- Page 2 Preface Manual Revision File number: Revision Date Revision Level Description 2016-06-28 Qbox 8 User Guide...
-
Page 3: Preface
Qbox 8 User Guide Preface Introduction Welcome to use Hi-Target Qbox series GIS data collector. This introduction describes how to use this product. Experience Requirement In order to help you use Hi-Target series products better, Hi-Target suggests you carefully read the instruction. If you are unfamiliar with the products, please refer to www.hi-target.com.cn... - Page 4 Exclusion Before using the products, please carefully read the operating instruction, and it will help you better to use it. Hi-Target Surveying Instrument Co., Ltd will not assume the responsibilities if you fail to operate the product according to the requirements in operating instruction, or operate the product wrongly because of failing to understand the operating instruction.
- Page 5 Qbox 8 User Guide Log in hi-target official website, download the electronic version introduction in “Download Center” → “Manual” → “Surveying Products” Advice If you have any comments and suggestions, please call us or Dial the national hotline: +86 400-678-6690. Your feedback information will help us to improve...
-
Page 6: Table Of Contents
Contents Contents Preface..............III Hardware ............. 1 1.1. Designs and Key Function ........2 1.1.1. Designs ..............3 1.1.2. Key function .............. 6 1.1.3. LED instruction ............7 1.2. Technical Specification ........9 1.3. Accessories ............13 Software ............16 2.1. -
Page 7: Hardware
Qbox 8 User Guide C H A P T E R Hardware This chapter describes: Designs and Key Function Technical Specification Accessories... -
Page 8: Designs And Key Function
Hardware 1.1. Designs and Key Function Qbox series high accuracy BD box, there are two model:Qbox5 (sub-meter) and Qbox8 (centimeter). The advantage of Qbox series: small and exquisite, accurate position. It connects with Android phone or pad by Bluetooth. After matching connection, you can set up differentiated services which make the ordinary hand set achieve professional positional accuracy. -
Page 9: Designs
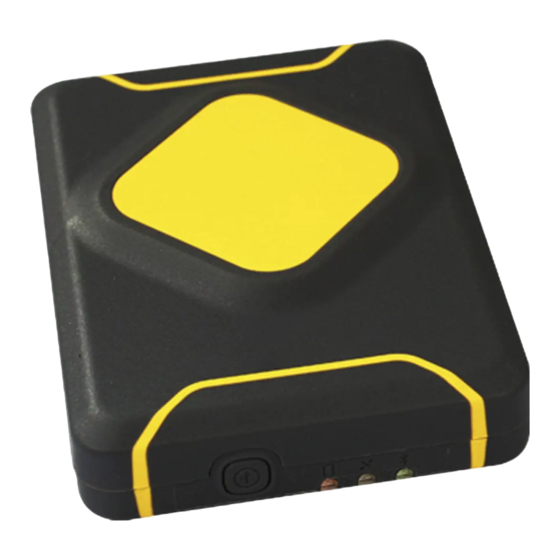
Qbox 8 User Guide 1.1.1. Designs Qbox 5/6 Figure 1-1-1 ① Mainboard antenna ② One-piece power key and indicator light ③ QR-code and scan download App software ④ Device model number、S/N code... - Page 10 Hardware Figure 1-1-2 ⑤ Back clamp ⑥ Micro USB connector Qbox 8 Figure 1-1-3...
- Page 11 Qbox 8 User Guide ① Mainboard antenna ② SN code and device type ③ QR code (scan it to download related software) Figure 1-1-4 ④ Micro USB socket ⑤ Power button ⑥ Power lamp ⑦ Satellite lamp ⑧ Signal lamp...
-
Page 12: Key Function
Hardware 1.1.2. Key function Qbox 5/6 Power on: Long press power key one second, green indicator lights up, loose the power key; Power off: Long press power key two seconds, green indicator light go out, loose the key; Force shut down: After starting up,long press the power key six seconds, green indicator light go out, loose it to force shut down. -
Page 13: Led Instruction
Qbox 8 User Guide Long press power button for 10 seconds to shut down forcibly. 1.1.3. LED instruction Qbox 5/6 Charging when powered off, red lights up means being charged, green lights up means the battery is full charged. Charging when working, the yellow light slow flashing means it is not positioning, the yellow light fast flashing means the memory space is not enough. - Page 14 Hardware Enquiry battery: Single press power button, the power instruction lamp will flash one to four times which means different power capacity. (Once: 0%-25%, twice: 25%-50%, three times: 50%-75%, four times: 75%-100%) Satellite lamp Long bright green means tracked; Flashing green means tracking.
-
Page 15: Technical Specification
Qbox 8 User Guide 1.2. Technical Specification Qbox 5 Qbox 6 ● ● ● ● GLONASS ● ● ● ● Galileo GNSS feature SBAS(WASS, EGNOSS, MASAS) ● ● and QZSS ● ● Helical antenna The first positional time: ● ● seconds (typical) Single position 2.5m... - Page 16 Hardware Charging time: ● ● 3 hours, supports charging by car and charging online. ● ● Size: 90*57*26mm Weight; 70g(include battery) ● ● Physics ● ● Work temperature: -30℃~+70℃ property ● ● Storage temperature:-40℃~+80℃ ● ● Waterproof and dustproof: IP67 ●...
- Page 17 Qbox 8 User Guide Qbox 8 Operating system: Industrial grade real-time OS System configuration Storage: 8GB, support up to 32GB GPS: L1, L2, L2C GLONASS: L1, L2 BDS: B1, B2 Galileo: E1, E5b SBAS: WAAS/EGNOS/MSAS GNSS Features Time for the first fix: 30 seconds Correction message type: CMR/CMR+, RTCA RTCM 2.1/2.3/3.0/3.1/3.2 Fresh frequency: 1Hz, support higher frequency...
- Page 18 Hardware Charging time: 5 hours Device OS supported : Android/Windows/iOS Application Software: ZHD GNSS Tools functions Industry Applications: Supporting secondary development and highly industry-specific Size: 115mm× 85mm× 25mm Weight: 300g (with battery inside) Operating temperature: -30℃~+70℃ Physical Storage temperature: -40℃~+80℃ properties Dustproof/waterproof: IP67 Shock and vibration: Designed to survive a 2 m nature...
-
Page 19: Accessories
Qbox 8 User Guide 1.3. Accessories Frame 1 This frame can be used to fix Qbox 8 on pole. Figure 1-3-1... - Page 20 Hardware Frame 2 This frame can fix device such as phone or tablet with Qbox 8 Figure 1-3-2...
- Page 21 Qbox 8 User Guide Adapter and USB cable The Adapter and USB cable is used for charging and data transfer. Figure 1-3-3 Figure 1-3-4...
-
Page 22: Software
Software C H A P T E R Software This chapter describes: GNSS Tools Static Data Transfer Firmware Upgrade... -
Page 23: Gnss Tools
Qbox 8 User Guide 2.1. GNSS Tools 2.1.1. Installing GNSS Tools is handheld GIS software, it can get CM and DM accuracy coordinates after connecting Qbox 8 and Qbox 5. 1. Download the .apk from our website, then connect the Android (4.0 or higher) device to the computer and turn on USB storage, copy it to the device, then disconnect. - Page 24 Software 2. Open the file manager, find the .apk and click it to install. Figure 2-1-2...
-
Page 25: Functions
Qbox 8 User Guide 2.1.2. Functions 1. Device On device interface, click Connect and Scan, after entered the pair code 1234 and connect success, it will show the information of the Qbox 8. Figure 2-1-3... - Page 26 Software 2. Rover You can connect VRS or Hi-Target server in here. VRS parameters include IP, Port, Username, Password and Mount Point. Hi-Target server parameters include IP, Port, Area ID and Group ID. Figure 2-1-4...
- Page 27 Qbox 8 User Guide 3. Satellite Skyplot, position information and satellites information are showed in here. Figure 2-1-5...
- Page 28 Software 4. Debug NMEA is showed in here, also you can do some operations and send commands in here. Figure 2-1-6...
- Page 29 Qbox 8 User Guide 5. Settings Figure 2-1-7 Click Settings on bottom-left to set software. Settings include: Auto Connection: Connect the last device when launch. Mock Position: Open the function in Developer options manually, and select Device only in Location mode. ...
- Page 30 Software Figure 2-1-8 Position Service-More: Test Mock GPS (Show or hide the menu of test mock gps), Upload Position (Show or hide the menu of upload position), Record GGA (Auto record GPGGA in gga.txt). Other-About: Get the GNSS Tools software information. ...
-
Page 31: Static Data Transfer
STATIC. For Qbox 8, connect it to PC, there will be two removable disks named STATIC and UPDATE. Figure 2-2-1 Open STATIC disk, copy the static raw data to PC, then import them to Hi-Target Geomatics Office software for processing. Figure 2-2-2... -
Page 32: Firmware Upgrade
Software 2.3. Firmware Upgrade For Qbox 5/6, turn on and connect it to PC, then copy the firmware to STATIC disk, disconnect it and restart, it will upgrade automatically. For Qbox 8, turn on and connect it to PC, then copy the firmware to UPDATE disk, disconnect it and restart, it will upgrade automatically.
Need help?
Do you have a question about the Qbox Series and is the answer not in the manual?
Questions and answers