
Related Manuals for Zodiac Pool Systems Baracuda MX8


Summary of Contents for Zodiac Pool Systems Baracuda MX8
- Page 2 Zodiac Pool Systems, Inc. 1-800-822-7933 www.ZodiacPoolSystems.com Regional Extension________________ Instructor___________________________________________________ ext._________ Sales Representatives________________________________________ ext._________ __________________________________________________________ ext._________ Service Manager_____________________________________________ ext._________ __________________________________________________________ ext._________...
-
Page 3: Table Of Contents
TABLE OF CONTENTS Table of Contents FEATURES, BENEFITS, and COMPONENTS..............4 INSTALLATION......................5-7 DISASSEMBLY......................8-13 ASSEMBLY........................14-18 TROUBLESHOOTING ....................19 LEAF CANISTER & LIST PRICING ................20 PARTS DIAGRAM ......................21... -
Page 4: Features, Benefits, And Components
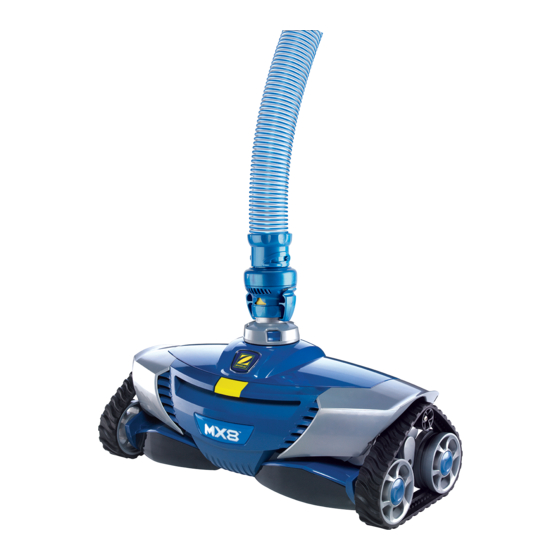
FEATURES, BENFITS, and COMPONENTS... -
Page 5: Installation
INSTALLATION Installation: Pool Preparation 1- Clean skimmer(s), filter pump basket, and filter. 2- Remove excessive debris from pool. 3- Close main drain. 4- Adjust return lines to point downward to ensure complete cleaning coverage. If return fittings cannot be adjusted, replace the fitting with a type that can. - Page 6 INSTALLATION Installation: Pool Connection, Skimmer 1- Remove and store skimmer basket 2- Insert the valve cuff into the skimmer line and connect the FlowKeeper with the arrow pointing towards the bottom of the skimmer. 3- Connect the hose directly to the FlowKeeper valve or use the 45º...
-
Page 7: Installation
INSTALLATION Installation: Flow Once the hose is attached to the wall or skimmer, prime the cleaner line by holding it to a return or forcing the complete hose under water. Keeping the hose submerged, attach the blue quick connect to the end of the hose. Click the Flow Gauge onto the connector and turn on the pump. -
Page 8: Disassembly
DISASSEMBLY Disassembly: Removing the Cover 1- Press yellow button on the front of the cleaner head. 2- Open the top cover. 3- Grasp the top cover while holding the cleaner body of the cleaner down securely. 4- Pull the top cover to remove from the cleaner body. -
Page 9: Assembly
DISASSEMBLY Disassembly: Removing Engine Assembly 1- Unscrew the 4 screws holding the middle engine housing in. 2- Remove the middle engine housing. 3- Remove engine assembly. 4- Remove drive shaft and keyed bearings from the engine assembly. - Page 10 DISASSEMBLY Disassembly: Removing Track 1- Remove the track by lifting it over the wheel wheels and pulling. Disassembly: Removing Scrubber Assembly 1- Align arrows on the scrubber assembly and housing to locate the screw in the hole. 2- Unscrew to remove the scrubber assembly.
- Page 11 DISASSEMBLY Disassembly: Removing Direction control devices 1- Unscrew and lift off the body panel assembly. 2- Unscrew the direction control assembly from the body panel. 3- Separate the direction control assembly from the body panel.
- Page 12 DISASSEMBLY Note: The right side of the chassis, the right body panel, and the right direction control assembly are all marked with the letter “A” for easy assembly. The left side of the chassis, the left body panel, and the left direction control assembly are all marked with the letter “B”...
- Page 13 DISASSEMBLY Disassembly: Removing Wheels & Bearings 1- Using a small screw driver, press in on the locking tab located on the wheel pin from the top of the cleaner head. 2- Using the inserted screwdriver, slide the wheel and pin from the housing..
- Page 14 ASSEMBLY Assembly: Assembling Wheels & Bearings 1- Replace the two bearings in each wheel. 2- Align the tab on the wheel pin with the slot on the housing. 3- Press the pin with the wheel in until the tab locks into place. Assembly: Assembling Direction Control Devices...
- Page 15 ASSEMBLY Assembly: Assembling Direction Control Devices 1- Align the direction control device to the correct body panel. 2- Screw the pieces together. 3- Put the body panel assembly on the housing and screw into place.
- Page 16 ASSEMBLY Assembly: Assembling Scrubber Assembly 1- Place the scrubber assembly in the housing and align the arrows. 2- Screw the scrubber assembly into the housing. Assembly: Assembling Track 1- Place the track on the small wheel and one of the large wheels. 2- Stretch the track over the other large wheel check for rotation of all...
- Page 17 ASSEMBLY Assembly: Assembling Engine Assembly 1- Assemble drive shaft and the keyed bearings from the engine assembly. 2- Insert engine assembly. 3- Insert the middle engine housing. 4- Screw in the 4 screws holding the middle engine housing in.
- Page 18 ASSEMBLY Assembly: Assembling the Cover 1- Snap the cover into the slots on top of the housing. 2- Confirm proper connection by opening and closing the cover 2 or 3 times. Notes: _____________________________________________________________________ _____________________________________________________________________ _____________________________________________________________________...
-
Page 19: Troubleshooting
TROUBLESHOOTING Troubleshooting: 1- Clean skimmer(s), filter pump basket, and filter. 2- Confirm Returns are facing down to the pool bottom 3- Confirm proper installation: • Main Drain Closed • Hose Length & Float Location • Pool Connection • Flow • Cleaner Connection. 4- Check for debris jammed in the engine. -
Page 20: Leaf Canister & List Pricing
LEAF CANISTER & 2011 LIST PRICING... -
Page 21: Parts Diagram
PARTS DIAGRAM... - Page 22 Zodiac Pool Systems, Inc. MX8 3/2011 800.822.7933 Final...
Need help?
Do you have a question about the Baracuda MX8 and is the answer not in the manual?
Questions and answers