Espressif ESP8266 User Manual
Hide thumbs
Also See for ESP8266:
- Technical reference (100 pages) ,
- System description (30 pages) ,
- Manual (22 pages)
Table of Contents
Advertisement
Advertisement
Table of Contents

Subscribe to Our Youtube Channel
Related Manuals for Espressif ESP8266


Summary of Contents for Espressif ESP8266
- Page 1 ESP8266 Weather Station User Guide V 1.0 Mar 2017...
-
Page 2: Table Of Contents
Tool Setup ........................9 Download and Install the Serial Driver ..............10 The Arduino IDE ....................11 Install the ESP8266 tool chain ................12 Selecting the Correct Board ................13 Setting the Correct Port ..................14 Testing the Setup: WiFi Scanner ................ 15 G. - Page 3 The JSON Streaming Parser Library..............42 Conclusion ......................44 Collecting and Displaying Local Data ................. 45 The Climate Node Setup ..................45 Thingspeak Setup ....................46 Programming the Climate Node ................48 More Projects......................49 The ESP8266 PlaneSpotter ................49 The ESP8266 WorldClock .................. 50...
-
Page 4: Introduction
1.Introduction The ESP8266 WeatherStation is one easy way to get started with the ESP8266 and IoT. The included guide helps you step-by-step to setup an internet connected weather station which shows current and forecasted weather information. The Uctronics ESP8266 WeatherStation Kit has the advantage that everything fits together, but you can of course also get the components from your preferred supplier. -
Page 5: Assembly
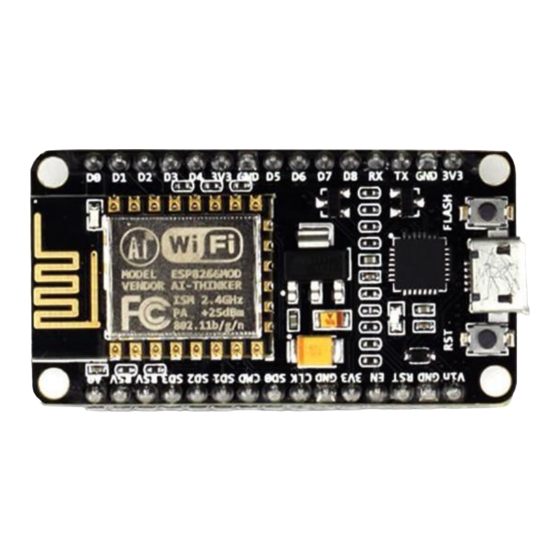
NodeMCU V1.0 or the Wemos D1 mini. They come with a USB connector and have the maximum number of available pins ready for your usage. The absolute minimal requirement is that your ESP8266 module has at least two free GPIO pins to connect it to the OLED display. -
Page 6: Oled Display
B. OLED Display With the display, you also have many options: do you want the pixels to be white or blue, or do you even prefer a two-color display where the footer is in one color and the rest in another? What really matters is the driver chip and the protocol. -
Page 7: Dht11 Humidity & Temperature Sensor
C. DHT11 Humidity & Temperature Sensor This DHT11 Temperature & Humidity Sensor features a temperature & humidity sensor complex with a calibrated digital signal output. By using the exclusive digital-signal- acquisition technique and temperature & humidity sensing technology, it ensures high reliability and excellent long-term stability. -
Page 8: Wires & Cables
D. Wires & Cables You will also need some wires to connect the display to the ESP8266. In case you want to connect the display directly to the NodeMCU you will need at least four female-to-female jumper wires, since both the display and the NodeMCU have male pin headers. The wires don’t need to be long, 7.87”... -
Page 9: Tool Setup
In this chapter, we will prepare your development environment by installing all the tools necessary. Drivers are needed to communicate with the ESP8266, a tool called “Arduino IDE” will let us write code, and a sample project will prove that the components are working well... -
Page 10: Download And Install The Serial Driver
To program the NodeMCU V1.0, your development platform (PC, Mac, Linux) needs to detect the Serial-To-USB adapter soldered onto the ESP8266 module. This ESP8266 development module has built in a high-quality Labs CP2102 Single-Chip USB to UART Bridge with Micro- USB connector that baud rates up to 921600. -
Page 11: The Arduino Ide
B. The Arduino IDE The Arduino Integrated Development Environment (IDE) is the tool you will use to program the ESP8266. IDEs are more than just editors; they help you with various tasks during the development process. To install the Arduino IDE, go to https://www.arduino.cc/en/Main/Software and download the latest version matching your operating system: ⚫... -
Page 12: Install The Esp8266 Tool Chain
A tool chain is the set of tools that lets you compile and create binaries for a certain platform. Since we want to create binaries for the ESP8266 we need a different tool chain than the one that comes with the plain vanilla Arduino IDE. The Arduino IDE has a wonderful feature, Board Manager, to save you the hassle of downloading many different files and copying them into obscure locations. -
Page 13: Selecting The Correct Board
D. Selecting the Correct Board Now your Arduino IDE knows about ESP8266 boards in general. But not all the ESP8266 boards are the same; there are subtle but important differences in available Flash Memory and how they can be programmed. The selection of the correct board also defines the names of the GPIO pins: the designers of the NodeMCU decided to introduce a completely new naming scheme for the pins. -
Page 14: Setting The Correct Port
BAUD. 10 BAUD is equal to 1 character per second. Your average PC or Mac doesn’t have such a serial interface, so how can we program the ESP8266? This is done through a Serial- to-USB converter. Some ESPs already come with a built-in converter; others need an external one for programming. -
Page 15: Testing The Setup: Wifi Scanner
“Sketch”. To compile and transfer the binary to the ESP8266 click on the green circle that contains an arrow on the very top of the window. If everything went well this will compile the sketch andupload the binary to the ESP. It might... - Page 16 ⚫ We installed a driver which lets us program the ESP8266 with custom code that we wrote. Which driver needs to be installed depends on the Serial-to-USB converter we use. Some ESP modules already have such a converter; others will need an additional one.
-
Page 17: Esp8266 Programming Basics
In this chapter, we will work with exercises which you can download from GitHub. They contain several Arduino projects for the ESP8266. For an exercise open the related project in your Arduino IDE and try to solve the given task. If you get stuck or want to see an alternative solution open the project which ends with “_Solution”:... -
Page 18: The Arduino Sketch
The ESP8266 is a bit different here. If your operations run for too much time a so-called watchdog will reset the ESP8266. You can prevent this by allowing the controller to do important operations while you are still in the main loop. Calling... -
Page 19: Hello World: The Serial Console
So where can we display the text? We will use the Serial object to do that. While you are developing a program on the ESP8266, the microcontroller is connected to the computer that the Arduino IDE is running on. We use this connection to write a new binary onto the flash memory of the ESP8266. - Page 20 Now your output should look something like this: If you want to learn more about the Serial object you can find more in the following link: http://esp8266.github.io/Arduino/versions/2.3.0/doc/reference.html#serial The exercise contains another important built-in function: delay(1000); This instructs the processor to wait 1000 milliseconds (1 second) before continuing with the execution.
-
Page 21: Input/Output: Gpio Pins
LOW which is 0V. What values for PIN can you use? If you are using a generic ESP8266 module (not a NodeMCU) your pins will be labeled GPIO0, GPIO1, etc. To use pin GPIO0 you would write digitalWrite(0, HIGH);... - Page 22 Pure blinking is boring. We want our little ESP8266 to live! Control the intensity of the LED and make it look as if the ESP8266 was breathing. Note: if the LED was on another pin than D0 we would use pulse width modulation (PWM) and the writeAnalog(PIN, INTENSITY) method.
-
Page 23: Interrupts
Depending on your age you might remember interrupts from your PC. They were always important to get your sound card to play beautiful music. The ESP8266 can also be controlled by interrupts. In the previous exercises we were checking regularly for the state of a GPIO pin. -
Page 24: Measuring Analog Signals
F. Measuring analog signals So far we can read and write the digital states HIGHand LOW, but what if we want to deal with analog signals? The ESP has one Analog To Digital Converter (ADC) which can be used to measure voltage in the range 0 - 1V. To do that use the following command: unsigned value = analogRead(A0);... -
Page 25: Wifi
So how can we use the WiFi module of the ESP8266? First of all you need to know that the ESP8266 can operate as a WiFi client (like a smartphone or laptop) and/or as an access point (like a WiFi router or extender). -
Page 26: Http
H. HTTP By connecting to the internet you can exchange data between your ESP8266 and the network. Let’s look at how we can load content from a web server using the Hyper Text Transfer Protocol (HTTP). This protocol is the foundation of the World Wide Web. - Page 27 Serial.print("connecting to "); Serial.println(host); // Use WiFiClient class to create TCP connections WiFiClient client; const int httpPort = 80; if (!client.connect(host, httpPort)) { Serial.println("connection failed"); return; // We now create a URI for the request String url = "/guide/"; Serial.print("Requesting URL: "); Serial.println(url);...
- Page 28 Please note that there are better ways to do that. The WiFiManager (https://github.com/tzapu/WiFiManager) for instance starts the ESP8266 as an access point if it cannot connect to any SSID. You then use your smartphone to configure the WiFi credentials and there is no need to hard code these into your firmware.
- Page 29 A click on View Certificate will bring up the detail window about Google’s certificate: Scroll down to the bottom of the window and copy the value behind SHA1. This is the fingerprint to verify that you are actually talking to www.google.ch. Exercise 04.06: Better safe than sorry! In this exercise we will start with the same program as I included earlier in this chapter.
-
Page 30: The Esp8266 Weatherstation
5. The ESP8266 WeatherStation In this chapter we will get the WeatherStation to run. We will install several libraries used for setting up access to the internet, for reading and parsing the data from the service providing your local weather forecasts, as well as a library to display the data on the OLED display. Then we will adjust the WeatherStation code to display your local weather information and get a so-called API key to access the weather forecast service. - Page 31 SSD1306 OLED Library...
-
Page 32: Open The Weather Station Example
Wifi Scanner Sketch. Now we are going to use the WeatherStation template to get started. Go to File > Examples > ESP8266 Weather Station > WeatherStationDemo Save the new sketch with a good name in a location you will remember - but leave it open. -
Page 33: Getting The Openweathermap Api Key
C. Getting the OpenWeatherMap API API (Key): What is an API and what is an API Key? Application Programming Interfaces (APIs) are a well-defined way on how one piece of code can talk to another. This can be on the same device, but often refers to the communication between two devices connected by a network. - Page 34 C. Getting the OpenWeatherMap API The ESP8266 WeatherStation: OpenWeatherMap API Page If you should forget your key you can always come back and get it here.
-
Page 35: Configuring The Weather Station
You might use it in a future project (have a look at the “More Projects” chapter). Now we are almost ready to get the weather station running on the ESP8266 for the first time. But we need to wire the display to the NodeMCU first. -
Page 36: Connecting The Hardware
E. Connecting the Hardware The WeatherStation Kit comes with an OLED display that has four connectors: VCC, GND, SCL and SDA. They have the following meaning: ⚫ VCC and GND are the power supply of the display. VCC is the positive supply voltage and GND stands for “ground”. - Page 37 LUA firmware. If you are programming a NodeMCU module you can use the printed D# names. If you use a generic ESP8266 module then you have to use the corresponding GPIO numbers. Here is a table of the mapping:...
-
Page 38: First Run
F. First Run Now we’re all set to run the WeatherStation software for the first time. Click on the Upload arrow and wait until the compilation and the transfer have ended. Now you should see the OLED display lighting up and displaying a WiFi icon. The module should now be trying to acquire access to the wireless network you have defined earlier. - Page 39 G. Summary If everything went well you now have a working ESP8266 WeatherStation. Congratulations! Let’s look back what we did in this chapter: ⚫ We used the WeatherStation example and created a working copy for us. All changes will be applied to the copy, not the original example. If you accidentally make your code unusable you can always go back to the example and start with a fresh copy.
-
Page 40: The Weatherstation Code Explained
6. The WeatherStation Code Explained In this chapter we will have a look at the building blocks of the WeatherStation. This project is a relatively complex piece of code and I hope to improve this chapter over time with new details. - Page 41 bits and bytes but also tries to understand the content. The streaming parser doesn’t care how big the document (or the amount of water) is, it just takes out what it needs from the stream. Streaming parsers are also referred to as event-based parsers since they react to certain events in the data stream.
-
Page 42: The Grammar
B. The Grammar The following image describes the grammar of a valid JSON object in a very concise way. It means that a JSON object knows three basic types: ⚫ object ⚫ array and ⚫ value JSON grammar Objects always start and end with curly brackets. They can be either empty (line to the top) or contain string/value pairs, separated by a colon. -
Page 43: The Json Streaming Parser Library
As mentioned earlier, a tree-based parser would load the whole document into memory and make it available once the document stream has ended. And this would just crash the ESP8266 pretty quickly; it does not have the resources to keep 200kb on the heap. - Page 44 the last key was I had seen and then I store the value in the appropriate variable. For the example from before I would do void ExampleListener::key(String key) { currentKey_ = key; void ExampleListener::value(String key) { if (currentKey_ == "name") { name_ = value;...
-
Page 45: Conclusion
D. Conclusion For a document or object of the size we had in the example a streaming parser is usually an extreme overkill. It is complicated to use, requires you to write a lot of code and is memory- wise probably even worse than a tree parser. It is only recommended to implement a streaming parser if you have big objects or if you just don’t know how big your object might be. -
Page 46: Collecting And Displaying Local Data
WeatherStation Starter Kit: ⚫ An additional ESP8266 module, ideally a NodeMCU ⚫ A DHT11 or DHT22 humidity and temperature breakout module I will call this combo “The Climate Node”. Now use the female-to-female jumpers to connect... -
Page 47: Thingspeak Setup
B. Thingspeak Setup Thingspeak is a free cloud service which allows you to easily post (sensor) data, to visualize it and to retrieve it again using simple HTTP methods. I’d like to point out that you could also use OpenWeatherMap to store your climate data and it probably would be very easy to do as well. - Page 48 Thingspeak API keys The first one will allow you to write to this channel in Thingspeak, and the second one will allow you to read from it. Treat them as secrets and with care. Others might be able to spam your channel or to “steal”...
-
Page 49: Programming The Climate Node
C. Programming the Climate Node Now we have all the ingredients to post the climate data to Thingspeak. We just have to program the ESP8266 accordingly. Go to: https://github.com/supprot/ArduCAM_esp8266- dht-thingspeak-logger.git and download the code as a Zip file (or optionally do a GitHub checkout). -
Page 50: More Projects
A. The ESP8266 PlaneSpotter The ESP8266 PlaneSpotter is an additional project that you can build with the same hardware you used for the WeatherStation. After entering your coordinates it displays information on airplanes which enter the airspace defined by your parameters. I built this fun project because I see airplanes starting and landing from the nearby airport of Zurich. -
Page 51: The Esp8266 Worldclock
The WorldClock is yet another simple project which you can build with the WeatherStation hardware - and you already have a demo installed in your Arduino editor. Just go to File > Examples > ESP8266 Weather Station > WorldClockDemo The ESP8266 World Clock...
Need help?
Do you have a question about the ESP8266 and is the answer not in the manual?
Questions and answers