Table of Contents
Advertisement
Quick Links
GRASS/WEED TRIMMER
UMK435T
OWNER'S MANUAL
MANUEL DE L'UTILISATEUR
MANUAL DE EXPLICACIONES
Read and understand this Owner's Manual before operating the grass/weed trimmer.
Lire et bien comprendre ce manuel avant d'utiliser la débroussailleuse.
Lea y entienda este Manual del propietario antes de operar la recortadora de hierba/maleza.
Advertisement
Table of Contents

Related Manuals for Honda Power Products UMK435T


Summary of Contents for Honda Power Products UMK435T
- Page 1 GRASS/WEED TRIMMER UMK435T OWNER'S MANUAL MANUEL DE L'UTILISATEUR MANUAL DE EXPLICACIONES Read and understand this Owner’s Manual before operating the grass/weed trimmer. Lire et bien comprendre ce manuel avant d'utiliser la débroussailleuse. Lea y entienda este Manual del propietario antes de operar la recortadora de hierba/maleza.
- Page 2 Honda UMK435T OWNER’S MANUAL MANUEL DE L’UTILISATEUR MANUAL DE EXPLICACIONES Honda Motor Co., Ltd. 2010...
- Page 4 Thank you for purchasing a Honda grass/weed trimmer. This manual covers the operation and maintenance of the Honda GRASS/WEED TRIMMER UMK435T. Honda Motor Co., Ltd. reserves the right to make changes at any time without notice and without incurring any obligation.
-
Page 5: Table Of Contents
CONTENTS 1. SAFETY INSTRUCTIONS ..............2. SAFETY LABEL LOCATIONS ............14 3. COMPONENT IDENTIFICATION ............15 4. CONTROLS ..................17 5. PRE-OPERATION CHECKS ..............20 6. STARTING THE ENGINE ..............32 7. TRIMMING OPERATION .............. -
Page 6: Safety Instructions
SAFETY INSTRUCTIONS To ensure safe operation For your safety and safety of others, pay special attention to these precautions: Honda grass/weed trimmer is designed to give safe and dependable service if operated according to instructions. Read and understand the Owner’s Manual before operating the grass/weed trimmer. - Page 7 To ensure safe operation Operator Responsibility Never operate the grass/weed trimmer when tired, ill or under influence of alcohol or other drugs. Any part from the machine is a potential source of danger if the machine is used in abnormal conditions or if the maintenance is not done correctly.
- Page 8 To ensure safe operation Operator Responsibility While operating the grass/weed trimmer, always wear following protective clothing and protective devices. − Protective clothing Wear adequate clothes with long sleeves and long pants. The clothes must fit your body and button up or zip up the clothes securely.
- Page 9 To ensure safe operation Operator Responsibility * Safety boots Wear the safety boots with the non-slip sole and toe protector to protect your feet from the flying debris. Do not operate the equipment when barefoot or wearing open sandals. Wear the leg protectors as well. *...
- Page 10 To ensure safe operation Operator Responsibility Do not operate the grass/weed trimmer with the grass deflector, labels, and other parts removed. Note that the grass deflector is provided for protection of the operator from the debris that are thrown from the wheeling cutting attachment.
- Page 11 To ensure safe operation Operator Responsibility Stop the engine with the engine switch to the OFF position in the following cases: − Before any operation around the cutting attachment. − Before checking, cleaning or working on the grass/weed trimmer. − After striking a foreign object.
- Page 12 To ensure safe operation Operator Responsibility Do not use the grass/weed trimmer with worn or damaged parts. Parts must be replaced, or repaired. Replace worn or damaged parts with Honda genuine parts. Non equivalent quality parts may damage the machine and be prejudicial to your safety. Adjust the holding position of your grass/weed trimmer.
- Page 13 To ensure safe operation Operator Responsibility Injury caused by vibration and cold: You may feel the prickling or burning pain in your fingers, and the fingers may lose color and feeling depending on your constitution. It is believed that these symptoms are brought by vibration and/or exposure to cold.
- Page 14 To ensure safe operation Child Safety Keep children indoors and supervised at all times any outdoor power grass/weed trimmer is being used nearby. Young children move quickly and are attracted especially to the grass/weed trimmer and trimming activity. Never assume children will remain where you last saw them. Be alert and turn the grass/weed trimmer off if children enter the area.
- Page 15 To ensure safe operation Fire and Burn Hazard Gasoline is extremely flammable, and gasoline vapor can explode. Use extreme care when handling gasoline. Keep gasoline out of reach of children. Store fuel in containers specifically designed for this purpose. Refuel outdoors only, and do not smoke while refuelling or handling fuel.
- Page 16 To ensure safe operation Carbon Monoxide Poisoning Hazard Exhaust contains poisonous carbon monoxide, a colorless and odorless gas. Breathing exhaust can cause loss of consciousness and may lead to death. If you run the engine in an area that is confined or even partially enclosed, the air you breathe could contain a dangerous amount of exhaust gas.
-
Page 17: Safety Label Locations
SAFETY LABEL LOCATIONS Your grass/weed trimmer must be used with care. Therefore, decals have been placed on the machine, to remind you pictorially of main precautions to take during use. Their meanings are explained on page These decals are considered as a part of the grass/weed trimmer. Should one become detached or unreadable, contact your Honda dealer for its replacement. -
Page 18: Component Identification
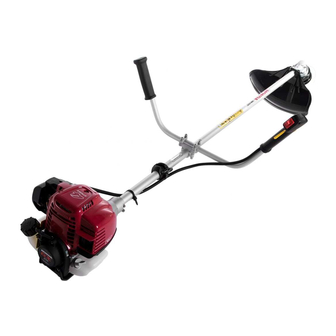
COMPONENT IDENTIFICATION THROTTLE TRIGGER ENGINE SWITCH CUTTING BLADE GEAR CASE THROTTLE TRIGGER INTERLOCK GRASS DEFLECTOR U-SHAPED HANDLE FRAME SERIAL NUMBER... - Page 19 SPARK PLUG CAP (inside the top cover) SPARK PLUG TOP COVER AIR CLEANER MUFFLER PRIMING PUMP ENGINE OIL FILLER CAP CHOKE LEVER STARTER GRIP FUEL TUBE (BLACK TUBE) ENGINE SERIAL NUMBER FUEL RETURN TUBE FUEL TANK CAP (TRANSPARENT TUBE) Record the frame serial number (see page ) and the engine serial number in the space below.
-
Page 20: Controls
CONTROLS Engine switch The engine switch enables and disables the ignition system. The engine switch must be in the ON position for the engine to run. Turning the engine switch to the OFF position stops the engine. ENGINE SWITCH Priming pump Pressing the priming pump feeds the gasoline from the fuel tank to the carburetor. - Page 21 Choke lever The choke lever opens and closes the choke valve in the carburetor. The CLOSED position enriches the fuel mixture for starting a cold engine. The OPEN position provides the correct fuel mixture for operation after starting, and for restarting a warm engine. CHOKE LEVER CLOSED OPEN...
- Page 22 Throttle trigger The throttle trigger controls engine speed. Pulling and releasing the throttle trigger shown below makes the engine run faster or slower. THROTTLE TRIGGER The throttle trigger interlock must be depressed before the THROTTLE throttle trigger can be activated. TRIGGER INTERLOCK By pulling the throttle trigger...
-
Page 23: Pre-Operation Checks
PRE-OPERATION CHECKS For safe and efficient trimming, always make a pre-operation inspection before operating: Perform a pre-operation inspection on a firm, level surface with the engine stopped and make sure that the engine switch is in the OFF position. Check the engine oil level Running the engine with low oil level will cause serious engine damage. - Page 24 Use 4-stroke motor oil that meets or exceeds t h e r e q u i r e m e n t s f o r A P I s e r v i c e classification SE or later (or equivalent). Always check the API service label on the oil container to be sure it includes the letters SE or later (or equivalent).
- Page 25 Check the fuel level Use automotive unleaded gasoline with a Research Octane Number of 91 or higher (a Pump Octane Number of 86 or higher). Never use stale or contaminated gasoline or an oil/gasoline mixture. Avoid getting dirt or water in the fuel tank. Gasoline is extremely flammable and is explosive under certain conditions.
- Page 26 Check the fuel level visually from the outside of the fuel tank while keeping the fuel filler neck upright. If the fuel level is low, refuel the fuel tank until the level as specified. Remove the fuel tank cap gradually to release a pressurized air in the fuel tank.
- Page 27 Gasoline spoils very quickly depending on factors such as light exposure, temperature and time. In worst cases, gasoline can be contaminated within 30 days. Using contaminated gasoline can seriously damage the engine (carburetor clogged, valve stuck). Such damage due to spoiled fuel is disallowed from coverage by the warranty.
- Page 28 Check the air cleaner Never run the engine without the air cleaner; rapid engine wear will result. Move the choke lever to the CLOSED (upwards) position. Remove the air cleaner cover by unhooking the upper tab on the top of the air cleaner cover and its two lower tabs. Check the air cleaner element for dirt or obstruction.
- Page 29 Check the throttle cable free play Move the choke lever to the CLOSED (upwards) position. Remove the air cleaner cover by unhooking the upper tab on the UPPER TAB top of the air cleaner cover and its two lower tabs. CLEANER COVER LOWER TABS...
- Page 30 Check the carrying harness Put on the carrying harness. Set the hook to the hanger. Check that the hook is fastened to the hanger securely. CARRYING HARNESS HOOK HANGER HIP PAD...
- Page 31 Inspect the cutting attachment Cutting blade inspection: For safety, check the cutting blade for wear and damage and check the tightness of the cutting blade nut before starting the engine. Operating the grass/weed trimmer with a worn, cracked, or damaged cutting blade can cause a personal injury or equipment damage.
- Page 32 Nylon-line cutting head inspection: For safety, check the cutting head before starting the engine. Operating the grass/weed trimmer with the loose, cracked, or other damaged cutting head can cause a personal injury or equipment damage. Thrown cutting head by loose fastening can hit the operator or bystanders causing death or serious injury.
- Page 33 Inspect the grass deflector and deflector sheet Never use the grass/weed trimmer without its grass deflector. Stones or other foreign objects thrown outward by the wheeling cutting attachment or contact with the wheeling cutting attachment could cause personal injury or property damage. Stop the engine with the engine switch to the OFF position.
- Page 34 Check all bolts and nuts Check each bolt and nut for looseness. Tighten them securely if necessary. Check the handle for loose mounting bolts or screws, and tighten them securely if necessary. HANDLE MOUNTING BOLTS (4) U-SHAPED HANDLE HANDLE MOUNTING BOLTS (2)
-
Page 35: Starting The Engine
STARTING THE ENGINE Exhaust gas contains poisonous carbon monoxide. Never run the engine in an enclosed area. Be sure to provide adequate ventilation. Start the engine in a place away from the people, pets, and surrounding buildings. Be sure there are no obstacles in the working area. - Page 36 To start a cold engine, move the choke lever to the CLOSED position. To restart warm engine, leave the choke lever in the OPEN position. CLOSED OPEN CHOKE LEVER Press the priming pump several times until fuel stays in a priming pump.
- Page 37 Pull the starter grip lightly until you feel resistance while stepping on the carrying frame with your foot and holding the carrying frame with your hand, then pull briskly in the direction of the arrow as shown below. Return the starter grip gently. Do not allow the starter grip to snap back against the engine.
- Page 38 Carburetor Modification for High Altitude Operation. At high altitude, the standard carburetor air-fuel mixture will be too rich. Performance will decrease, and fuel consumption will increase. A very rich mixture will also foul the spark plugs and cause hard starting. Operation at an altitude that differs from that at which this engine was certified, for extended periods of time, may increase emissions.
-
Page 39: Trimming Operation
TRIMMING OPERATION Read and understand the safety instructions on pages to before operating the grass/weed trimmer. If you notice any abnormal sound, smell, vibration, or other unusual signs, stop the engine immediately and consult your authorized Honda dealer. Grass/weed trimmer holding position adjustment: Stop the engine and adjust the length of the carrying harness. - Page 40 Cutting attachment applications: For more efficient use, select an appropriate blade in accordance with the length of grass and other ground conditions. Mowing for low grass and Cleaning. Nylon-line (Tap & go) Mowing large areas of grass and tall grass. Cutting blade (3-tooth...
- Page 41 Basic operation: With the engine idling, hook the trimmer to your carrying harness and hold the trimmer at the correct position. Be careful to avoid contact with the cutting attachment while handling the trimmer with the engine running. The cutting attachment should not rotate with the engine idling. If there is rotation at idle, adjust the idle speed correctly before using the trimmer.
- Page 42 Operate the grass/weed trimmer not by using your arm force but by using your waist so that the cutting attachment swings in a level arc from right to left. Hold the grass/weed trimmer so that you can shift your weight to the right leg then to the left leg safely and easily, and walk slowly with narrow strides.
-
Page 43: Stopping The Engine
STOPPING THE ENGINE Release the throttle trigger. Turn the engine switch to the OFF position. Note that the cutting attachement keeps turning for a while by inertia after the engine is stopped. THROTTLE TRIGGER ENGINE SWITCH Be sure that the engine is stopped and the cutting attachment stops turning before placing the grass/weed trimmer on the ground. -
Page 44: Maintenance
Replacement parts which are not of equivalent quality may damage the trimmer. Periodic inspection and adjustment of the Honda UMK435T is essential if high level performance is to be maintained. Regular maintenance will also help to extend service life. The required service... - Page 45 Maintenance schedule REGULAR SERVICE PERIOD First Every 3 Every 6 Every Every Each month months months year 2 years Refer Perform at every indicated month or operating hour 10 hrs. 25 hrs. 50 hrs. 100 hrs. 300 hrs. page interval, whichever comes first. ITEM Engine oil Check level...
- Page 46 Tool kit The tools supplied are necessary for performing some periodic maintenance, simple adjustments and repairs. SPARK PLUG WRENCH × 10 mm WRENCH 5 mm HEXAGON WRENCH 4 mm HEXAGON WRENCH TOOL BAG...
- Page 47 Engine oil change If the engine has been running, the engine, muffler and the engine oil are very hot and they remain hot for a while after stopping the engine. To protect you from burn, wait until they cool down before starting the oil change.
- Page 48 Please dispose of used motor oil in a manner that is compatible with the environment. We suggest you take it in a sealed container to your local service station for reclamation. Do not throw it in the trash or pour it on the ground.
- Page 49 Air cleaner service A dirty air cleaner will restrict air flow to the carburetor. To prevent carburetor malfunction, service the air cleaner regularly. Service more frequently when operating the grass/weed trimmer in extremely dusty areas. Never use gasoline or low flash point solvents for cleaning the air cleaner element.
- Page 50 Cutting attachment replacement Nylon-line cutting head: To avoid severe personal injury, make sure that the engine switch is in the OFF position to prevent accidental starting. Use a genuine Honda replacement cutting head or its equivalent. Wear heavy gloves to protect your hands when replacing the cutting head.
- Page 51 Cutting blade: To avoid severe personal injury, make sure that the engine switch is in the OFF position to prevent accidental starting. Use a genuine Honda replacement cutting blade or its equivalent. Wear heavy gloves to protect your hands, when working around the cutting blade.
- Page 52 Grass deflector replacement Install the grass deflector in the proper position securely to protect you from the debris that are thrown from a wheeling cutting attachment. Wear heavy gloves to protect your hands, when working around the cutting attachment. Installation position of grass deflector Nylon-line cutting head equipped: Place the plate holes A and B pointing up.
- Page 53 Nylon-line cutting head equipped: Cutting blade equipped: × 20 mm × 20 mm SOCKET BOLTS (4) SOCKET BOLTS (4) PLATE PLATE GRASS DEFLECTOR GRASS DEFLECTOR...
- Page 54 Spark plug service Recommended spark plug: CMR5H (NGK) To ensure proper engine operation, the spark plug must be properly gapped and free of deposits. If the engine has been running, the muffler will be very hot, be careful not to touch the muffler. Never use a spark plug of incorrect heat range.
- Page 55 Measure the plug gap with a feeler gauge. Correct as necessary by carefully bending the side electrode. The gap should be: 0.6 0.7 mm − SIDE ELECTRODE 0.6 0.7 mm − WASHER INSULATOR Check that the spark plug washer is in good condition and thread the spark plug in by hand to prevent cross-threading.
- Page 56 Throttle cable check and adjustment Adjust the throttle cable free play properly. UPPER TAB Adjustment: Move the choke lever to the CLOSED (upwards) position. Remove the air cleaner cover by unhooking the upper tab on the top of the air cleaner cover and its two lower tabs.
- Page 57 Operate the throttle system several times and check it has the free play (i.e. throttle lever does not move while operating the throttle trigger). After adjustment, check the throttle trigger for smooth operation. Consult your authorized Honda dealer if necessary. THROTTLE TRIGGER Reinstall the air cleaner cover by inserting the lower tabs, then insert the upper tab.
- Page 58 Engine cooling fin inspection Inspect the cooling fin visually through the cover. If there are dry grass, leaves and mud clogged, consult your authorized Honda dealer for cleaning it. COOLING FINS (Inside the top cover)
- Page 59 Fuel filter service Note that the clogged fuel filter can cause poor engine performance. Gasoline is extremely flammable and is explosive under certain conditions. You can be burned or seriously injured when handling fuel. Observe the following when servicing the fuel filter. Stop the engine.
- Page 60 Pull out the fuel filter with the mechanic’s wire from the fuel filler neck gently. Check the fuel filter for contamination. If the fuel filter is dirty, wash it gently with nonflammable or high flash point solvent. If the fuel filter is excessively dirty, replace it.
- Page 61 Be sure that the engine oil filler cap is tightened securely. Remove the fuel tank cap and drain the gasoline into the container by tipping the engine toward the fuel filler neck. FUEL FILLER NECK ENGINE OIL FILLER CAP FUEL TANK CAP Pull out the fuel filter with the mechanic’s wire from the fuel filler neck gently.
-
Page 62: Storage
STORAGE Proper storage preparation is essential for keeping your grass/weed trimmer trouble free and looking good. The following steps will help to keep rust and corrosion from impairing your grass/weed trimmer. If the grass/weed trimmer has been running, the engine will be very hot;... - Page 63 Press the priming pump several times until all fuel left in the fuel return tube is returned into the fuel tank. FUEL TANK CAP PRIMING PUMP FUEL RETURN TUBE (TRANSPARENT TUBE) Tip the engine toward the fuel filler neck again to drain the fuel left in the fuel tank into the container.
-
Page 64: Troubleshooting
TROUBLESHOOTING When the engine will not start: Is the engine switch in the ON position? Is there fuel in the fuel tank (see page Gasoline is extremely flammable and explosive under certain conditions. Do not smoke or allow flames or sparks in the area. Is gasoline reaching the carburetor? To check, press the priming pump several times (see page Is the spark plug in good condition? -
Page 65: Specifications
SPECIFICATIONS MODEL UMK435T Power product HAAT description code Frame TYPE UEDT Handle type U-shaped Clutch type Centrifugal clutch Tool Cutting blade Nylon-line Cutter Type 3-teeth blade Tap & Go O.D. 255 mm 440 mm Overall length 1,901 mm 1,870 mm... - Page 66 Engine UMK435T MODEL Engine model GX35T Engine description code GCAMT Engine type 4-stroke, overhead cam, 1 cylinder Displacement 35.8 cm Bore and Stroke 39.0 × 30.0 mm Engine Net power 1.0 kW/7,000 rpm * (in accordance with SAE J1349 ) Engine max.
- Page 67 oHonda Motor Co., Ltd. 2010 efs XXXX.XXXX.XX 37VK9600 Printed in Thailand 00X37-VK9-6001...
Need help?
Do you have a question about the UMK435T and is the answer not in the manual?
Questions and answers