
Subscribe to Our Youtube Channel
Related Manuals for ForaCare FORA P30 Plus


Summary of Contents for ForaCare FORA P30 Plus
- Page 1 Blood Pressure Monitoring System Sistema de Monitoreo de Presión Arterial Owner’s Manual Manual del Propietario...
- Page 3 These studies also suggest that diabetes patients could reduce the risk of cardiovascular diseases by managing their blood pressure. With the use of this FORA P30 Plus Blood Pressure Monitoring System, you can easily monitor your blood pressure by yourself.
- Page 4 IMPORTANT SAFETY PRECAUTIONS READ BEFORE USE 1. Use this device ONLY for the intended use described in this manual. 2. Do NOT use accessories which are not specified by the manufacturer. 3. Do NOT use the device if it is not working properly or if it is damaged.
-
Page 5: Table Of Contents
TABLE OF CONTENTS BEFORE YOU BEGIN 1 Intended Use 1 Test Principle 1 Contents of System 2 Monitor Overview 3 Screen Display 4 Setting the Monitor 5 MEASURING THE BLOOD PRESSURE 7 Before Measurement 7 Fitting the Cuff Correctly 7 Proper Measurement Position 9 ... -
Page 7: Before You Begin
BEFORE YOU BEGIN Intended Use The FORA P30 Plus Blood Pressure Monitoring System is intended for use in measuring the systolic and diastolic blood pressure and pulse rate using a non-invasive technique in which an inflatable cuff is wrapped on the upper arm. This system should only be used on people who are 18 years old or older. -
Page 8: Contents Of System
Contents of System The FORA P30 Plus system kit includes: Monitor Device 4 x AA Alkaline Batteries ○ ○ Owner’s Manual Pressure Cuff ○ ○ Protective Wallet ○ Quick Start User Guide / ○ Warranty Card NOTE: If any items are missing from your kit or opened before use, please contact ... -
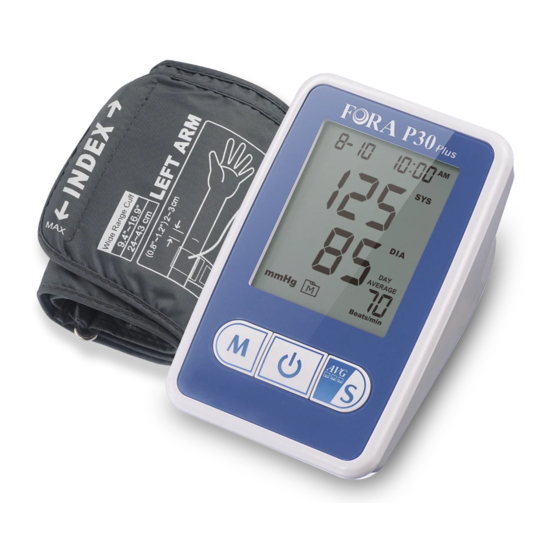
Page 9: Monitor Overview
Monitor Overview Display Screen Battery Compartment ○ ○ M Button AC/DC Adapter Port ○ ○ To view the monitor memory. Optional for in-wall power supply. ON/OFF Button ○ Air Jack To start a single non-invasive ○ blood pressure Pressure Cuff ○... -
Page 10: Screen Display
Screen Display Date Day Average Result ○ ○ Systolic Pressure Value Day / Night-Time Symbol ○ ○ Diastolic Pressure Value Diastolic Pressure Symbol ○ ○ Unit for Blood Pressure Battery Symbol ○ ○ Memory Mode Symbol Systolic Pressure Symbol ○ ○... -
Page 11: Setting The Monitor
Setting the Monitor Before using your monitor for the first time, or if you change the monitor battery, you should check and update these settings. Make sure you complete the steps below and have your desired settings saved. Entering the Setting Mode Start with the monitor off. - Page 12 3. Setting the time format Press M button to select the desired time format --- 12h (AM/PM) or 24h. Press AVG/S. 4. Deleting the memory If you do not wish to delete the saved results, press AVG/S to skip this step. Otherwise, with "dEL"...
-
Page 13: Measuring The Blood Pressure
MEASURING THE BLOOD PRESSURE Before Measurement Avoid caffeine, tea, alcohol and tobacco at least 30 minutes before measurement. Wait 30 minutes after exercising or bathing before measurement. Sit or lie down for at least 10 minutes before measurement. ... - Page 14 Stretch the left (or right) arm in front with the palm facing up. Slide and place the cuff onto the arm with the air tube and artery mark region (in red) toward the lower arm. Wrap and tighten the cuff above the elbow.
-
Page 15: Proper Measurement Position
Proper Measurement Position 1. Sit down for at least 10 minutes before measuring. 2. Place the elbow on a flat surface. Relax the hand with the palm facing up. 3. Make sure the cuff is about the same height as the location of your heart. - Page 16 NOTE: If you press during measurement, the monitor will be turned off. If the pulse rate symbol is shown as “ ” instead of “ ”, that means the heart beat period deviated from the mean heart beat by greater than 25%. ●Average Measurement Mode Always apply the pressure cuff before turning on the monitor.
- Page 17 ●Auscultatory Mode Only trained healthcare professionals may perform this manual blood pressure measurement. This manual method involves applying a stethoscope to patient’s arm and listening to the pulse while the air is slowly let out again. The systolic pressure is the maximum pressure in an artery at the moment when the heart is beating and pumping blood through the body.
- Page 18 5. The diastolic pressure is measured from the moment the operator is unable to hear the sound of the pulse. Take the reading according to the value on the display. This reading indicates the patient’s diastolic pressure.
-
Page 19: Monitor Memory
MONITOR MEMORY Your monitor stores the 60 most recent test results along with respective dates and times in its memory. To recall the memory, start with the monitor off. Reviewing Test Results 1. Press and release M. “ ” will appear on the display. 2. -
Page 20: Reviewing Day Average Results
Reviewing Day Average Results 1. Press and hold M button until the monitor turns on. Release M button and then the days average result measured in general mode will appear on the display. 2. Press M button again to review the Day-time average result 3. -
Page 21: Maintenance
MAINTENANCE Battery Your monitor comes with four 1.5V AA size alkaline batteries. Low Battery Signal The monitor will display the two messages below to alert you when the monitor power is getting low. 1. The “ ” appears along with a displayed message: The monitor is functional and the result remains accurate, but it is time to change the... -
Page 22: Using An Ac Adapter (Optional)
NOTE: Replacing the batteries does not affect the test results stored in the memory. As with all small batteries, these batteries should be kept away from children. If swallowed, promptly seek medical assistance. Batteries might leak chemicals if unused for a long time. Remove the batteries if you are not going to use the device for an extended period (i.e., 3 months or more). -
Page 23: Caring For Your Monitor
Remove an AC adapter from the monitor 1. When the monitor is off, remove the AC adapter power plug from the electrical outlet. 2. Disconnect the AC adapter plug from the AC adapter jack of the monitor. Caring for Your Monitor To prevent the meter from dirt, dust or other contaminants, please wash and dry your hands thoroughly before use. -
Page 24: System Troubleshooting
SYSTEM TROUBLESHOOTING If you follow the recommended action but the problem persists, or error messages other than the ones below appear, please call your local customer service. Do not attempt to repair yourself and never try to disassemble the meter under any circumstances. Error Messages MESSAGE WHAT IT MEANS... -
Page 25: Troubleshooting
Troubleshooting 1. If there is no display after pressing POSSIBLE CAUSE WHAT TO DO Batteries exhausted. Replace the batteries. Batteries incorrectly installed or Check that the batteries are correctly absent. installed. 2. If the heart rate is higher or lower than user’s average: POSSIBLE CAUSE WHAT TO DO Movement during measurement. -
Page 26: Detailed Information
DETAILED INFORMATION Reference Values Clinical studies show that adult diabetes is often accompanied by elevated blood pressure. People with diabetes can reduce their heart risk by managing their blood pressure along with diabetes treatment Monitoring your routine blood pressure trend helps you to know your body condition. - Page 27 *3: New ACC (American College of Cardiology) and AHA (American Heart Association) guidelines for the detection, prevention, management and treatment of high blood pressure (2017).
-
Page 28: Specifications
SPECIFICATIONS System Performance Power Source: Four 1.5V AA alkaline batteries Size of Monitor w/o Cuff: 160 mm (L) x 95 mm (W) x 66.5 mm (H), around 400g without battery Cuff Size: Wide range 9.4-16.9 inches (24-43 cm) Memory: Maximum 60 memory records Power Saving: Automatic power off if system is idle for 3 minutes System Operating Condition: 41°F to 104°F (5°C to 40°C), 15 - 93% RH... - Page 31 Si posee alguna duda, comuníquese de forma gratuita con el Centro de atención al cliente de ForaCare al 1-888-307-8188 de lunes a viernes de 8:30 am a 5:00 pm (hora estándar del Pacífico) o visite...
- Page 32 IMPORTANTES MEDIDAS DE SEGURIDAD LEÁSE ANTES DE SER USADO 1. Utilice este sistema SOLAMENTE para el uso previsto. 2. NO utilice accesorios que no hayan sido suministrados por el fabricante. 3. NO utilice este aparato si sospecha que está trabajando erróneamente o ha sufrido algún daño.
- Page 33 TABLA DE CONTENIDO ANTES DE EMPEZAR 1 Uso Previsto 1 Principios de la Prueba 1 Contenido del Sistema 2 Apariencia y Funciones Principales del Medidor 3 Pantalla de Visualización 4 Configurando el Medidor 5 MEDICIÓN DE LA PRESIÓN ARTERIAL 7 Antes de Realizar la Medición 7 ...
-
Page 35: Antes De Empezar
ANTES DE EMPEZAR Uso Previsto El Sistema de Monitoreo de la Presión Arterial FORA P30 Plus está previsto a ser utilizado para medir la presión arterial diastólica y sistólica y frecuencia cardiaca mediante el uso de una técnica no invasiva en la que una banda inflable se envuelve en la parte superior del brazo. -
Page 36: Contenido Del Sistema
Contenido del Sistema El sistema FORA P30 Plus incluye: Medidor 4 x AA baterías alcalinas ○ ○ Manual del propietario Banda de presión ○ ○ Funda protectora ○ Tarjeta de garantía ○ NOTA: Si alguno de estos artículos no están incluidos o si la caja ha sido abierta ... -
Page 37: Apariencia Y Funciones Principales Del Medidor
Apariencia y Funciones Principales del Medidor Pantalla de Visualización Compartimiento de la batería ○ ○ Botón M Puerto para el Adaptador de ○ ○ CA/CC Para ingreasar la memoria Permite conectar la fuente de del medidor. alimentación. Botón ON/OFF ○ Salida del Aire ○... -
Page 38: Pantalla De Visualización
Pantalla de Visualización Fecha Simbolo de dia y noche ○ ○ Valor de Presión Sistólica Promedio Diario ○ ○ Símbolo de Presión Diastólica ○ Valor de Presión Diastólica ○ Unidades para la Presión Símbolo de Batería ○ ○ Arterial Símbolo de Función de Símbolo de Presión Sistólica ○... -
Page 39: Configurando El Medidor
Configurando el Medidor Antes de usar el medidor por primera vez o si desea cambiarle las baterías, debe verificar y actualizar estas configuraciones. Asegúrese de completar los pasos descritos a continuación y guardarlos de nuevo. Entrando a la función de configuración Comience con el medidor apagado. - Page 40 3. Seleccione reloj de 12 o 24 horas Presione y libere botón M para seleccionar el formato de hora 12h (AM/PM) o 24h. Presione AVG/S. 4. Borrando la memoria Si usted no desea borrar los resultados guardados, cuando los símbolos “dEL” y “...
-
Page 41: Medición De La Presión Arterial
MEDICIÓN DE LA PRESIÓN ARTERIAL Antes de Realizar la Medición ● Evite la cafeína, el té, el alcohol y el tabaco por lo menos 30 minutos antes de realizar la medición. ● Antes de la medición, espere por lo menos 30 minutos después de haber hecho ejercicios o de haber tomado un baño. - Page 42 3. Estire el brazo izquierdo (o derecho) hacia el frente con la palma de la mano hacia arriba. Deslice y coloque la banda en el brazo con el tubo de aire y la región de marca de arterias (en rojo) hacia el antebrazo.
-
Page 43: Posición Correcta Para Efectuar La Medición
Posición Correcta para Efectuar la Medición 1. Siéntese al menos 10 minutos antes de realizar la medición. 2. Coloque el codo sobre una superficie plana. Relaje la mano con la palma de la mano hacia arriba. 3. Asegúrese de que la banda este al mismo nivel del corazón. - Page 44 3. Después de la medición, el medidor mostrará la presión sistólica y la presión diastólica, así como la frecuencia cardiaca o pulso. 4. Presione para apagar el medidor. Si no, se apagará automáticamente después de 3 minutos. NOTA: Si presiona el botón de durante la medición, el medidor se apagará.
- Page 45 3. Despues de tomar las tres mediciones, se hara un promedio de los resultados para obtener la medicion de presion arterial. Presione para apagar el dispositivo. ● Método Ausculatorio Solamente personal entrenado profesionalmente puede hacer este tipo de medición de presión arterial. Este método manual involucra colocar el audífono del estetoscopio sobre el pulso humeral o branquial del brazo del paciente y escuchar el pulso mientras el aire va saliendo lentamente.
- Page 46 3. El dispositivo empezará automáticamente el proceso de desinflado. El operador del aparato puede ajustar la presión de inflado de ser necesario. Durante el proceso de medición, mantenga presionando el boton M en cualquier momento para mantener inflado, libere a la presión deseada.
-
Page 47: Memoria Del Medidor
MEMORIA DEL MEDIDOR La memoria de su medidor puede almacenar las 60 pruebas más recientes con sus respectivas fechas y horas. Para ingresar en la memoria de su medidor comience con el medidor apagado. Visualización de Los Resultados 1. Presione y libere M. El símbolo “... -
Page 48: Revisando Los Resultados Del Promedio Diario
Revisando Los Resultados del Promedio Diario 1. Mantenga presionado el botón M hasta que el medidor se encienda. El resultado promediado de días aparecerá en la pantalla. Presione el botón M de nuevo para ver los resultados promedios del tiempo del día. Presione el botón M de nuevo para ver los resultados promedios del tiempo de noche. -
Page 49: Mantenimiento Baterías
MANTENIMIENTO Baterías Su medidor viene con cuatro baterías alcalinas tamaño 1.5V AA. Señal de batería agotada o baja El medidor mostrará uno de los mensajes a continuación, con el fin de alertarlo cuando el medidor se esté quedando sin batería. 1. -
Page 50: Usando El Adaptador Ac (Opcional)
2. Remueva las baterías viejas y reemplácelas con cuatro baterías alcalinas AA de 1.5V. 3. Cerrar la tapa de las baterías. NOTA: Reemplazando las baterías no afecta los resultados guardados en la memoria. Como con todas las baterías pequeñas, éstas deben estar fuera del alcance de niños pequeños. -
Page 51: Cuidado De Su Medidor
Desconecte el adaptador AC del medidor 1. Cuando el medidor esté apagado, remueva el adaptador AC del enchufe eléctrico. 2. Desconecte el adapatador AC del enchufe del medidor. Cuidado de Su Medidor Para evitar que su medidor se llenen de polvo o se ensucie con algún contaminante, por favor recuerde lavarse y secarse las manos antes de usarlo. -
Page 52: Localizacion Y Resolucion De Problemas En El Sistema
LOCALIZACION Y RESOLUCION DE PROBLEMAS EN EL SISTEMA El siguiente es un resumen de mensajes de la pantalla. Si su medidor muestra un mensaje de error, por favor, siga las acciones para el mensaje de error como se describe en la tabla de abajo. Si el problema persiste, póngase en contacto con su agente local de servicio al cliente para obtener ayuda. -
Page 53: Localización Y Resolución De Problemas
Localización y Resolución de Problemas 1. Si no muestra ningún mensaje después de presionar CAUSAS POSIBLES QUÉ HACER Batería agotada. Reemplace las baterías. Las baterías pueden haber sido Verifique que las baterías hayan sido instaladas incorrectamente o instaladas correctamente. quizás no hayan sido colocadas. 2. -
Page 54: Información Detallada
INFORMACIÓN DETALLADA Valores Referenciales Estudios clínicos han demostrado que la diabetes en adultos está frecuentemente acompañada por presión arterial elevada. Las personas con diabetes pueden reducir el riesgo de sufrir un ataque cardiaco supervisando su presión arterial mientras llevan un tratamiento contra la diabetes Conociendo la tendencia de su presión arterial puede ayudarle a determinar si su cuerpo goza de buena salud o no. - Page 55 *2: Séptimo Reporte del Comité de la Junta Nacional en Prevención, Evaluación y Tratamiento de Alta Presión Arterial. Publicación del NIH, 2003. No. 03-5233 *3: Nuevos lineamientos del ACC (Colegio Americano de Cardiología) y el AHA (Asociación Americana del Corazón) para la detección, prevención, manejo, y tratamiento de la presión arterial alta (2017).
-
Page 56: Especificaciones
ESPECIFICACIONES ● Rendimiento del Sistema Fuente de Alimentación: Cuatro baterías alcalinas AA de 1.5V Dimensiones del dispositivo: 160 (LA) x 95 mm (AN) x 66.5 mm (AL), 400g sin baterías Tamaño del manguito: Amplio rango 9.4-16.9 pulgadas (24-43 cm) Memoria: 60 registros de memoria como máximo Ahorro de Energía: Apagado automático si el sistema permanece inactivo durante 3 minutos Condiciones de Funcionamiento del Sistema:... - Page 60 Distributed by ForaCare, Inc. / Distribuido por ForaCare, Inc. 893 Patriot Drive Suite D, Moorpark, CA 93021 USA Product made in Taiwan / Producto hecho en Taiwán Toll Free / Número de Teléfono Gratuito: 1-888-307-8188 (8:30 am-5:00 pm PST, Monday-Friday / 8:30 am-5:00 pm PST, Lunes a Viernes) For assistance outside of these hours, please contact your healthcare professional.
Need help?
Do you have a question about the FORA P30 Plus and is the answer not in the manual?
Questions and answers