Table of Contents
Advertisement
Available languages
Available languages
Quick Links
Advertisement
Table of Contents

Related Manuals for Archos Hello 5


Summary of Contents for Archos Hello 5
- Page 1 Quick Start Guide...
- Page 3 Support > After-sales support www.archos.com, click Support > Downloads > Declaration of conformity Compatible devices and / or subscriptions to additional services may be necessary to take full advantage of your ARCHOS Hello 5. Warranty, Legal and Safety booklet: www.archos.com/support/warranty.html...
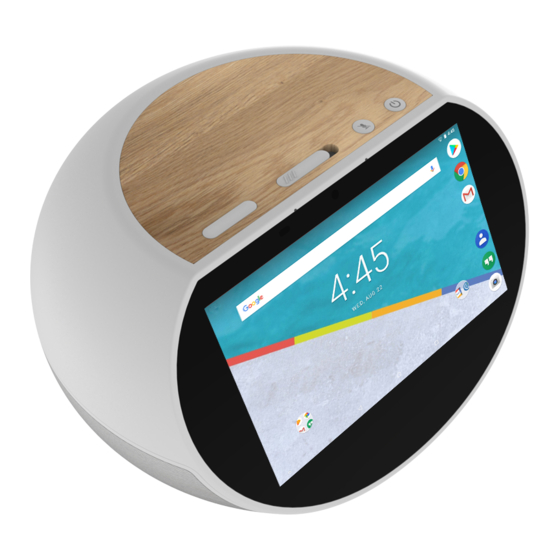
- Page 4 Describing your device DC-in charging port Micro SD slot Micro USB port Back speaker...
- Page 5 Describing your device ON/OFF Mic Mute Camera cover Microphones Volume +/- 10. Camera Privacy You can hide the camera with the camera cover and turn off the mic with the Mic Mute button.
- Page 6 Starting up Installing your ARCHOS Hello 5 First, plug in the charging cable into the DC-in port of the ARCHOS Hello 5. Plug in the charger to a socket. Note: your device is battery-powered. We advise you to keep it plugged.
- Page 7 Security. Choose a screen lock. Wireless charging for Qi compatible devices To charge your Qi compatible device, put it in the center of the wooden surface. The ARCHOS Hello 5 must be plugged in during the charging process. Qi wireless charging...
-
Page 8: Troubleshooting
Reinitialize your device. Go to Settings > Backup & reset > Factory data reset. If you can’t have access to the settings for any reason, consult our FAQs about the reinitialization process. For more answers about your technical difficulties, do not hesitate to visit: faq. archos.com... - Page 9 Support > Téléchargements > Déclaration de conformité Des appareils compatibles ou/et des abonnements à des services complémentaires peuvent être nécessaires pour profiter pleinement de votre ARCHOS Hello 5. Livret de garantie, juridique et de sécurité : www.archos.com/ support/warranty.html...
- Page 10 Description du ARCHOS Hello 5 Connecteur de charge Emplacement Micro SD Port Micro USB Haut-parleur arrière...
- Page 11 Description du ARCHOS Hello 5 ON/OFF Désactivation du micro Cache caméra Micros Volume +/- 10. Appareil photo Vie privée Vous pouvez masquer la caméra avec le cache et couper le micro avec le bouton de désactivation du micro.
-
Page 12: Premiers Pas
Branchez le câble de rechargement sur le port DC-in de l’appareil Branchez la prise du câble sur une prise de courant. Note : l’ARCHOS Hello 5 fonctionne aussi sur batterie. Il est recommandé de placer votre ARCHOS Hello 5 sur une surface plane et stable. - Page 13 Chargement sans fil des produits Emplacement compatibles Qi de recharge sans Pour recharger votre produit compatible fil Qi avec la technologie Qi, placez-le au centre de la surface en bois. Pendant la recharge, l’ ARCHOS Hello 5 doit être branché sur une prise secteur.
-
Page 14: Dépannage
Réinitialisez votre appareil. Allez dans Paramètres > Sauvegarde & réinitialisation > Réinitialiser votre appareil. Si vous ne pouvez pas accéder à ces paramètres, consultez notre foire aux questions sur le processus de réinitialisation.. Pour plus de renseignements sur vos problèmes techniques, n’hésitez pas à consulter la page : faq.archos.com... - Page 15 Sie auf Support > After-Sales Support www.archos.com, click Support > Downloads > Declaration of conformity Kompatible Geräte und/oder kostenpflichtige Streaming-/Abo-Dienste sind möglicherweise zur voll umfänglichen Nutzung Ihres ARCHOS Hello 5 erforderlich. Garantie, Rechts- und Sicherheitshandbuch : www.archos.com/ support/warranty.html...
- Page 16 Funktionen der Tasten von ARCHOS Hello 5 Ladeanschluss microSD Steckplatz Micro USB Port Lautsprecher...
- Page 17 Funktionen der Tasten von ARCHOS Hello 5 Ein/Aus Mikro stumm Abdeckung f. die Kamera Mikrofon Lautstärke +/- 10. Kamera Privatsphäre Wenn gewünscht, lässt sich die Kamera abdecken und das Mikro ausschalten.
- Page 18 Starten Inbetriebnahme Ihres ARCHOS Hello 5 1.Verbinden Sie zuerst das Ladekabel mit dem Ladeanschluss des ARCHOS Hello 5 2.Stecken Sie dann den Stecker in eine Steckdose Beachten Sie bitte, dass das ARCHOS Hello 5 unter Akku-Betrieb läuft. Wir empfehlen jedoch eine dauerhafte Stromversorgung des Hello. Wir empfehlen, das Gerät auf einer ebenen Fläche zu installieren.
- Page 19 App Settings [Einstellungen] und dann Security [Sicherheit]. Wählen Sie eine Displaysperre aus. Kabelloses Laden für Qi-kompatible Geräte Qi kabelloses Um Ihr Qi-kompatibles Gerät aufzuladen, Aufladen legen Sie es in die Mitte der Holzoberfläche. Der ARCHOS Hello 5 muss während des Ladevorgangs eingesteckt sein.
-
Page 20: Fehlerbehebung
Initialisieren Sie das Gerät neu. Gehen Sie zu Settings > Backup & reset > Factory data reset [Einstellungen > Sichern & zurücksetzen > Zurücksetzen auf Werkseinstellungen]. Falls Sie keinen Zugriff auf die Einstellungen haben, konsultieren Sie bitte unsere FAQs über den Vorgang der Neuinitialisierung. Weitere Antworten bei technischen Problemen finden Sie unter: faq.archos.com... - Page 21 Ondersteuning> Ondersteuning na verkoop www.archos.com, click Support > Downloads > Declaration of conformity Compatibele apparaten of/en betaalde abonnement diensten kunnen nodig zijn om volledig te profiteren van je ARCHOS Hello 5. Garantie, juridisch en veiligheidsboekje: www.archos.com/support/warranty.html...
- Page 22 Beschrijving van de ARCHOS Hello 5 knoppen DC-in oplaad poort Micro SD slot Micro USB poort Achter speaker...
- Page 23 Beschrijving van de ARCHOS Hello 5 knoppen AAN/UIT Microfoon Mute Camera afdekschuif Volume +/- Microfoons 10. Camera Privacy u kunt de camera afdekken met de camera afdekschuif en de microfoon uitzetten met de Microfoon Mute.
-
Page 24: Aan De Slag
Aan de slag Installatie van je ARCHOS Hello 5 1.Plug eerst de oplaadkabel in de DC-in poort van de ARCHOS Hello 5. 2.Steek de stekker van de oplader in het stopcontact. LET OP: dit apparaat is voorzien van een accu. We adviseren je om de oplader erop aangesloten te laten. - Page 25 Settings [Instellingen] en dan Security [Beveiliging]. Kies een schermvergrendeling. Qi draadloos Draadloos opladen voor Qi-compatibele opladen apparaten Om uw Qi-compatibele apparaat op te laden, plaatst u het in het midden van het houten oppervlak. De ARCHOS Hallo 5 moet zijn aangesloten tijdens het laadproces.
- Page 26 > Factory data reset [Instellingen > Back-up & reset > Fabrieksinstellingen herstellen]. Wanneer u geen toegang krijgt tot de instellingen, lees dan de FAQ’s over het herstellen van de fabrieksinstellingen. Voor meer antwoorden op technische vragen gaat u naar: faq.archos.com...
- Page 27 Supporto> Download> Dichiarazione di conformità Dispositivi compatibili di parti terze e/o abbonamenti a pagamento a servizi complementari potrebbero essere necessari per ottenere un’esperienza d’uso più completa del vostro ARCHOS Hello 5. Garanzia, legale e libretto di sicurezza: www.archos.com/support/warranty.html...
- Page 28 Descrizione dei tasti di ARCHOS Hello 5 Porta di ricarica DC-in Micro SD slot Porta Micro USB Speaker posteriore...
- Page 29 Descrizione dei tasti di ARCHOS Hello 5 ON/OFF Mic Mute Chiusura Fotocamera Microfoni Volume +/- 10. Fotocamera Privacy É possibile oscurare la fotocamera attraverso l’apposita chiusura e disattivare il microfono grazie al Mic Mute.
-
Page 30: Operazioni Preliminari
Operazioni preliminari Istallazione di ARCHOS Hello 5 1.Inizia con il collegare il caricabatterie nella porta DC-in dell’ARCHOS Hello 5. 2.Collegare il caricabatteria ad una presa di corrente. NATA: ARCHOS Hello 5 funziona anche con la batteria integrata. Si consiglia di lasciarlo collegato. Si consiglia di installare il dispositivo su una superficie piana. - Page 31 Operazioni preliminari Creazione di cartelle delle applicazioni nella schermata iniziale, rilascia l’icona di un’app sopra un’altra: le due icone si raggrupperanno. Modifica dello sfondo tenere premuto con il dito un punto vuoto della schermata iniziale, quindi scegliere dall’elenco: Wallpaper (Sfondo). Widget tenere premuto con il dito un punto vuoto della schermata iniziale, quindi scegliere dall’elenco: Widgets.
-
Page 32: Risoluzione Dei Problemi
Riavviare il dispositivo. Andare in Settings (Impostazioni) > Backup & reset (Backup e ripristino) > Factory data reset (Ripristino impostazioni di fabbrica). Se, per qualche ragione, non si avesse accesso alle impostazioni, consultare le FAQ relative alla procedura di riavvio. Per ulteriori soluzioni relative a problemi tecnici, visitare: faq.archos.com... - Page 33 Soporte> Soporte postventa www.archos.com, haga clic en Soporte> Descargas> Declaración de conformidad Es posible que se necesiten dispositivos compatibles o/y servicios de suscripciones de pago para aprovechar al máximo su ARCHOS Hello 5. Garantía, legal y libro de Seguridad: www.archos.com/support/warranty.html...
- Page 34 Descripción de los botones de ARCHOS Hello 5 DC-in Punto de carga Micro SD ranura Micro USB puerto Altavoz Trasero...
- Page 35 Descripción de los botones de ARCHOS Hello 5 Encendido/Apagado Mic Silencio Cubierta Cámara Microfonos Volumen +/- 10. Camara Privacidad Puede ocultar la camar con la cubierta de la camara cover y desactivar el mic con el Mic silencio.
-
Page 36: Antes De Empezar
Antes de empezar Instalando tu ARCHOS Hello 5 1.Primero, conecte el cable de carga en el puerto de entrada de DC de ARCHOS Hello 5. 2.Conecte el cargador a un enchufe. Note:Su dispositivo funciona con baterías. Le aconsejamos que lo mantenga enchufado. - Page 37 Ajustes, y luego Seguridad. Escoja una pantalla de bloqueo. Carga inalámbrica para dispositivos compatibles con Qi Qi carga Para recargar su dispositivo compatible con Qi, inalámbrica colóquelo en el centro de la superficie de madera. El ARCHOS Hello 5 debe estar enchufado durante el proceso de carga.
-
Page 38: Resolución De Problemas
Reinicialice el dispositivo. Vaya a Ajustes > Copia de seguridad / restablecer > Restablecer datos de fábrica. Si por cualquier motivo no puede acceder a los ajustes, consulte nuestra página de preguntas y respuestas sobre el proceso de reinicialización. Para resolver cualquier incidencia técnica, no dude en visitar: faq.archos.com... -
Page 39: National Restrictions
Only for indoor applications Archos company (Contact adress : ARCHOS SA 12 Rue Ampère 91430 Igny France) declares that this device ARCHOS Hello 5 is in compliance with the essential requirements and other relevant provisions of directive 2014/53/EU: https://www.archos.com/products/conformity.html Par la présente, ARCHOS (adresse de contact : ARCHOS SA 12 Rue Ampère 91430 Igny France) déclare que l’appareil ARCHOS Hello 5 est conforme aux exigences essentielles et aux autres... - Page 40 Enjoy all Google services ! For more information, go to: Google Play https://www.android.com/play/ Youtube https://www.youtube.com/ Google Maps https://support.google.com/ Gmail https://support.google.com/mail Google Drive https://www.google.com/drive/ Google, Google Play, Android, and related marks and logos are trademarks of Google LLC.
- Page 41 After the laboratory measurements, when it is kept 0.5cm from your body the SAR values for this mobile are : Body Max:0.142W/Kg (10g)
- Page 43 PN: 116730...
Need help?
Do you have a question about the Hello 5 and is the answer not in the manual?
Questions and answers