Advertisement
Table of Contents
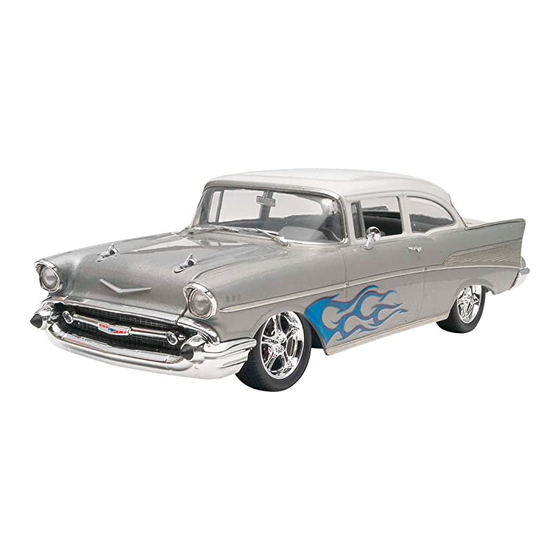
The 1957 Chevrolet
one of the most
®
popular and widely recognized cars in
history, and a true American classic.
With its great looks and easily hot rod-
ded V-8 engine, the 1957 Chevrolet
Bel Air
Two-Door Sedan is a hot rod-
®
der's and customizer's dream machine.
Your Revell model features a detailed
stock 283 cubic inch V-8 or 283 V-8
with custom valve covers, air clean-
er and alternator, optional stock or
lowered suspension, stock wheels
with white wall tires, custom five
spoke wheels or chrome wheels with
moon style hubcap and low profile
tires. Authentic
factory decal mark-
ings and interior panels plus cus-
tom flame graphics are also incuded.
* REPEAT SEVERAL TIMES
* OPTIONAL PARTS
* A REPETER PLUSIEURS FOIS
* PIECES EN OPTION
Read tHIS BeFORe YOU BeGIn
* Study the assembly drawings.
* Each plastic part is identified by a number.
* In the assembly drawings, some parts will be
marked by a star (★) to indicate chrome
plated plastic.
* For better paint and decal adhesion, wash
the plastic parts in a mild detergent solution.
Rinse and let air dry.
* Check the fit of each piece before
cementing in place.
* Use only cement for polystyrene plastic.
* Scrape plating and paint from areas
to be cemented.
* Allow paint to dry thoroughly before
handling parts.
* Any unused parts may be discarded.
decal applIcatIOn InStRUctIOnS
1. Cut desired decal from sheet.
2. Dip decal in water for a few seconds.
3. Place wet decal on paper towel.
4. Wait until decal is movable on paper backing.
5. Place decal in position on model, face up and
slide backing away.
6. Press out air bubbles with a soft damp cloth.
7. Milkiness that may appear is for better decal
adhesion and will dry clear. Wipe away any
excess adhesive.
8. Do not touch decal until fully dry.
9. Allow the decals 48 hours to dry before
applying clear coat.
nOte: decals are compatible with
setting solutions or solvents.
If you have any questions or comments, call our hotline at:
Revell Inc Consumer Service Department, 1850 Howard Street Unit A, Elk Grove Village, Illinois 60007
Be sure to include the plan number (85425100200), part number, description, your return address and phone number.
KIT 4251
'
57 cHeVY
®
* DECAL
* ALTERNATIVE ASSEMBLY
* DECAL COMANIE
* ENSEMBLAGE ALTERNATIVE
lIRe ce QUI SUIt aVant de cOmmenceR
* Etudier les schémas de montage.
* Chaque pièce en plastique est identifiée par un numéro.
* Sur les schémas de montage, certaines pièces sont
marquées d'une étoile (★) pour indiquer qu'elles sont en
plastique chromé.
* Pour une meilleure prise de la peinture et des autocollants,
laver les pièces en plastique avec une solution détergente peu
concentrée. Les rincer et les laisser sécher à l'air.
* Vérifier que chaque pièce s'ajuste bien avant
de la coller en place.
* N'utiliser que de la colle pour polystyrène.
* Gratter les parties à coller pour enlever le chrome et la peinture.
* Laisser la peinture bien sécher avant de manipuler les pièces.
* Toute pièce inutilisée peut être jetée.
dIRectIVeS d'applIcatIOn deS aUtOcOllantS
1. Découper l'autocollant désiré de la feuille.
2. Tremper l'autocollant dans de l'eau pendant quelques secondes.
3. Placer l'autocollant mouillé sur une serviette en papier.
4. Attendez que l'autocollant puisse être déplacé sur son
support en papier.
5. Mettre l'autocollant en position sur le modèle face sur
le dessus et faire glisser le support pour l'enlever.
6. Appuyer avec un chiffon doux humide pour éliminer les bulles d'air.
7. La substance laiteuse qui peut apparaître est destinée à
améliorer l'adhésion de l'autocollant et devient incolore au
séchage. Essuyer pour enlever tout excédent d'adhésif.
8. Ne pas toucher l'autocollant tant qu'il n'est pas bien sec.
9. Laisser l'autocollant sécher pendant 48 heures avant
d'appliquer une couche transparente.
RemaRQUe: les autocollants sont compatibles avec
les solutions de fixage ou les solvants.
or, please write to:
Visit our website: www.revell.com
Revell Inc Elk Grove Village, IL. Copyright © 2009. All rights reserved.
Bel aIR
tWO-dOOR Sedan
®
®
2' n 1
* CEMENT TOGETHER
* A COLLER
* REMOVE AND THROW AWAY
* A RETIRER ET JETER
this paint guide is provided to complete this kit as
shown on the box.
Ce guide de peintures est fourni pour reproduire le modèle
réduit qui apparaît sur la boîte.
Noir satiné
Semi Gloss Black
Gris mat
Flat Gray
Rouge brilliant
Gloss Red
Rouge De Moteur De Chevy
Chevy Engine Red
Pourpre métallisé brilliant
Gloss Purple Metallic
Aluminum
Aluminum
Argent
Silver
Acier
Steel
Blanc brilliant
Gloss White
Argent métallisé brilliant
Gloss Silver Metallic
(800) 833-3570
85425100200
* DO NOT CEMENT
* NE PAS COLLER
Advertisement
Table of Contents

Related Manuals for REVELL '57 CHEVY BEL AIR


Summary of Contents for REVELL '57 CHEVY BEL AIR
- Page 1 If you have any questions or comments, call our hotline at: or, please write to: Revell Inc Consumer Service Department, 1850 Howard Street Unit A, Elk Grove Village, Illinois 60007 Be sure to include the plan number (85425100200), part number, description, your return address and phone number.
-
Page 2: Engine Assembly
enGIne aSSemBlY CYLINDER HEADS RIGHT CHEVY ENGINE RED ENGINE HALF CHEVY ENGINE RED ALUMINUM ALUMINUM OIL FILTER LEFT ENGINE HALF SEMI GLOSS BLACK CHEVY ENGINE FRONT COVER CHEVY ENGINE OIL PAN DECAL CHEVY ENGINE DISTRIBUTOR ★369 CARBURETOR SEMI GLOSS BLACK COIL cUStOm CHROME... - Page 3 enGIne aSSemBlY cOntInUed cUStOm RIGHt SIde OF enGIne ★111 ALTERNATOR CHROME SEMI GLOSS BLACK STARTER FAN BELT SEMI GLOSS BLACK ALUMINUM PULLEY'S WITH SEMI GLOSS BLACK BELT ★370 FUEL PUMP cUStOm CHROME StOcK DECAL ★109 AIR CLEANER SEMI GLOSS BLACK CHROME AIR CLEANER TOP SEMI GLOSS BLACK...
-
Page 4: Front Chassis Assembly
FROnt cHaSSIS aSSemBlY StOcK cUStOm LEFT UPPER-A-ARM RIGHT SEMI GLOSS BLACK UPPER-A-ARM SEMI GLOSS BLACK LEFT UPPER-A-ARM SEMI GLOSS BLACK RIGHT CHASSIS UPPER-A-ARM SEMI GLOSS BLACK SEMI GLOSS BLACK StOcK STEERING GEAR BOX FIRSt SEMI GLOSS BLACK LOWER-A-ARM SEMI GLOSS BLACK FRONT SPRINGS SEMI GLOSS BLACK enGIne tO cHaSSIS... -
Page 5: Exhaust Assembly
exHaUSt aSSemBlY RIGHT EXHAUST ALUMINUM GAS TANK SEMI GLOSS BLACK LEFT EXHAUST ALUMINUM ReaR SUSpenSIOn aSSemBlY cUStOm StOcK REAR AXLE SPACERS 104A DIFFERENTIAL DIFFERENTIAL COVER SEMI GLOSS BLACK COVER SEMI GLOSS SEMI GLOSS BLACK BLACK REAR AXLE SEMI GLOSS BLACK REAR AXLE (PAINT DISK BRAKES STEEL WITH SEMI GLOSS BLACK... -
Page 6: Rear Shock Assembly
ReaR SHOcK aSSemBlY SHOCK SHOCK ABSORBER ABSORBER SEMI GLOSS SEMI GLOSS BLACK BLACK WHeel and tIRe aSSemBlY StOcK cUStOm WHITE WALL INSERT ★312 TIRE HUBCAP CHROME ★328 BABY MOON WHEEL CHROME INNER WHEEL SEMI GLOSS BLACK TIRE METAL INNER WHEEL SEMI GLOSS BLACK ReaR cUStOm... -
Page 7: Window Assembly
WIndOW aSSemBlY REAR WINDOW DOME LIGHT LEFT CLEAR CLEAR SIDE WINDOW ★367 REAR VIEW MIRROR CLEAR CHROME LEFT WINDSHIELD VENT WINDOW CLEAR CLEAR RIGHT SIDE WINDOW CLEAR RIGHT VENT WINDOW CLEAR BODY InteRIOR aSSemBlY FRONT SEAT TOP FLAT GRAY DECAL DECAL LEFT INTERIOR SIDE... - Page 8 FIReWall aSSemBlY FIREWALL SEMI GLOSS BLACK MASTER CYLINDER GUNMETAL daSHBOaRd aSSemBlY DECAL DECAL DASHBOARD LIGHT GRAY STEERING WHEEL LIGHT GRAY DECAL STEERING COLUMN LIGHT GRAY SEMI GLOSS BLACK ALUMINUM BOdY / InteRIOR / cHaSSIS aSSemBlY cOmpleted cOmpleted cHaSSIS InteRIOR Kit 4251 - Page 8...
-
Page 9: Front Assembly
RadIatOR aSSemBlY DECAL UPPER RADIATOR WALL RADIATOR HOSE SEMI GLOSS BLACK SEMI GLOSS BLACK RADIATOR GLOSS BLACK attacH lOWeR LOWER HOSe RADIATOR HOSE HeRe SEMI GLOSS BLACK FROnt aSSemBlY aIR cleaneR RIGHT LEFT HEATER BOX HALF HEATER BOX HALF OmItted FOR SEMI GLOSS BLACK SEMI GLOSS BLACK claIRtY... -
Page 10: Rear Assembly
FROnt aSSemBlY cOntInUed ★317 HEADLIGHT BEZEL CHROME HEADLIGHT LENS CLEAR RIGHT HORN SEMI GLOSS BLACK ★317 HEADLIGHT BEZEL LEFT HORN CHROME SEMI GLOSS BLACK HEADLIGHT LENS CLEAR ReaR aSSemBlY ★322 RIGHT TAILLIGHT SURROUND CHROME TAILLIGHT TRANSPARENT RED ★320 REAR BUMPER CHROME BACKUP LIGHTS ★321... -
Page 11: Hood Assembly
HOOd aSSemBlY ★314 HOOD ORNAMENT CHROME RIGHT HOOD HOOD HINGE SEMI GLOSS BLACK ★314 HOOD ORNAMENT CHROME ★316 HOOD "V" ORNAMENT CHROME LEFT HOOD HINGE SEMI GLOSS BLACK ★313 HOOD FRONT MOLDING CHROME FInal aSSemBlY ★365 ★366 ★363 LEFT RIGHT SIDE VIEW MIRROR WINDSHIELD WIPER WINDSHIELD WIPER... -
Page 12: Decal Placement
decal placement Kit 4251 - Page 12...
Need help?
Do you have a question about the '57 CHEVY BEL AIR and is the answer not in the manual?
Questions and answers