
Related Manuals for LX Navigation Colibri II


Summary of Contents for LX Navigation Colibri II
- Page 1 Colibri II Flight recorder and navigation instrument Manual version: 1.7 LX navigation d.o.o., Tkalska 10 SLO 3000 Celje, tel: + 386 3 490 46 70, fax: + 386 3 490 46 71 support@lxnavigation.si http://www.lxnavigation.si...
-
Page 2: Table Of Contents
SD Card ..............................14 Logger..............................15 I-record ..............................15 Event ..............................15 Warnings ..............................16 ENL ................................16 Display ..............................16 NMEA ..............................17 Password ..............................17 Flarm ............................... 17 Info ................................17 Colibri II – Flight recorder and navigation instrument Page 2... - Page 3 Flying with Colibri II ............................. 23 List of standard parts and options ......................24 Options ..............................24 Colibri II power and data interface ....................24 Optional mounting frame ........................24 Appendix ..............................25 Connection Flarm to Colibri II ......................... 25 Revision history ............................
-
Page 4: Introduction
When the battery is charging, a “plug” symbol appears in top right corner of main page as shown in the figure to the right. After battery is full, charging symbol disappear! Colibri II – Flight recorder and navigation instrument Page 4... -
Page 5: Controls
Note! There is no USB port carried out, this means no direct communication from the Colibri II to a PC via USB. It can only be used for external power in (5V max) and NMEA data out to external units. -
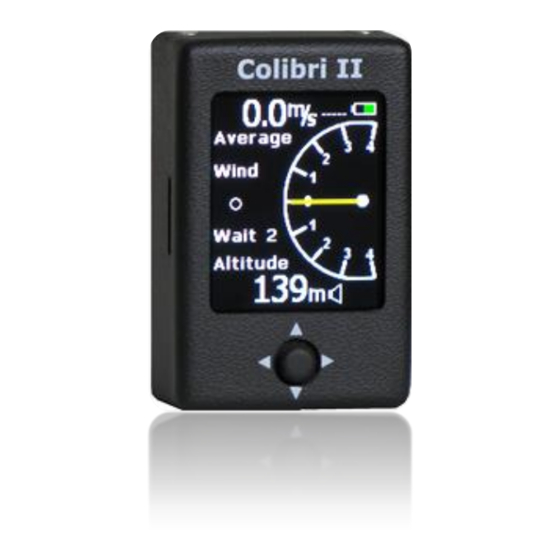
Page 6: Main Page
The numeric figures inside the circle show the current vario and the arrow shows wind direction. Buttons: Left -> setup page Right -> TP navigation page / Flarm radar page Up, down -> no effect Enter -> main page Colibri II – Flight recorder and navigation instrument Page 6... -
Page 7: Flarm Radar Page
Colibri II. Near gliders are displayed as yellow. All gliders located in radio range will be shown simultaneously on the display. On the top right corner the selected zoom is displayed. - Page 8 This unique ID may only be created when Flarm data is being received from the other unit There is space to store up to 50 unique IDs. These ID’s will be saved in the Colibri II for future flights. The procedure:...
-
Page 9: Tp Navigation Page
“Inside” word will be displayed on screen above TRK navbox. Pressing the up or down button changes the zoom. After pressing the Enter button the task edit function appears. Colibri II – Flight recorder and navigation instrument Page 9... -
Page 10: Task Tp Navigation Selection
Entering a task can be accomplished after the header transfer. Once the task has been prepared on the PC, it can be transferred via a new .hdr file on the SD card. Colibri II – Flight recorder and navigation instrument Page 10... -
Page 11: Gps Information Page
Buttons: Left -> GPS information page Right -> setup page Up, down -> moving up and down over logbook Enter -> flight options Colibri II – Flight recorder and navigation instrument Page 11... -
Page 12: Flight Options
This allows the pilot to use actual QNH data or elevation data. In fact the pilot should enter airfield elevation before takeoff if known. After correct input the Colibri II altimeter will show QNH altitude (above sea level) in both cases. -
Page 13: Vario
Under this sub setup page you can set units for vario (m/s, knots), altitude (m, ft), distance (km, nm, mi), speed (km/h, mph, kts), pressure (mbar, inHg), UTC offset to local time and format for GPS coordinates. Colibri II – Flight recorder and navigation instrument Page 13... -
Page 14: Sd Card
FORMAT: Will format your micro SD card and create all necessary folders. Important! If the TP file has more than 500 points only the first 500 will be transferred, the rest will be cut off. Colibri II – Flight recorder and navigation instrument Page 14... -
Page 15: Logger
IGC file (PEV marked records in the flight recorder). The interval parameter defines how often fixes will be recorded and the number of fixes defines for how long the additional fixes will be recorded after the PEV has been activated. Colibri II – Flight recorder and navigation instrument Page 15... -
Page 16: Warnings
Warnings The Colibri II will alert with an audible alarm when a preset altitude, based on QNH settings, is reached. A warning message will also be shown on the screen and the pilot is obliged to acknowledge the warning with the enter button. To turn altitude warning OFF, set altitude to minimum value and next value will turn the altitude warning to OFF. -
Page 17: Nmea
Baud Rate. The NMEA data is available through the USB connector on the unit. Note! NMEA data sent out of the Colibri II doesn’t match the RS 232 standard. So a level converter should be used. It is suggested to use the original LX Navigation power and data adapter. -
Page 18: Battery Information And Power Management
Acoustic beeps will alert user in the last 5 min with intervals on one minute. To abort automatic power down press any key. If the Colibri II power and data interface is used, the internal battery will recharge itself and then use the glider battery for Colibri II operation. -
Page 19: Flight Recorder Management
Flight evaluation To check the flight data integrity use the IGC shell program. IGC shell is an IGC freeware program specially designed to verify the flight record integrity. Use the latest LXN.dll file to validate Colibri II flights. Colibri II – Flight recorder and navigation instrument... -
Page 20: Igc File Structure
B0927294619153N02003304EA0006900093007000 B0927354619153N02003304EA0007000093007000 B0927414619153N02003304EA0007000093007000 G record is a digital signature, B0927474619152N02003304EA0007000091007000 ensures data integrity and is always B0927534619153N02003304EA0006900091007000 the last record of the flight. B0927594619152N02003304EA0006800091007000 B0928054619152N02003304EA0006800091007000 B0928114619152N02003304EA0006800093007000 B0928174619153N02003304EA0006800091007000 G33069178E3C800E8CE815DD7F0D6968983E2BC0F44C3DC20645F06CC9F78E84 GAF5B28F33E76C8DC5C105CB2B168472106BA50860B3DC93F72D9439C9B371975 G43221B Colibri II – Flight recorder and navigation instrument Page 20... -
Page 21: Baro Trace Check (Calibration)
NMEA data is sent at BR selected on SETUP/NMEA menu. The same rate is used for additional data in the LXWP format. Data exchange with 3 party units Colibri II is able to communicate with the units (programs) that are listed below. It is necessary to arrange the suitable cable connections. Unit Declaration... -
Page 22: Installation
Installation The installation process is simple due to the Colibri II HW configuration. If the unit will be used as a standalone flight recorder (using the internal battery only) no installation work will be necessary. In fact, the unit may be kept in a pocket or put anywhere in the cockpit. Due to its low weight some temporary installation methods such as adhesive tapes or velcro can be used. -
Page 23: Flying With Colibri Ii
*.hdr file from setup/SD card/load info. Check if the screensaver mode is on or off. If you wish to use the Colibri II as a logger only then the screen saver will extend battery duration for 3 hours. -
Page 24: List Of Standard Parts And Options
The unit has two plugs. On one side there is a standard USB A connector. Use the included USB cable to connect the Colibri II on this side. On the other side is an RJ45 plug. This plug is a standard IGC 6-pin connector. -
Page 25: Appendix
Appendix Connection of Flarm to Colibri II Colibri II – Flight recorder and navigation instrument Page 25... -
Page 26: Revision History
Changes based in FW v1.2 - Tp navigation on task is always to start point after takeoff. - Added Flarm display / radar as option when Colibri II is used together with Flarm system. - Pressure units can be changed under “SETUP->UNITS” from inHg to mbar.
Need help?
Do you have a question about the Colibri II and is the answer not in the manual?
Questions and answers