
Related Manuals for Oliver 1908

Summary of Contents for Oliver 1908
- Page 1 Walker, Michigan, U.S.A. 49534-7564 USER’S OPERATING AND INSTRUCTION MANUAL MODEL 1908 AUTOMATED PACKAGING SYSTEM 1908S20000CV...
-
Page 2: Table Of Contents
INDEX QUICK SPECS…...……………………...……………………………… PG. 1-2 INTRODUCTION AND DESCRIPTION………………………………. PG. 1-3 UNCRATING…………………………………………………………….. PG. 1-4 SAFETY..........……………………..………….. PG. 1-8 MACHINE PLACEMENT………………………………………..……… PG. 1-9 MACHINE COMPONENTS…………………………………………….. PG. 1-12 START-UP……………………………………………………………….. PG. 1-17 OPERATING PROCEDURE............. PG. 1-20 TECHNICAL SPECIFICATIONS............PG. 1-24 CLEANING AND MAINTENANCE....…....…... PG. 1-26 TROUBLE SHOOTING........…......….. -
Page 3: Quick Specs
QUICK SPECS Weight 300 lbs Overall Dimensions 30” W x 64” L x 50” H Loading Station 3 tray carriers Electrical 1 phase, 60 hz, 115 VAC, 15 amps Air Supply 90 psi ± 10 psi Air Connector Size ¼” Air Compressor: Electrical 1 phase, 60 hz, 115/230 VAC,... -
Page 4: Introduction And Description
The machine can be operated with a 120 V.A.C. outlet. The Model 1908 is an automated system capable of producing a high volume, but it is easy to operate and requires minimal space. - Page 5 Recipient’s location and not at the Shipper’s Location. Remove the tie-downs that hold the Trays from moving. Cut bands that hold the 1908 Machine and the Air Compressor on the skid. Lift the Air Compressor and then the Machine off the skid in a safe manner.
-
Page 6: Safety
Improper installation or operation of this equipment may cause injury to personnel or damage to equipment. · Before operating the OLIVER Model 1908 Lidder read through this manual. Never allow an untrained person to operate this machine WARNING ·... -
Page 7: Machine Placement
MACHINE PLACEMENT AND UTILITIES MODEL 1908 Decide on a suitable location for the machine. This location should have ample room to work around all sides of the machine. Once the machine is in the location where it will be used, the brakes on the casters should be locked by stepping down on the brake locking lever. - Page 8 3/8” ID air hose that needs to be connected between the air compressor and the Model 1908. This air hose has quick-disconnect fittings at both ends for easy connection and disconnection. Pull the collar back on the female portion of the quick- disconnect fitting and then push the female portion onto the male portion and release your hand.
- Page 9 Air Compressor Continued The air compressor has been factory set. If for some reason the settings are not correct, the following procedure should be followed to set the output pressure from the compressor. The gage shown below should be set at 80 PSI. This is accomplished by turning the knob on the regulator clockwise to increase pressure or counter clockwise to decrease pressure.
-
Page 10: Machine Components
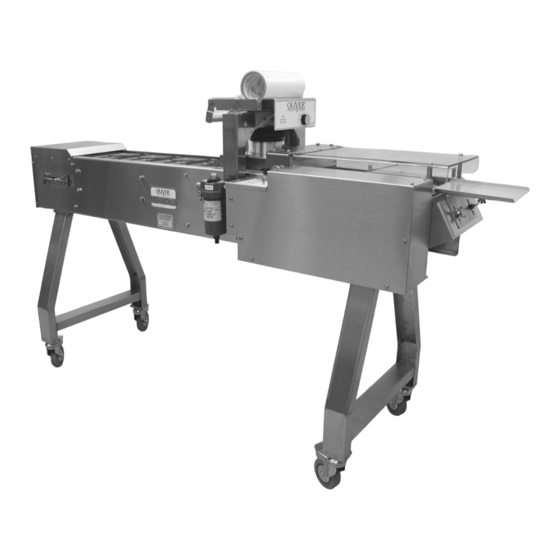
MACHINE COMPONENTS Before proceeding further, take a moment to familiarize yourself with the identification of the machine components as shown in the illustrations below. HEAT SEAL DWELL TIMER FILTER FILTER OK / REPLACE REPLACEMENT LABELS INDICATOR FILTER BRACKET 11/12/09 1908S20001... - Page 11 ON/OFF KNOB PULL UP TO START PUSH DOWN TO STOP SPEED ADJUSTMENT-TURN LOCKING NUT CLOCKWISE TO SLOW DOWN TURN COUNTER CLOCKWISE TO SPEED UP 11/12/09 1908S20001 1-10...
- Page 12 RUBBER GASKET TRAY CARRIER DRIVE SPROCKET CUTTER BLADE CUTTER ASSEMBLY 11/12/09 1908S20001 1-11...
- Page 13 DISCHARGE TABLE THESE WING NUTS ALLOW FOR MOVING THE DISCHARGE TABLE IN AND OUT TO CLEAR THE TRAY CARRIERS WING NUTS LOOSEN TO ADJUST TABLE UP OR DOWN TAKE-UP DEVICE ADJUSTMENT SCREW LOCKING NUT 11/12/09 1908S20001 1-12...
-
Page 14: Start-Up
START-UP To turn the machine on, plug in the power cord. Wait 30 minutes to allow the heated platen to reach operating temperature. At this time, turn on the air compressor so it can fill the storage tank with compressed air. The machine has been shipped from the factory with the speed set at approximately 7 to 10 trays per minute. - Page 15 Test both sides of the lid. The rough or tacky side of the lid will be the adhesive side. The film supplied by Oliver Products Company is wound with the adhesive side toward the inside of the roll. If the film is loaded in accordance with the “FILM FEED”...
- Page 16 ON/OFF KNOB PULL UP TO START PUSH DOWN TO STOP 11/12/09 1908S20001 1-15...
-
Page 17: Operating Procedure
To operate the Model 1908, plug in the power cord. Wait 30 minutes to allow the heated platen to reach operating temperature. Turn on the air compressor. - Page 18 NOTE · Never run the machine with trays and no film. Doing so can possibly cause a jam because the trays can stick to the heated platen and be pulled out of the tray carriers. 4. Pull the black palm button up to start the machine running. After a few trays come out of the machine, stop and check to see that the seals are acceptable.
- Page 19 The discharge table on the Model 1908 has a height adjustment. The discharge table should be set at the proper height so that the bottoms of the trays are just slightly above it as they leave the tray carriers.
-
Page 20: Technical Specifications
7. At the end of the day, unplug the Model 1908 from the wall outlet. This is the only way to turn off the machine. NOTE · IT IS NOT RECOMMENDED TO LEAVE THE MACHINE PLUGGED IN WHEN IT IS GOING TO BE OUT OF OPERATION FOR AN EXTENDED PERIOD OF TIME. - Page 21 Machine Dimensions 64” 45” 34” 17” 11/12/09 1908S20001 1-20...
- Page 22 Air Compressor Weight: 60 LBS. Electrical: 115 VAC, 15 Amps, Single Phase, and 60 Hz Length of Air Hose: 70 Ft. Air Hose I.D.: 3/8” Air Connector Size: ¼” NPT Oil: Use a full synthetic motor oil like Mobil-1 10w -30 NOT USE REGULAR AUTOMOTIVE OIL SUCH AS 10W-30 Air Compressor Dimensions 11/12/09...
-
Page 23: Cleaning And Maintenance
CLEANING AND MAINTENANCE Disconnect the power from the Model 1908 and allow the unit to cool before cleaning. The tray carriers should be removed and cleaned daily. It is better to remove them for cleaning rather than trying to clean them in the machine. The tray carriers can be placed in your dishwasher for cleaning if you desire. - Page 24 REMOVING TRAY CARRIERS NOTE · These cleaning recommendations are not meant to replace or supersede plant- standard manufacturing procedures or regulatory requirements. · If the machine has been operating, allow the unit to cool before cleaning. CAUTION · CAUTION HOT: The heater cover and upper platen are very HOT! Care must be taken to protect yourself and others.
- Page 25 · Make sure the unit has been unplugged from power. Clean the OLIVER Model 1908 Lidder with a with mild cleaner or sanitizing solution and a damp cloth. It is important that the surface of the heated platen be kept clean and smooth.
- Page 26 NOTE · The use of plastic or soft-metal scouring pads such as Scotch Brite® or Chore Boy® brands provide a safe and effective means of cleaning the cutter assembly. Wipe all surfaces with a sanitizing agent after cleaning. Once a month the conveyor chains should be lubricated with vegetable oil such as cooking spray.
- Page 27 ADJUSTING SCREW LOCKING NUT 11/12/09 1908S20001 1-26...
-
Page 28: Troubleshooting
TROUBLESHOOTING There are no user serviceable parts on your OLIVER Model 1908 Lidder except for the cutter blade. Should you experience problems with your machine call the Oliver Products Company 24 Hour Emergency Service number @ 1 800-253-3893. Please have the serial number of your machine available to give to the Customer Service representative. - Page 29 SYMPTOM CORRECTIVE ACTION Poor seal quality Verify that the platen is heated by placing your hand near the platen and try to detect if there is heat radiating out from it-DO NOT TOUCH THE PLATEN Check to see if the platen is dirty Check rubber gasket on tray carriers for damaged or missing pieces Check to see that the film is centered on the tray...
- Page 30 MECHANICAL REPLACEMENT PARTS LIST EXPLODED VIEW (FRAME) For Service Parts Call Oliver Products @ 800-253-3893 3/31/09 1908S2003...
- Page 31 WASHER - #10 STST SPRING LOCK 5851-9355 STRIP CARRIER SUPPORT 1908-0024 SCREW - HEX HD 3/8 - 16 5843-1052 WASHER – FLAT 3/8” 5851-9306 STRIP – WEAR 48.5 LONG 1908-0052 For Service Parts Call Oliver Products @ 800-253-3893 3/27/09 1908S20003...
- Page 32 LEG SENIOR MEAL UNIT 1908-0027 NUT – HX FULL 1/4 -20 5832-0520 SCREW – HEX HD 1/4 -20 5843-1005 WASHER – LOCK 1/4 “ STST SPRING 5851-9357 CASTER – STEM, 4” WHEEL 5902-2409 For Service Parts Call Oliver Products @ 800-253-3893 3/27/09 1908S20003...
- Page 33 MECHANICAL REPLACEMENT PARTS LIST EXPLODED VIEW (ARCH & HEATER PLATEN) 3/27/09 1908S20003...
- Page 34 SPRING AIR ACTUATOR 5143-2002 O-RING 6909-3113 SCREW HEX HD 3/8-16 5843-1061 WASHER - 3/8 SPRING LOCK 5851-9359 PUSHER – SPACER HEATER PLATEN 1508-0018-3 PIN SPRING SUPPORT 1908-0123 SPRING TENSION 7024-4104 For Service Parts Call Oliver Products @ 800-253-3893 3/27/09 1908S20003...
- Page 35 SPACER FILM DISPENSER 1508-0016-1 ROD FILM DISPENSER 1908-0043 TUBE 4639-1414-1115 BEARING ROLL END 5252-3002 RING RETAINER (G) 5840-1273 ROLLER FILM GUIDE 1908-0041 BRACKET FILM TAKEUP ROLLER 1908-0163 SEE NEXT LAYOUT ------------- For Service Parts Call Oliver Products @ 800-253-3893 3/27/09 1908S20003...
- Page 36 MECHANICAL REPLACEMENT PARTS LIST EXPLODED VIEW (CUTTER & DISCHARGE) For Service Parts Call Oliver Products @ 800-253-3893 3/27/09 1908S20003...
- Page 37 1808-0071 STRIP BACKER 1908-0031 BEARING SINT BRZ FLNG FB812-4 5254-3110 COVER CUTTER 1908-0032-001 BRACKET SIDE CUTTER – RH 1908-0065-0001 BRACKET SIDE CUTTER – LH 1908-0065-0002 RETAINER FRONT BUSHING W/TAB 1908-0066-1001 For Service Parts Call Oliver Products @ 800-253-3893 3/27/09 1908S20003...
- Page 38 BASE LIFT TRAY GUIDE 1908-0089 RETAINER- LIFT RAMP INSIDE 1908-0084 KNOB KNRLD - 1/4 – 20 5911-7024 COVER BOTTOM DRIVE 1908-0047 SUPPORT SHELF 69042 ADJUSTABLE GUIDE SHELF 69043 LIFT SENIOR MEALS TRAY 1908-0088 For Service Parts Call Oliver Products @ 800-253-3893 3/27/09 1908S20003...
- Page 39 MECHANICAL REPLACEMENT PARTS LIST EXPLODED VIEW (PLATEN) 327 329 For Service Parts Call Oliver Products @ 800-253-3893 3/27/09 1908S20003 3-10...
- Page 40 SCREW – STST PN HD SLOTTED M3.5 8843-2261 INSULATOR – PUSHER SILICONE 6516-0070 SCREW RND HD 6-32 STST 5843-5211 WASHER - #6 FLAT STST 5851-9300 SPRING BRACKET PLATE 1908-0265 SPACER - PLATEN 1908-0266 For Service Parts Call Oliver Products @ 800-253-3893 3/27/09 1908S20003 3-11...
- Page 41 PLATE – HEATER 115V 1908-0264 ELECTRICAL ENCLOSURE BRACKET 1908-0268 SCREW HEX HD 10-24 STST 5843-1231 WASHER #10 STST SPRING LOCK 5851-9355 NUT – HEX MACHINE # 10-24 STST 5832-0578 For Service Parts Call Oliver Products @ 800-253-3893 3/27/09 1908S20003 3-12...
-
Page 42: Electrical
ELECTRICAL 11/10/09 1908S20050... -
Page 43: Pneumatic
PNEUMATIC DIAGRAM 11/10/09 1908S20051... -
Page 44: Warranty
Oliver Packaging & Equipment Company warrants that if any part of the equipment (other than a part not manufactured by Oliver Packaging & Equipment) proves to be defective (as defined below) within one year after shipment, and if Buyer returns the defective part to Oliver Packaging &... -
Page 45: Warranty Procedure
4. The service dealer will then complete an invoice and send it to the Customer Service Department at Oliver Packaging & Equipment Company. 5. The Customer Service Manager of Oliver Packaging & Equipment Company will review the invoice and returned parts, if applicable, and approve for payment. -
Page 46: Returned Parts Policy
This policy applies to all parts returned to the factory whether for warranted credit, replacement, repair or re-stocking. Oliver Packaging & Equipment Company requires that the customer obtain a Return Material Authorization (RMA) number before returning any part. This number should appear on the shipping label and inside the shipping carton as well.
Need help?
Do you have a question about the 1908 and is the answer not in the manual?
Questions and answers