
Subscribe to Our Youtube Channel
Related Manuals for Watts Clever EW4008


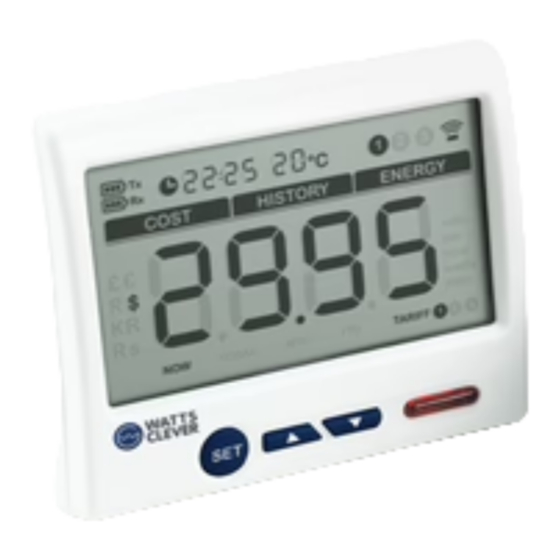
Summary of Contents for Watts Clever EW4008
- Page 1 °C WIRELESS Energy Monitor Monitor household electricity use Instruction Manual EW4008...
- Page 2 Welcome Notes on Safety The Watts Clever WIRELESS Energy Monitor helps you conserve electricity by Caution showing you how much you use, and what it costs, as you use it. This feedback will help you take steps to reduce your energy consumption and save money.
-
Page 3: Table Of Contents
Contents Contents of the box Thank you for your purchasing WIRELESS Energy Monitor. Please verify that Contents of the box your package contains all of the components shown below. Parts If any item is missing. Please contact your reseller immediately. Setup 1 Full LCD Display Layout 2 Settings before start... -
Page 4: Parts
Parts Setup 2 Settings before start Pairing hole Wall Sticker You have to finish below required settings before you start to use, other- Display LED light wise the Energy Monitor will not work probably. The required settings will finish the settings for YEAR MONTH TIME... - Page 5 Setup Setup Press [ button1] to confirm and you will see that the hundred - digit Press the [ button1] shortly and operate the same way as for the of the year begins to flash. YEAR setting to finish the setting of the month value (range 01 - 12). Do the same way until you set the correct value of the last single - digit.
- Page 6 Setup Setup Step 5 • Setting Mode - Setup for the TIME Step 6 • Setting Mode - Setup for the VOLTAGE After you press [ Down button3] to confirm the setting of DAY and then After you press [ Down button3] to confirm the setting of TIME and then will enter into voltage setting interface, where you will find three dashes to...
- Page 7 Setup Setup Step 7 • Setting Mode - Setup for the CURRENCY Press the [ button1] shortly to enter the location setting of decimal point. Use the [ button2] or [ Down button3] to adjust the deci- After you press [ Down button3] to confirm the setting of VOLTAGE and mal point to the correct location, and press the [...
- Page 8 Setup Setup Press the [ button1] shortly, the hour value of the clock will flash. Step 9 • Complete Setting Mode of Energy Monitor Use the [ button2] or [ Down button3] to adjust to the correct hour To modify, please press the [ button1] again to restart the setting (range: 00-23).
-
Page 9: Pairing
Setup Setup 3 Pairing When the pairing is successfully finished, the antenna icon stops flash- ing and stays on the top right corner of the LCD screen. The paired LCD Step 1 • Prepare for Energy Monitor screen will return to the COST Mode (as Fig. 14). In case the Power Trans- mitter begins to send data, the COST Mode will show the data accordingly. -
Page 10: Installation Of The Power Transmitter
Setup 4 Mode of Energy Monitor 4 Installation of the Power Transmitter 1 COST Mode You may choose to put the Power Transmitter in a dry place near the moni- The COST Mode is what the user usually sees from the LCD screen of the tored object or stick the Power Transmitter on the wall near the monitored Energy Monitor. -
Page 11: Energy Mode
4 Mode of Energy Monitor 4 Mode of Energy Monitor 2 ENERGY Mode 3 ENERGY HISTORY Mode From the COST Mode, shortly press the [ button1] ONCE to switch From the COST Mode, press the [ button1] 2 TIMES to switch to the to the ENERGY Mode (as Fig. -
Page 12: 23 4 Cost History Mode
4 Mode of Energy Monitor 4 Mode of Energy Monitor 4 COST HISTORY Mode Energy consumption data of a specific day To view the energy consumption data of an exact day, from the ENERGY From the COST Mode, shortly press the [ button1] 3 TIMES to switch... -
Page 13: Reset Of Energy Monitor
4 Mode of Energy Monitor Reset of Energy Monitor Resetting and Data Clearance Cost data of a specific day To view the cost data of an exact day, from the COST HISTORY Mode, To clear the history data (resetting), please follow the instruction as follows: press the [ button2] for about 3 seconds until the display enter into the history date input interface (as Fig. -
Page 14: Buzzer Mode Of Energy Monitor
Reset of Energy Monitor Buzzer Mode of Energy Monitor Buzzer Mode Step 3 • After the LED light flashes, release the [ button2] and [ Down button3]. The LCD screen will display the programming version (as Fig. 27). From the COST Mode, press the [ button2] and [ Down button3] at the... -
Page 15: Rj45-Usb Data Cable And Software
RJ45-USB Data Cable and Software Tips for use RJ45-USB Data Cable and Software Find out the electric power of your country The RJ45-USB Data Cable and the software allow you to view your electricity Afghanistan, Albania, Angola, Argentina, Armenia, Azerbai- consumption data on your computer. -
Page 16: How Electricity Is Measured
Now, WIRELESS Energy Monitor is ready to work for Tips for use you. How electricity is measured Feedback on your electricity consumption will help you change your energy habits, resulting in lower electricity bills. Many household have saved up to Power is the ability to do work. - Page 17 +852 2815 6700 Power Transmitter • 90.5 (L) x 72 (W) x 44.5 (H) mm www.wattsclever.com Operating range • 80 - 265V © 2011 Watts Clever Wireless transmission • 433 MHz SRD band (International) Limited Maximum rated sensor current • 100A All Rights Reserved Min current sensitivity •...
Need help?
Do you have a question about the EW4008 and is the answer not in the manual?
Questions and answers