Table of Contents
Advertisement
Advertisement
Table of Contents

Related Manuals for Auto Vox X2


Summary of Contents for Auto Vox X2
- Page 1 AUTO-VOX X2 Stream Media Mirror Dash Camera...
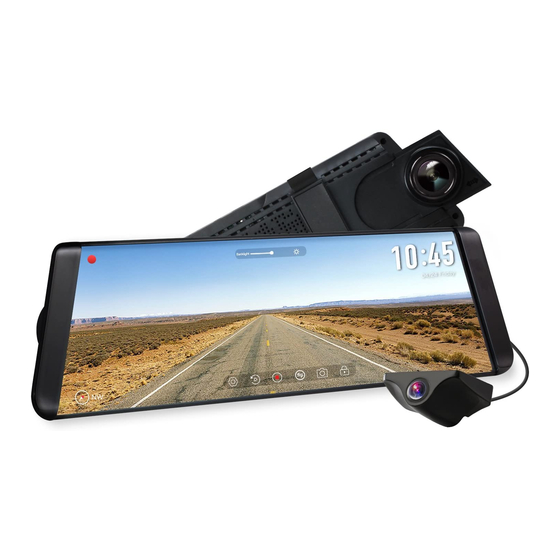
- Page 3 Introduction Auto-Vox X2 Stream Media Mirror Dash Cam contains a 9.88’’ LCD touch-sensitive screen. All operations could be easily done by swiping your fingers. Dual Lens Recording and Lane Departure Warning System makes it much more applied than the common dash cam does. No-damage straps make the installation a piece of cake.
-
Page 4: Table Of Contents
TABLE OF CONTENT Chapter 1 Chapter 3 Precautions.............. Monitor installation..........Warning..............Charger connection..........Warranty..............Wire connection step..........Testing..............Chapter 2 Wire Routing............Main Features............Chapter 4 Monitor Description..........Touch Screen Interface Guide......... Technical specification........... Menu Operation............Chapter 5 Functions..............Troubleshooting............ -
Page 5: Chapter 1 Precautions
AUTO-VOX reserves the right to amend the warranty contents without prior notice. Note: 1. AUTO-VOX shall not be liable for any damages which exceed the express warranty, including incidental, special or consequential damages, or lost of anticipated profits or benefits. -
Page 6: Chapter 2 Main Features
Chapter 2 Main Features Monitor • 9.88” LCD touch-sensitive screen mirror • In-built 1296P front view camera • OEM look • No-damage installation Backup Camera • 720p resolution • 140 degrees viewing angle • IP 68 Water-proof • Digital high-definition processor GPS Antenna •... - Page 7 Car Charger • Plug and use • 12V convert to 5V power supply • Provide power immediately User Manual • Friendly user manual provides detailed information about installation AUTO-VOX X1 Stream Media Mirror Dash Camera...
-
Page 8: Monitor Description
Monitor Description TF card slot AV(backup cam) USB(power port) Power GPS port Reset slot Camera LCD display screen Note: FUNCTIONS Power: press once ,enter into screen saver; press the button twice, close the screen; press more than 3 seconds, turn off the monitor. UVC: Connect the backup camera for image transmission GPS Port: For GPS Antenna connection Reset Slot: Reset the mirror... -
Page 9: Touch Screen Interface Guide
WIRING AT A GLANCE To reversing light +12V GPS port USB(power port) AV(backup cam) GPS port Car Cigarette Lighter Touch Screen Interface Guide Menu&Setting: Touch and enter to set the screen (Note: You need to pause recording before entering into menu.) Video/Photo Playback: Playback video&photo Start/Stop video: Record and save every precious moment Rear view/Front view switchable: Switch between front view&... -
Page 10: Menu Operation
Photograph: Take photos in one moment Emergency Lock: Lock the Video as SOS file(will not be covered by Loop-recording) Menu Operation Storage Space • Display Total Memory/Available Memory/TF card format LDWS • Lane Departure Warning System Speed Mode • mph and km/h optional Driving Mode •... - Page 11 Date&Time • Date and Time setting Resolution • 1080P(default)/1296P optional Loop Recording • 1min/2min/3min fragment available G-Sensor • Low/OFF/HIGH sensitivity optional Parking Mode Sensitivity • LOW/OFF/HIGH Sensitivity optional VOLUME • LOW/MED/HIGH Volume optional LCD Brightness • Manual/Auto LCD brightness adjustable Sound Record •...
-
Page 12: Functions
Language • English,korean,Russian,German,French,Japanese Parking Line • Select "ON" if you need guide line GPS Info • Display GPS signal strength and location information About Car DVR • Display Car DVR information : Model number , SW version , Firm , Website Reset Setup •... - Page 13 Driving Mode The dual dash cam X2 offers Driving Mode to make sure the screen function as rear view mirror to secure your drive. Default OPEN, turn off in Driving Mode selection.
- Page 14 Parking Mode Parking mode only applies to parked vehicles with constant power supplied. When the DVR detects any collision, it will start recording for a short period of time. This feature is very useful if you want to use DVR to record what happens to your vehicle while it is parked.
- Page 15 Delete/Lock Files Select “OK” to delete and lock files Date&Time Setting a.GPS auto setting time When the GPS auto setting time is on, you can set the time zone according to your location. The product will set time automatically. Note: When the GPS auto setting time is off, you can set date and time manually...
- Page 16 Format b.Set date a.Select Storage Space in Menu c.Set time d.Set time zone...
- Page 17 TF Card and complete! Note:Do not remove or insert TF card when dual dash cam X2 is powered on or when the format isn’t completed because it may damage the TF card. Since our product does not include a TF card, the TF card must be optionally purchased .Suggested Capacity: Class 10, 64GB-128GB.
-
Page 18: Monitor Installation
Chapter 3 Installation Monitor installation Step 1: Attach one side of the buckle Step 2: Press the bandage to make it closer and attach another side of the buckle. Step 3: Adjust the angle, cover the OEM mirror and done! Step 1 Step 2 Step 3... - Page 19 INSTALLING BACKUP CAMERA ABC123 Step1 Loose the screws on the license plate with wrench. Step1 Find a best location and make a mark. Step2 Install the camera bracket behind the license plate. Step2 Drilling a hole and threading ABC123 Step3 Tear off the film A of the 3M adhesive and fix it to the marked Step3 Remove the bracket B and stick the 3M tape to backup camera...
-
Page 20: Wire Connection Step
WIRE CONNECTION STEP 1. Connect the red wire to the reverse light(positive). 2. Open the inner plastic panel and remove it from the hatch or tailgate.(The panels are usually attached to the tailgate by clips. It may take a bit longer to avoid clip damages. Once the panel is removed, the work will be done easily) 3. -
Page 21: Testing
WIRE ROUTING Please route the video cable as the picture below Attach rearview mirror Install rearview camera Connect reversing light... -
Page 22: Technical Specification
Chapter 4 Technical specification Mirror Screen Size 9.88-inches Supply Voltage DC 5-5.5V Resolution 1080P,1296P Video H.264 1296P@30fps+720P@25fps Battery In-built Polymer lithium ion battery Loop Recording 1/2/3min fragment optional Front View Camera Included TF Card 64GB-128GB,Class 10(not included) Operating Temperature -20-70 centigrade Storage Temperature -40-80 centigrade... - Page 23 G-sensor Support GPS Tracking Playback Support Lane Departure Warning System Support Audio Recording Support Parking Line Support Parking Mode Support Photography Support Playback Support Dual Lens Record Support Automatic when plug USB charger to cigarette lighter or press on/off button powered by Power Mode in-built lithium battery...
- Page 24 Front View Camera Viewing angle 140 degrees Aperture Size F2.2 Len Focus Type Adjustable Processor High-definition HD image processor Pixel 4.0million Backup Camera Viewing Angle 140 degree Input frequency 54MHz/27MHz/84.25MHz Lens Sensor Size Water-Proof IP68 Waterproof 1/3 inch Working Temperature -20-70 centigrade Lens Focus Type Fixed...
-
Page 25: Chapter 5 Troubleshooting
Chapter 5 Troubleshooting Video recording/photography unavailable 1. Check if TF Card inserted or not. 2. Low TF card class, please insert a high class TF card(class10,etc.) 3. If the solutions mentioned above do not help, the TF card may be broken, please replace a new one. Unable to playback 1. - Page 26 1. Check and see if there is power supply issue, if not, please try turn on/off manually. 2. Reset or restore the dash cam. Note: If the trouble shooting instruction does not offer enough help to solve your issues, please feel free to contact our after-sales service department at service@auto-vox.com. Thanks for your trust to AUTO-VOX.
- Page 27 Ver-1.0...
- Page 28 Email: service@auto-vox.com...
Need help?
Do you have a question about the X2 and is the answer not in the manual?
Questions and answers