
Related Manuals for Nonin PalmSAT 2500A VET


Summary of Contents for Nonin PalmSAT 2500A VET
- Page 1 Operator’s Manual ® PalmSAT Model 2500A VET Veterinary Pulse Oximeter with Alarms English...
- Page 2 MPS, Medical Product Service GmbH Borngasse 20 D-35619 Braunfels, Germany References to “Nonin” in this manual shall imply Nonin Medical, Inc. Nonin and PalmSAT are registered trademarks or trademarks of Nonin Medical, Inc. ® ® Microsoft and Windows are registered trademarks of Microsoft Corporation.
-
Page 3: Table Of Contents
Contents Indications for Use ..................1 Warnings ........................ 1 Cautions ......................... 2 Guide to Symbols ..................4 Displays, Indicators, and Controls............... 6 Displays ........................6 Display ...................... 6 Pulse Rate Display....................6 Indicators ........................ 7 Pulse Quality LED Indicator ................7 Low Battery LED Indicator .................. - Page 4 Contents (Continued) Calendar and Clock Settings.................21 Care and Maintenance .................22 Alarms ......................23 High Priority Alarms ....................23 Medium Priority Alarms ..................23 System Fault Alarms .....................24 Memory Functions ..................25 Data Collection......................25 Memory Playback....................25 Communications ..................26 Serial Output ......................26 Connecting the Device into a Medical System ............27 Service, Support, and Warranty..............28 Service and Support....................28 Warranty........................28...
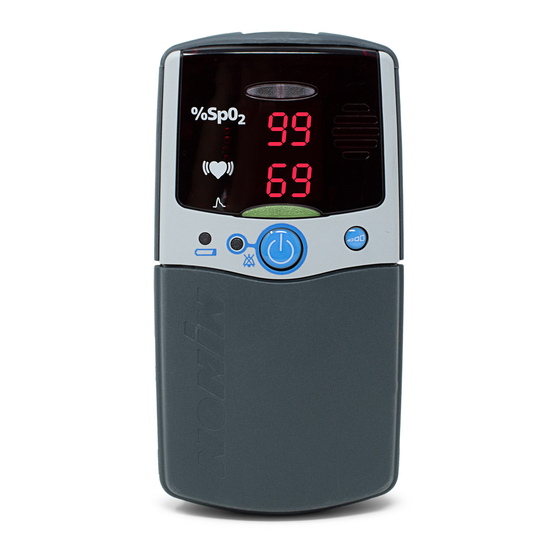
- Page 5 Figures Figure 1. Model 2500A VET - Front View..............6 Figure 2. Model 2500A VET - Rear View ..............11 Figure 3. Installing Batteries..................11 Figure 4. Connecting the Sensor................13 Figure 5. Small Lingual Clip Placement ..............15...
- Page 6 Tables Table 1. Symbols ....................... 4 Table 2. Adjustable Parameters and Settings............17 Table 3. Alarm Limits and Volume Settings ............. 19 Table 4. High Priority Alarms ................... 23 Table 5. Medium Priority Alarms................24 Table 6. Pulse Oximeter Sensor Connector Pin Assignments......... 26 Table 7.
-
Page 7: Indications For Use
Indications for Use Indications for Use ® The Nonin Model 2500A VET PalmSAT Veterinary Pulse Oximeter with Alarms is indicated for use in measuring and displaying functional oxygen saturation of arterial hemoglobin (SpO ) and pulse rate for animals. The device is intended for continuous monitoring and/or spot-checking of animals during both motion and no-motion conditions, and for animals who are well or poorly perfused. -
Page 8: Cautions
Verify that all visible indicators illuminate and that an audible indicator sounds during the startup (initialization) sequence. If any indicator is not lit or the audible indicator does not sound, do not use the device. Contact Nonin Technical Service for assistance. - Page 9 EN 60950, IEC 62368-1, or UL1950 for data-processing equipment. This device is a precision electronic instrument and must be repaired by trained Nonin personnel only. Field repair of the device is not possible. Do not attempt to open the case or repair the electronics. Opening the case may damage the device and void the warranty.
-
Page 10: Guide To Symbols
Guide to Symbols Guide to Symbols This table describes the symbols that are found on the Model 2500A VET system or packaging. Detailed information about functional symbols can be found in “Displays, Indicators, and Controls.” Table 1: Symbols Symbol Description CAUTION! Consult Instructions for Use. - Page 11 Guide to Symbols Table 1: Symbols (Continued) Symbol Description Storage/Shipping Temperature Range RoHS Compliant (China) Display Symbols %SpO 2 %SpO Display Pulse Rate Display Pulse Quality LED Low Battery LED Alarm Silence LED Front Panel Buttons On/Off Advance...
-
Page 12: Displays, Indicators, And Controls
Displays, Indicators, and Controls Displays, Indicators, and Controls This chapter describes the displays, indicators, and controls (figure 1) for the Model 2500A VET. Pulse Oximeter Alarm Bar LED Sensor (Bicolor) Connector Speaker Display Pulse Quality LED Indicator (Tricolor) Pulse Rate Display Advance Button Low Battery... -
Page 13: Indicators
Displays, Indicators, and Controls Indicators Pulse Quality LED Indicator Located above the On/Off button, this tricolor indicator blinks once for each detected pulse and changes color with the pulse strength signal: • Green indicates a good pulse strength. • Amber indicates a marginal pulse strength. To improve signal quality, reposition the sensor, try a different sensor type, eliminate animal movement, or improve the site’s circulation. -
Page 14: Controls
Displays, Indicators, and Controls Controls On/Off Button This button turns the device on and off. During Setup mode, this button selects the value of a setting and advances to the next setting. Advance Button During normal operation, this button allows the user to adjust the volume or review settings. -
Page 15: Introduction
This simple method gives the user a pulse-by-pulse visual indication of waveform signal quality without requiring the user to perform complex waveform analysis. The Model 2500A VET pulse oximeter may be used with a variety of Nonin-branded veterinary oximeter sensors. -
Page 16: Batteries
Introduction Batteries CAUTION: Use only Nonin-specified battery types with this device. CAUTION: Do not use fully charged and partially charged batteries at the same time. This may cause the batteries to leak. The Model 2500A VET can be powered by either 4 AA-size alkaline batteries or the optional Model 2500B Rechargeable NiMH (Nickel Metal Hydride) Battery Pack. -
Page 17: Installing Batteries
“Troubleshooting.” CAUTION: Replace batteries within 30 seconds to avoid losing settings (date, time, and data stored in memory) or corrupting data. See Accompanying Documents NONIN MEDICAL, INC. PLYMOUTH, MN USA MODEL 2500A VET 4 X 1.5V AA PULSE OXIMETER IEC LR6... -
Page 18: Important Notes About Battery Use
Introduction Important Notes about Battery Use Four AA alkaline batteries provide the device with approximately 60 hours of continuous operation. The rechargeable NiMH battery pack provides approximately 40 hours of continuous operation. Clock/calendar settings can significantly affect battery storage life. Batteries drain during storage, but they drain much more quickly when the clock/calendar functions are set. -
Page 19: Using The 2500A Vet Pulse Oximeter
Using the 2500A VET Pulse Oximeter Connecting the Sensor Connect the pulse oximeter sensor (with the Nonin logo facing up) to the top of the device (figure 4). Ensure the sensor is firmly plugged in. Refer to “Sensor Placement” or to the specific sensor package insert for pulse oximeter sensor positioning information. -
Page 20: Monitoring
• Transflectance Sensor (2000T) – Suitable for placement on the underside, base of the tail (near the anal orifice) of a dog. Nonin’s veterinary sensors are reusable. Clean them with a mild detergent. Allow enough time for the sensor to dry thoroughly before reusing. -
Page 21: Sensor Placement
Using the 2500A VET Pulse Oximeter CAUTION: This device is designed to determine the percentage of arterial oxygen saturation of functional hemoglobin. Factors that may degrade pulse oximeter performance or affect the accuracy of the measurement include the following: • excessive ambient light •... - Page 22 Using the 2500A VET Pulse Oximeter Model 2000SA Small Animal Flex Sensor Application The small animal flex sensor is suitable for use on the toe of a dog or the base of the tail on very small animals such as rats. Shave the site completely before sensor application.
-
Page 23: Detailed Operation
Detailed Operation Detailed Operation All functions of the Model 2500A VET are controlled by the On/Off and Advance buttons located on the front of the unit. Setup Mode Setup mode is used to adjust alarm limits, clear the memory, and adjust calendar and clock settings. In Setup mode, the Advance and On/Off buttons are used to make all selections. - Page 24 Detailed Operation Table 2: Adjustable Parameters and Settings (Continued) Pulse Rate Display Setting Display Default Value Range of Values Pulse Rate Low Alarm 20 to 200 by 5 High Alarm 80 - 100 Audible Alarms Hi, Lo, Off Memory Clear No, Yes Delete (confirm clear) No, Yes...
-
Page 25: Alarm Settings
Detailed Operation Alarm Settings WARNING: To comply with relevant product safety standards, ensure that all alarm volumes are set appropriately and are audible in all situations. Do not cover or otherwise hinder any speaker openings. WARNING: Verify all alarm setting and limits during system startup to ensure that they are set as intended. -
Page 26: Recalling Alarm Settings
Detailed Operation Recalling Alarm Settings The 2500A VET retains most user settings when the device is turned off. However, if SpO (02L) is set below 85% and/or the Alarm Volume (Adb) is OFF, these settings revert to their default values when the device is turned on. The user may recall the Alarm Volume--OFF setting by using Setup mode to turn on the device and selecting rCL yES. -
Page 27: Clearing The Memory
Detailed Operation Clearing the Memory The Memory Clear function deletes the data currently stored in the device’s memory. NOTE: If “no” is selected for either CLr or dEL, Setup mode continues to the calendar and clock settings. 1. Enter Setup mode, and scroll through the settings until Memory Clear (CLr) appears in the display. -
Page 28: Care And Maintenance
Care and Maintenance Care and Maintenance Wipe the device with a soft cloth dampened with a mild detergent or 10% bleach solution. Do not use undiluted bleach or any cleaning solution other than those recommended here, as permanent damage could result. Dry with a soft cloth, or allow to air dry. Clean after each use or as needed. -
Page 29: Alarms
Alarms Alarms This section describes the alarm functions of the Model 2500A VET. The device features audible and visual alarms that indicate both high and medium priority alarm conditions. WARNING: In the event the sensor becomes dislodged from the animal, audible and visual alarms are activated, requiring that a veterinary professional investigate the reason for the alarm status. -
Page 30: System Fault Alarms
1. Attempt to clear the error by turning the device off and on. 2. If the problem persists, contact Nonin Technical Service. WARNING: When a system fault occurs, the animal will no longer be monitored. -
Page 31: Memory Functions
Memory Functions Memory Functions Data Collection Each time the Model 2500A VET is turned on (except during Setup mode), data are automatically collected in memory. The device can collect and store up to 72 hours of SpO and pulse rate information. -
Page 32: Communications
Communications Communications Serial Output The Model 2500A VET provides real-time data output capability via the pulse oximeter sensor connector (a 9-pin Sub-D connector). The pulse oximeter sensor connector pin assignments are listed in table 6. Table 6: Pulse Oximeter Sensor Connector Pin Assignments Pin Number Assignment ®... -
Page 33: Connecting The Device Into A Medical System
Communications Connecting the Device into a Medical System Incorporating the device into a medical system requires the integrator to identify, analyze, and evaluate the risks to patient, operators, and third parties. Subsequent changes to the medical system after device integration could introduce new risks and will require additional analysis. Changes to the medical system that must be evaluated include: •... -
Page 34: Service, Support, And Warranty
This warranty excludes cost of delivery to and from Nonin. All repaired units shall be received by the purchaser at Nonin's place of business. Nonin reserves the right to charge a fee for a warranty repair request on any device that is found to be within specifications. - Page 35 Service, Support, and Warranty DISCLAIMER/EXCLUSIVITY OF WARRANTY: THE EXPRESS WARRANTIES SET FORTH IN THIS MANUAL ARE EXCLUSIVE AND NO OTHER WARRANTIES OF ANY KIND, WHETHER STATUTORY, WRITTEN, ORAL, OR IMPLIED INCLUDING WARRANTIES OF FITNESS FOR A PARTICULAR PURPOSE OR MERCHANTABILITY SHALL APPLY.
-
Page 36: Accessories
1000USB USB Interface Adapter 1000USB-C USB Interface Adapter (Continua™) For more information about Nonin parts and accessories contact your distributor, or contact Nonin at (800) 356-8874 (USA and Canada), +1 (763) 553-9968, or +31 (0)13 - 79 99 040 (Europe). - Page 37 CAUTION: Use only the Nonin-branded Model 2000SL, 2000T, or 2000SA veterinary sensors for monitoring. These sensors are manufactured to meet the calibration requirements for the Nonin Model 2500A VET pulse oximeter. The oximeter is calibrated for adult human hemoglobin measured at the finger tip. Although animal hemoglobin has similar optical characteristics, other types of hemoglobin or alternate sensor locations may affect the calibration.
-
Page 38: Troubleshooting
Non-specified sensor is being used. Replace sensor with a Nonin- branded sensor. ECG monitor may not be functioning Examine animal. properly. Replace ECG monitor or refer to ECG monitor operator's manual. - Page 39 If the problem persists, contact Nonin Technical Service. Note: If these solutions do not correct the problem with your device, please contact Nonin Technical Service at (800) 356-8874 (USA and Canada), +1 (763) 553-9968, or +31 (0)13 - 79 99 040...
-
Page 40: Technical Information
Technical Information Technical Information NOTE: This product complies with ISO 10993-1, Biological Evaluation of Medical Devices Part 1: Evaluation and Testing. CAUTION: A functional tester cannot be used to assess the accuracy of a pulse oximeter monitor or sensor. CAUTION: All parts and accessories connected to the serial port of this device must be certified according to at least IEC Standard EN 60950, IEC 62368-1, or UL 1950 for data-processing equipment. -
Page 41: Table 8. Electromagnetic Immunity
Technical Information Table 8: Electromagnetic Immunity Electromagnetic Immunity Test IEC 60601 Test Level Compliance Level Environment—Guidance This device is intended for use in the electromagnetic environment specified below. The user of this device should ensure that it is used in such an environment. Electrostatic ±8 kV contact ±8 kV contact... -
Page 42: Table 9. Guidance And Manufacturer's Declaration- Electromagnetic Immunity
Technical Information Table 9: Guidance and Manufacturer’s Declaration— Electromagnetic Immunity IEC 60601 Compliance Immunity Test Electromagnetic Environment—Guidance Test Level Level This device is intended for use in the electromagnetic environment specified below. The user of this device should ensure that it is used in such an environment. Portable and mobile RF communications equipment should be used no closer to any part of the device, including cables, than the recommended separation distance calculated from the equation applicable to the frequency of the transmitter. -
Page 43: Equipment Response Time
Technical Information Table 10: Recommended Separation Distances This table details the recommended separation distances between portable and mobile RF communications equipment and this device. This device is intended for use in an electromagnetic environment in which radiated RF disturbances are controlled. -
Page 44: Testing Summary
Specific to this example: • The response of the 4-beat average is 1.5 seconds. Testing Summary accuracy, and low perfusion testing were conducted by Nonin Medical, Inc., as described below: Accuracy Testing During motion and no-motion conditions at an independent research laboratory, SpO... -
Page 45: Principles Of Operation
Technical Information Principles of Operation Pulse oximetry is a non-invasive method that passes red and infrared light through perfused tissue and detects the fluctuating signals caused by arterial pulses. Well-oxygenated blood is bright red, while poorly oxygenated blood is dark red. The pulse oximeter determines functional oxygen saturation of arterial hemoglobin (SpO ) from this color difference by measuring the ratio of absorbed red and infrared light as volume fluctuates with each pulse. - Page 46 Technical Information Dimensions: 13.8 cm H x 7.0 cm W x 3.2 cm D (5.4 in H x 2.8 in W x 1.3 in D) Weight: 213 g (7.5 oz) (with alkaline batteries) 233 g (8.2 oz) (with NiMH rechargeable battery pack) Classifications per ANSI/AAMI ES60601-1 and CAN/CSA-C22.2 No.
Need help?
Do you have a question about the PalmSAT 2500A VET and is the answer not in the manual?
Questions and answers