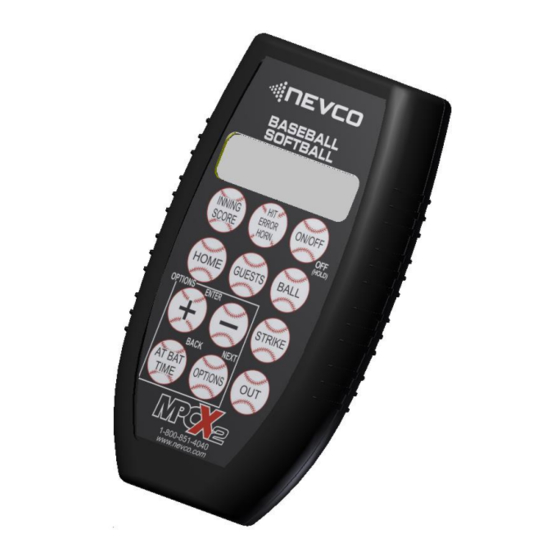
Nevco MPCX2 Setup Procedure
Control / receiver
Hide thumbs
Also See for MPCX2:
- Operator instructions manual (24 pages) ,
- Operator instructions manual (23 pages) ,
- Operator instructions manual (30 pages)
Advertisement
Quick Links
MPCX2 Control / Receiver setup procedure
Before using the MPCX2 control it must be mated to the receiver(s) and set for the model of scoreboard
that you wish to operate.
Mating a New Control to Receiver(s)
Record the receiver(s) ID's located on the receiver box before
Step 1.
installation for future reference. Multiple receivers can be
used with multiple controllers all on the same network. (The
serial number is in the battery door on a segment timer)
Step 2.
Install the receiver(s) into the scoreboard and power up the
receiver(s) that are to be used.
Standard Installation – Uses the RJ12 output of the receiver.
a.
Rain Type Box Installation – Uses the coax output of the receiver and a 9VDC
b.
power supply.
Step 3.
Wait approximately 15 seconds after the receiver has been turned on before turning on the
MPCX2 controller in order to allow enough time for the receiver to be initialized.
Step 4.
Insert the batteries included with the MPCX2 control or turn the control ON by pressing
The display will read:
Enter in the receiver ID's located on the receiver box using the controller keypad buttons
Step 5.
(NEXT) to move the cursor and
Options
When done press the (BACK) button in the lower left corner.
Step 6.
The screen will then prompt with.
Step 7.
Pressing
to be entered into the controller and will display the message.
Step 8.
If additional receivers are to be added then select
additional receivers do not need to be added then select
reset.
135-0240
Enter Rec ID:
000000
+
will reset the controller. Pressing
+
or
-
to increment or decrement each digit.
Reset Now?
(+)NOW
(-)LATER
-
will allow additional receiver ID's
+
and repeat steps 5 through 6. If
-
Record Receiver ID's Here
Add Another?
(+)YES
and the controller will be
ON/
OFF
(-)NO
3/23/18
Advertisement

Related Manuals for Nevco MPCX2


Summary of Contents for Nevco MPCX2
- Page 1 MPCX2 Control / Receiver setup procedure Before using the MPCX2 control it must be mated to the receiver(s) and set for the model of scoreboard that you wish to operate. Mating a New Control to Receiver(s) Record the receiver(s) ID’s located on the receiver box before Step 1.
- Page 2 Setting the Control for Your Model of Scoreboard This procedure is not necessary if you have one of the following models: 1500, 1510, 1530, 1535, 1550, 1600, 1610, 1630, 1635, 1650, 1000, 1010, 1030, 1035, 3500, 3502, 3504, 3514, 3515, 3516, 3520, 3525, 3534, 3550, 1632, 9605, 9505, 9715, 9515, 3400, 3402, 3404, 3414, 3415, 3416, 3425, 3434, 9405, 9550, SCD-5, SCD-7, S60- LED, S60, SCD-4.
- Page 3 MPCX2 Scoreboard Model Screen to Select Control 3500, 3502, 3504, 3514, 3515, 3516, 3520, 3525, 3534, 3550, 1632, 9605, 9715, 9505, 9515, 3400, 3402, 3404, 3414, 3415, 3416, 3425, Type A (+) 3434, 9405 7504, 7505, 7516, 7520, 7524, 7525, 7530, 9505, 9515, 7404, 7405,...
- Page 4 MPCX2 Scoreboard Model Screen to Select Control 1000, 1010, 1030, 1035, 1500, 1510, 1530, 1535, 1550 Standard (+) 1003, 1006, 1503, 1506, 1508, 1540, 1603, 1604, 1606, 1608, 1609 Score by Inn (+) 1020, 1025, 1515, 1520, 1525, 9505, 9515, 9605, 9715...
Need help?
Do you have a question about the MPCX2 and is the answer not in the manual?
Questions and answers