Table of Contents
Advertisement
Advertisement
Table of Contents

Related Manuals for Rigaku Progeny


Summary of Contents for Rigaku Progeny
- Page 1 Progeny™ and Progeny™ LT Analyzer User Manual Rev D 1006232_RevD...
- Page 2 OF THIS SITE, EVEN IF RIGAKU ANALYTICAL DEVICES OR AN AUTHORIZED REPRESENTATIVE THEREOF HAS BEEN ADVISED OF THE POSSIBILITY OF SUCH DAMAGES. Progeny is a trademark of Rigaku Analytical Devices, Inc. All other trademarks are the property of their respective holders.
-
Page 3: Table Of Contents
Progeny – The New Generation! ..................7 Carrying Your Instrument ....................9 Understanding Raman Spectroscopy ................10 What You Can Do with Progeny Analyzers ................ 10 Verify Chemicals..........................11 Setup Flexible Laboratories ........................ 11 Screen for Counterfeit Products ......................11 Ensure Homeland Security ........................ - Page 4 Using Standard or Strong Passwords ....................20 Accessing Primary Features ....................21 Using Common On-screen Controls .................. 21 Logging Out ........................23 Operating Progeny Analyzers ................24 Preparing to Scan: Performance Qualification ..............24 Performance Verification ........................25 Instrument Calibration ..................... 26 Preparing to Scan: Hazardous or Volatile Materials ............
- Page 5 Enabling and Disabling Batch Mode and Rescans .............. 82 Customizing User Prompts ....................83 Running Batch Applications ....................83 Sync Results to Personal Computer ..............90 Progeny to PC Configuration via USB connection .............. 90 Progeny to PC Configuration via Simple Wi-Fi connection ..........92 1006232_RevD...
- Page 6 Contents Progeny to PC Configuration via Advanced Wi-Fi connection ..........94 View Instrument Results Files on PC ................. 97 8. Export and Import Settings ................. 98 Export Data and Settings ....................98 Import Data and Settings ....................98 9. Maintenance and Troubleshooting ............100 Cleaning Your Instrument ....................
- Page 7 Contents European WEEE Recycling and RoHS ................114 WEEE Compliance ..........................114 WEEE Konformität ..........................114 Conformité DEEE ..........................114 1006232_RevD...
-
Page 8: Preface
Preface Preface This manual provides instructions for operating and taking care of the Rigaku Analytical Devices (RAD) Progeny™ instrument that use Raman spectroscopy to identify a wide range of substances. Document Overview This manual includes the following sections: These sections…... -
Page 9: Document Conventions
This type of Raman shift is called an Anti-Stokes shift. Titles of book and manuals. For example: For more information, see the Quick Start Guide. Progeny Analyzer Safety and Compliance Notices Please read all safety and compliance notices before operating your instrument. 1006232_RevD... -
Page 10: Laser Safety And Compliance
Operation Notices. Complete appropriate training about your organization’s procedures and policies for using this instrument on both known and unknown samples. Ensure that your Progeny Analyzer is setup correctly for analysis of the samples you are testing. Laser Safety and Compliance Laser Safety and Compliance lists laser-specific safety and compliance notices for operating your instrument. -
Page 11: General Safety And Compliance
2. The above MEP and NOHD were calculated in accordance with American National Standard ANSI Z136.1 and the International Standard IEC 60825-14 for Rigaku Analytical Devices by John R. Kretsch, P.E., NCE of Interpro Consulting Engineering, LLC. General Safety and Compliance Although the Progeny Analyzer is designed to work in hazardous environments, it is not inherently safe in any environment. -
Page 12: Safe Operation Notices
Failing to consider the following issues while using the instrument may result in harm to the operator or damage to your instrument. Progeny contains a lithium ion battery which has been designed to be safe under normal operating conditions. Due to the nature of Li-ion batteries please consider the following safety precautions: ... -
Page 13: Contacting Rigaku Analytical Devices
Sulfuric acid Aqueous sodium hydroxide Please contact RAD if you require modifications for working in any of these conditions. Contacting Rigaku Analytical Devices Contact us between 9:00 AM and 5:00 PM Eastern Time Zone (UTC-04:00) for information and assistance:... -
Page 14: Introduction
Progeny Analyzers provide the power of Raman spectroscopy with no compromises. Actionable software provides either simple PASS/FAIL decisions or more detailed analyses for a variety of applications in the lab, in the field, or wherever you need data. Each Progeny package includes: ... - Page 15 Introduction Figure 1: Top View Heat sink Active laser warning Display Keypad Power/Enter Battery-door 1006232_RevD...
-
Page 16: Carrying Your Instrument
Heat sink Laser aperture Camera Figure 3: Battery-door View Battery-door assembly Carrying Your Instrument When moving your Progeny Analyzer from one work site to another, RAD recommends using the carrying case and including the following items: Charger Cables ... -
Page 17: Understanding Raman Spectroscopy
What You Can Do with Progeny Analyzers Progeny Analyzers provide a portable platform for analyzing a wide range of substances. Their customizable interfaces and flexible operating properties make it simple to verify or identify the substances you encounter. The following sections outline how Progeny Analyzers can integrate the power of Raman spectroscopy into your development, manufacturing, or security protocols. -
Page 18: Verify Chemicals
The results are stronger quality programs, documentable adherence to legal requirements, and improved consumer safety. With Progeny, bringing the lab to the samples allows manufacturers to receive, validate, and immediately put materials straight through to production. -
Page 19: Getting Started With Your Progeny Analyzer
Getting Started with your Progeny Analyzer Getting Started with your Progeny Analyzer The section contains instructions for getting to know your instrument, logging in, and navigating through basic functionality. Opening and Closing the Battery Compartment The battery compartment contains a battery slot, a power connector, and a mini-USB connector that enables users to access data. -
Page 20: Removing/Installing The Battery
If you have a docking stating (optional) the device charges when docked. Powering Your Instrument Progeny Analyzers have three power modes—power on, power off, and sleep or “power saving” mode. All power modes are available when either the battery is installed and charged, or your instrument is connected to the AC adapter. -
Page 21: Powering Off
Getting Started with your Progeny Analyzer 2. Hold down the Power/Enter hard key on your instrument keypad for a few seconds to display the Progeny Raman Welcome screen (Figure 5). Powering Off Your instrument may be powered off using either the Power... - Page 22 Getting Started with your Progeny Analyzer Figure 6. Progeny Main Screen with No Login Power Off Figure 7. Select User Screen Scrollable users list Cancel/Back Enter/OK When login is configured with the User List option disabled, the Enter User Name screen displays a virtual keyboard for entering your user name and logging in (Figure 8).
-
Page 23: Using Instrument Controls
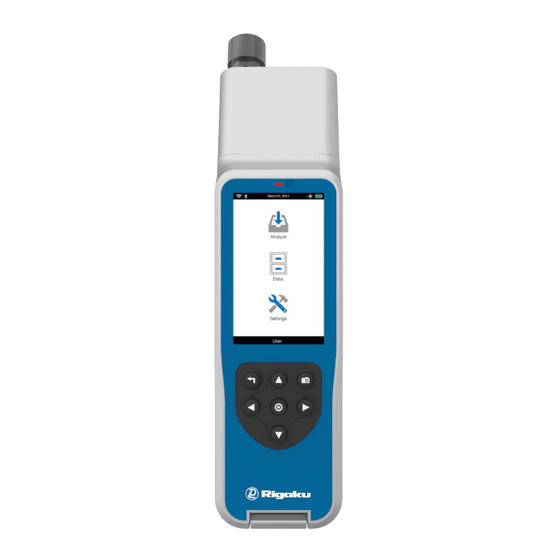
Cancel/Back Enter/OK Using Instrument Controls Progeny Analyzers have a touchscreen, virtual keyboard and keypad for navigating, viewing data, entering information, and scanning samples. Using the Touchscreen The touchscreen provides access to features, applications, and – depending on permission level –... -
Page 24: Using The Keypad
Getting Started with your Progeny Analyzer Using the Keypad The physical keypad contains the hard keys shown in Figure 9, which users in protective gear access to analyze samples in hazardous conditions. Figure 9. Keypad Layout Up arrow Cancel/Back Camera... - Page 25 Getting Started with your Progeny Analyzer To … With touchscreen … With keypad … Scroll though screen Drag or swipe the screen. Press Arrow hard keys to navigate through content and spectral on-screen controls, menu items, spectral images: images, and related screens.
-
Page 26: Using Instrument With No Login Vs. Login Requirement
Logging In with the Users List 1. At the Progeny Raman Welcome screen, select the main screen of the display to display the Select User screen and the current users list. 2. Scroll through the list to locate and select your name. -
Page 27: Resetting User Passwords
Main screen From this screen: 1. Review the instrument’s primary features (see “Accessing Primary Features”). 2. Begin operating the instrument (see “Operating Progeny Analyzers”). If the password is incorrect, an Error Incorrect Password screen displays. -
Page 28: Accessing Primary Features
Must be reset periodically (set by Admin) Passwords may not be reused Accessing Primary Features The Main screen displays the primary features of your Progeny Analyzer, which include Scan, Results, and Settings, as defined below: Feature Enables you to…... - Page 29 Getting Started with your Progeny Analyzer Control Name/Type Description Is available only from the Progeny Raman Welcome screen. Power off Shuts down instrument firmware. Powers the instrument off. Enter Enables a user-specified feature or setting change. Valid enter Enables a validated feature or setting change.
-
Page 30: Logging Out
After performing operations, developing applications, or configuring your instrument, log out of your user account. 1. Select (Cancel/Back) until the Main screen displays. 2. Select your user name to display the Logout confirmation screen. 3. Select the valid (Enter) to display the Progeny Raman Welcome screen. 1006232_RevD... -
Page 31: Operating Progeny Analyzers
Verification is recommended if there are any issues with spectra, the instrument has been recently serviced, or if the instrument has been stored. The Progeny Analyzer checks for the latest calibration status to ensure that it accurately processes spectral data. There are 2 options available for Instrumental Verification and Calibration: 1. -
Page 32: Performance Verification
Operating Progeny Analyzers Performance Verification It is good practice to include Performance Verification as part of the daily performance qualification prior to running any applications. 1. From the Main screen, select (Calibration) from the left of the action bar to display the Select Method screen with the calibration options (Figure 11). -
Page 33: Instrument Calibration
Certification Status. To re-calibrate your instrument for current operating conditions and reset the Certification Status: 1. If your Progeny Analyzer is off, power on (see “Powering On”) and log in (see “Using Instrument with Login”) to a user account. -
Page 34: Preparing To Scan: Hazardous Or Volatile Materials
Operating Progeny Analyzers 3. Select Instrument Calibration. Instrument Calibration is performed using the Benzonitrile sample only, so there is no material selection list. A confirmation screen similar to the Analyze Laser Warning screen (Figure 15) shows the laser warning. 4. Select the OK/ARM LASER soft key. -
Page 35: Preparing To Scan: Setting Scan Conditions
Operating Progeny Analyzers Preparing to Scan: Known Materials In a pharmaceutical environment the instrument can be used to scan through common packaging materials for verification or identification of pharmaceutical excipients and active pharmaceutical ingredients (API). The container can be either glass or plastic, but the material must not be opaque. In general, the more transparent the container is the more accurate the analysis will be. -
Page 36: Preparing To Scan: Other Scan Settings And Properties
Operating Progeny Analyzers 3. On the bottom of the panel select (Optimize). 4. Tap Arm Laser, and then Scan to begin continuous scanning in which another measurement is performed as soon as the first is finished. The spectra of the material are shown in the background and in the foreground is a red line showing the counts. -
Page 37: Performing Scans
Operating Progeny Analyzers Performing Scans Progeny Analyzers have two basic modes of operation—Analyze and Application. In both modes, the instrument starts by collecting spectral data from a sample of a substance. Analyze mode The instrument compares the detected data to its Master Library of spectral profiles and then calculates a Correlation Coefficient (CC) value for each comparison. - Page 38 Operating Progeny Analyzers Figure 14. Main Screen with Scan Options Scan options 2. From the Scan options, select (Analyze) to display the Analyze confirmation screen with the laser warning (Figure 15). Figure 15. Laser Warning Laser warning OK/ARM LASER Extended screen control 3.
- Page 39 Operating Progeny Analyzers Figure 16. Analyze Scan Screen Sample alignment Scan soft key Use Extended screen to see scan properties 4. Drag (Extended Screen) to the right, or select it and press the left arrow hard key, to review information about and/or change current scan properties.
- Page 40 Operating Progeny Analyzers 1. The configuration shown has the default setting, Auto Collect, selected which automatically cycles through a high, medium and low Power setting while scanning the material. From these settings, the user can then optimize the focal point and/or change the parameters in the Configuration.
- Page 41 Operating Progeny Analyzers Table 1. Available Properties for Analyze and Application Scans Categories/Properties Control Possible Values Description Collect Settings Power settings is determined automatically by analyzing the spectral response of the sample Auto Power Setting from 30-490 mW Note: Soft Key...
- Page 42 Sets the number of components that are listed in Range: Mixture Components Soft Key the scan result when Rigaku Mixture is set as the 1 (min) Search Algorithm Type. 6 (max) Sets the library of available spectral images to which current spectral result is compared ...
- Page 43 Operating Progeny Analyzers Categories/Properties Control Possible Values Description Opens a settings screen to select the correlation percentage for matching spectral results. The property has: Decimal format 0.80 Increments of 0.01 (default) Pass (or Match) Note: Range:...
- Page 44 Operating Progeny Analyzers Categories/Properties Control Possible Values Description Increments of: 0.05 from 0.50 to 0.80 0.01 from 0.80 to 0.99 Note: Search Threshold should be less than, or equal to, the Pass Threshold of the application. 3. Select the Scan soft key to start the sample-analysis cycle.
- Page 45 Camera hard key to display the Capture Image screen appears with a viewfinder. b. Point the Progeny unit at the object to be captured (e.g., material, container, label, etc.). c. Press the Camera hard key again or the (Camera Icon) d.
- Page 46 Operating Progeny Analyzers b. Repeat the (Extended screen) to view the report template image. c. Review the report d. Scroll down to view the image captured. e. If required sign and/or print the report. Drag (Extended screen) to the right, or select it and press the left arrow hard key to return to the memo and scan results screens.
-
Page 47: Advanced Options
Master Library. Progeny Analyzers have two types of applications: Verification and Identification. Verification applications check that your substances are what you expect them to be, by comparing scan results to a specified spectral profile and then providing Pass/Fail results. -
Page 48: Verification Of Known Substances
Advanced Options Power—specifies the intensity of the laser stimulus of the sample. Exposure—specifies the duration of the spectral collection period. Averages—specifies the number of times the stimulus/collection sequence is performed during the Scanning phase of the sample-analysis cycle. ... - Page 49 Advanced Options Important: This data is for comparison purposes only. If the profile is not identified as the Top Match or if the CC value listed with the profile data is not above 0.80, the sample substance may not be the substance named in the spectral profile.
- Page 50 Advanced Options Figure 20. Verification Laser Warning Laser warning OK/ARM LASER soft Use Extended Screen to view scan properties 8. Select OK/ARM LASER to display the application’s scan screen for the selected substance appears (Figure 21). Figure 21. Verification Application Scan Screen Sample alignment Scan soft key Use Extended Screen to...
- Page 51 Press the Camera hard key to display the capture Image screen with a viewfinder. b. Point the Progeny unit at the object to be captured (e.g., material, container, label, etc.). c. Press the Camera hard key again or the (Camera Icon) d.
-
Page 52: Identification In Custom Libraries
Advanced Options d. Select (Enter) to save the title to the scan results record. e. Drag (Extended screen) to the right, or select it and press the left arrow hard key to return to the scan results screen. 13. If required, view the results in the Report Template format: a. - Page 53 Advanced Options Figure 23. Select Application Screen with Identification App Selected Selected application Enter/OK key 4. Select (Enter) to launch the application. The confirmation screen shows the laser warning (Figure 20). 5. Select OK/ARM LASER to display the application’s scan screen (Figure 24). Figure 24.
- Page 54 Press the Camera hard key to display the capture Image screen with a viewfinder. b. Point the Progeny unit at the object to be captured (e.g., material, container, label, etc.). c. Press the Camera hard key again or the (Camera Icon), d.
-
Page 55: Viewing Results
(New Sample) to start a new application scan cycle. Viewing Results Scan results records are automatically saved onto the Progeny Analyzer after every scan, allowing all users to view and sign them. Viewing Scan Data Summaries 1. From the Main screen select (Results). - Page 56 Advanced Options Figure 26. Results Options Screen Archived Recent 3. The Results screen displays with the tab for the current week selected, and lists the scan results summaries by date (Figure 27a). Figure 27a. Results Screen Week tabs Month 4. Scroll through the screen to view summaries for the current week. 1006232_RevD...
- Page 57 Advanced Options The screen lists any records from the selected week, by date, which are currently stored on the instrument. Each summary shows information about the name of the primary substance match and a color- coded result icon as defined below. Table 2.
-
Page 58: Viewing Diagnostics And Information
Drop-Downs Data Items Typical Values Descriptions Model Number Progeny 1064 Lists the model number of your Progeny Analyzer. Lists the serial number of your instrument. Format starts Instrument Serial Number SN P14270001 with “SN” followed by an eight-digit, alpha-numeric serial number. -
Page 59: Viewing Diagnostics Data
3. Select the appropriate category to view information. 4. The Audit Log lists instrument status and activity. To meet 21 CFR Part 11 validation requirements, Progeny Analyzers automatically save instrument status and activity data for all users. To view logged data select Audit Log. - Page 60 Advanced Options Figure 28. Diagnostics Screen with Information Displayed Note: The icon ( ) is for password protected manufacturing entry only. 3. Select (Cancel/Back) to return to the Instrument Settings screen. Table 4. Diagnostic Screen Data Items Headers Data Items Typical Values Descriptions 30-40C but can...
-
Page 61: Managing Libraries
Advanced Options Managing Libraries Progeny Analyzers let users view, but not change, the Master Library and any sub-libraries of spectral profiles. 1. From the Main screen select (Settings) to display the Instrument Settings screen. 2. Select (Library) to display the Libraries screen listing both the Master Library and any defined sub-libraries. - Page 62 Advanced Options Figure 30. Enter Search Term Enter name, letter, CAS or synonym Enter 4. Select (Enter) to search the library. Figure 31. Search Results Search results containing the search term 5. Select the spectral file from the resulting list to display the detailed spectral profile screen (Figure 32).
- Page 63 Advanced Options Figure 32. Spectral Profile Details Screen for Benzonitrile Note: The Spectral Profile items listed below are optional except for Validation Material Background Material and Warnings. Item Description Product Names Primary product names for the spectral profile. File Name The name of the material as it appears in the Library.
-
Page 64: Adding Spectral Profiles To The Master Library
Advanced Options Item Description – Threat – Caution – No Threat Select up to 3 from the following list of warning symbols: – None – Irritant – Toxic – Explosive Warnings – Polluting – Corrosive – Flammable – Oxidizing The information label specified in National Fire Protection Agency (NFPA) 704 –... - Page 65 Advanced Options Once the instrument is optimized for a particular sample or category of samples, you can dynamically save the settings as an application by selecting the New Application icon in the Footer. Note: You must be logged in as either an Administrator or Developer to add spectral profiles 1.
- Page 66 Advanced Options Figure 33. Analyze Results Screen Result summary Add to Cancel/Back Sign Library 7. Select (Add to Library) to display the Enter Material Name screen. 8. Use the virtual keyboard or the touchscreen to enter the name of the sample substance. Select (Enter) to open the Select Library list.
- Page 67 Advanced Options Figure 34. New Profile Details Screen New Profile/material name Select detail to edit Enter 9. Add any of the details you need (see “Editing the Details of Spectral Profiles”). 10. Select (Enter) to save the updated profile. Editing the Details of Spectral Profiles After adding a spectral profile to the instrument’s Master Library, you can edit or enter the substance details of that profile.
-
Page 68: Creating Spectral Sub-Libraries
7. Select (Enter) to save the changes. Creating Spectral Sub-Libraries Because all Progeny Analyzer applications link to sub-libraries, to find spectral profiles for verifying or identifying scanned substances you must create spectral sub-libraries for the instrument before setting up your applications. - Page 69 Advanced Options Figure 35. Add Spectra Screen Active Selected item Spectra list 4. Tap the required spectral profile once to highlight it, then again to select it. A checkmark displays to the right side of the spectral profile name (Figure 36). Figure 36.
-
Page 70: Removing Spectral Profiles From Sub-Libraries
Advanced Options 5. Repeat the above steps to mark all required spectral profiles available from your filtered list. 6. Select (Enter) to display the sub-library screen listing copies of the selected spectral profiles (Figure 37). Figure 37. Sub-Library Screen with Added Profiles Added spectral profiles New spectral profile 7. -
Page 71: Deleting Spectral Sub-Libraries
Advanced Options Figure 38. Delete Control on the Sub-Library Screen Delete soft key 3. Select (Delete) to remove the spectral profile from the sub-library. Deleting Spectral Sub-Libraries When you no longer use any applications that require a specific sub-library, you can delete the sub- library. -
Page 72: Managing Applications
(Back) to return to the Instrument Settings screen. Adding New Applications Adding an application to the Progeny Analyzer places it into the list of current applications. By default, the new application is a Verification sequence that has all of the default application properties listed in Table . -
Page 73: Configuring Applications
6. Select (Back) to return to the Instrument Settings screen. Configuring Applications After adding the required new applications to your Progeny Analyzer, you must configure them to optimally analyze your substance samples. This process involves setting the properties for: ... - Page 74 Advanced Options Figure 40. Sample Application 1006232_RevD...
-
Page 75: Deleting Applications
Advanced Options 3. Select the category you need to configure. Table 1 lists the available values for the Settings (Page 35) Table 5 lists the available values for Search Results (Page 69) 4. The Report Templates option lists your instrument’s current report templates. Select the report template you need to view to display the Report Template Overview screen with the name of the template at the top. -
Page 76: Configuring Progeny Analyzers
(Settings) from the Main screen to display the Instrument Settings screen. 2. Enable Login Required. 3. Log out and restart your instrument. If this is the first login on the Progeny Analyzer it will be configured with the following two default accounts: Default User Name... -
Page 77: Customizing Global Settings
Information Diagnostics Green = Available = Not available Yellow = Some options available Customizing Global Settings Configuring Global Settings ensures that the information collected by your Progeny Analyzer complies with your organization’s security and data requirements. 1006232_RevD... -
Page 78: Configuring Login
When (On): LDAP Login is required. Switch Enabled Wi-Fi and LDAP connectivity information must be configured on the Progeny web page Settings menu See separate document “Wi-Fi and LDAP Setup Guide” for more information on this feature. 1006232_RevD... -
Page 79: Configuring Ldap (Lightweight Directory Access Protocol) Login Method
(Enter) to set the new Login options and return to the Instrument Settings screen. Configuring LDAP (Lightweight Directory Access Protocol) Login Method When LDAP (Lightweight Directory Access Protocol) is enabled on the Progeny Analyzer, user access is controlled by an LDAP server in a corporate IP network. -
Page 80: Enabling Ldap On The Progeny
(including disabling LDAP mode) to be performed on the Progeny: LDAP User: ldapadmin Password: 144 This special Admin user can only be used after Progeny restart. If the user has logged out, the Progeny must be restarted in order for this user to log in again. Note: ... -
Page 81: Choosing Language
Configuring Progeny Analyzers Options Control Description Using up to four data fields from the operating properties of the instrument, this option allows you to set the data file names to comply with your organization’s IT requirements. Default file name format uses the SN_USER_TIMESTAMP_NONE sequence for Field 1 through Field 4. -
Page 82: Managing User Accounts
If your organization uses the login feature, you will need to manage individual user accounts for all personnel who will be working with your Progeny Analyzer. Because Progeny Analyzers are 21 CFR Part 11 compliant, user accounts cannot be removed from the instrument. As a result, talk with your organization’s primary system administrator about a user-account naming strategy that fits your... - Page 83 Configuring Progeny Analyzers Figure 43. Add User’s Select Permission Level Screen 3. Select the required permission level for the User, then (Enter) to display the Enter User Name screen (Figure 44). Note: Until a valid user name is selected,...
-
Page 84: Viewing User Accounts
Configuring Progeny Analyzers 4. Select the text entry box and use the virtual keyboard to enter the User’s name. Note: User names must be between 6 - 36 characters long. No spaces or special characters are allowed. ... -
Page 85: Changing User Permission Levels
(Enter) to display the User screen with the updated (Level) set. Locking User Accounts Locking a user account restricts that users’ access to the Progeny Analyzer. This ensures that only users with current authorization can access the instrument. It can also be used to retire specific user accounts. -
Page 86: Resetting User Passwords
Configuring Progeny Analyzers Figure 47. New User Locked Screen Lock User Resetting User Passwords Users with the Administrator permission level can reset a users’ password to a randomly generated values. 1. From the User screen select Reset User to display the Reset User confirmation screen. -
Page 87: Barcode Scanner
Barcode Scanner Barcode Scanner Using the barcode scanner streamlines user workflow, and minimizes operator error from verification of substances in a container labeled with a barcode. For example, if your organization receives a shipment of ingredients for a product and you need to verify that the substances are labeled correctly before using them, the barcode scanner can be used in lieu of manually entering the compound name or selecting the compound from a list. -
Page 88: Using Barcode Scanner & Camera
A barcode can be scanned or image captured using either the barcode soft key or the camera hard key. Point the front of Progeny at the object to be scanned. 2. Touch (Barcode) on the screen, or press and hold the (Camera) hard key on the keypad to display the barcode or image on the screen. -
Page 89: Batch Collection
For users with Developer or Administrator permission levels, setting up batch sessions requires enabling Progeny’s batch-collection feature and then customizing interface prompts for collecting at least three parameters from users. When combined, these parameters specify the number of scan events for each batch session. -
Page 90: Customizing User Prompts
Batch Collection Figure 50. Batch Collect Settings Screen with Batch Mode On Add Prompt 3. Select Batch Mode to enable/disable the functionality. (On), Batch Mode is enabled. (Off), Batch Mode is disabled. 4. Select Allow Rescans to enable/disable the functionality to rescan a sample during batch mode analysis. - Page 91 Batch Collection Figure 51. Scan Options Screen 2. Select Batch to display applications. 3. Select an application for verification to highlight it. 4. Select (Enter) to launch the application and display the Select Material screen listing the spectral profiles available in the spectral sub-library linked to the application (Figure 52). 5.
- Page 92 Batch Collection Figure 53. Batch ID Prompt 7. Input the batch ID and select (Enter) to display the Number of Containers prompt. Figure 54 shows the number of containers set to “1,234”. Note: A total of 9,999 containers are possible to input. Figure 54 Figure 54.
- Page 93 Batch Collection 8. Input the number of containers and select (Enter) to display the Enter the Number of Measurements Per Container prompt. 9. Input the number of Measurements Per Container and select (Enter). Note: The maximum batch scan size is 149,985 (9999 containers x 15 measurements per container allowed).
- Page 94 Batch Collection Figure 56. Confirmation Screen 2. Press (Enter) to cancel the Batch and display a new screen. 3. Enter the Batch Cancel Memo (Figure 57). Figure 57. Batch Cancel Memo The Batch Summary screen displays with relevant Batch information at time of cancellation ( 4.
- Page 95 Batch Collection Figure 58. Batch Summary To resume the Batch Collection: a. Select (Batch Resume). b. Navigate to Results to see the incomplete Batch indicated with a yellow maker (Figure 59a). 1006232_RevD...
- Page 96 Batch Collection Figure 59a. Batch Summary Incomplete Highlight the incomplete Batch and select (Enter). Note: Using either option returns user to Scan Mode. 1. Continue Batch collection 2. Upon completion, if desired, add a Batch Complete Memo (Figure 59b) Fixure 59b. Batch Complete Memo 3.
-
Page 97: Sync Results To Personal Computer
A broadband connection is not necessary for connection. Progeny to PC Configuration via USB connection 1. Connect Progeny to USB port on PC with provided mini-USB to USB cable. 2. Wait for PC to recognize the new USB connection (USB Ethernet-RNDIS Gadget). - Page 98 6. Select Download All or Download Selected to download as PDF, XML and or TXT format Figure 62. Progeny Web Browser Screen From the Progeny web browser screen the user can view Results, Applications on the instrument, and other Users of the instrument.
-
Page 99: Progeny To Pc Configuration Via Simple Wi-Fi Connection
Figure 63. Chemical Spectra in Library Progeny to PC Configuration via Simple Wi-Fi connection There are two types of Wi-Fi connection methods, simple and advanced. To connect your Progeny Analyzer to the PC using simple Wi-Fi: 1. Navigate to Settings -> Communication -> Wi-Fi to display the Wi-Fi soft switch. - Page 100 Sync Results to Personal Computer Figure 64. Wireless Network Connection List 5. Select a wireless network with a green key icon from the Wireless Connections list by tapping on that row, in this case, RAC-WIL-GUEST, then tap the Connect key (Figure 65). Figure 65.
-
Page 101: Progeny To Pc Configuration Via Advanced Wi-Fi Connection
7. The blue wireless icon indicates that you are connected and an IP address has been assigned Figure 66. Selecting Wireless Network Connection 8. Enter the assigned IP address into your browser (e.g., http://10.9.4.108). To display the Progeny Instrument details. Note: ... - Page 102 2. The file is saved on the PC and can be found on the Progeny Settings web page, Configure WiFi Connection, using the Browse or Choose File button (Figure 67). Figure 67. Configuring Wi-Fi Network Connection 3. After selecting the file and clicking the Submit key, a message is displayed indicating that the configuration is successful and to reset the Wi-Fi connection.
- Page 103 Sync Results to Personal Computer 4. On the Progeny, navigate to Settings -> Communication -> Wi-Fi to display the Wi-Fi soft switch. 5. Select the soft switch to enable or disable the feature (On), Wi-Fi is enabled. (Off), Wi-Fi is disabled.
-
Page 104: View Instrument Results Files On Pc
Do not include WWW prefix. View Instrument Results Files on PC 1. After a Progeny to PC connection is made by any of the methods described above, results can be viewed under the Progeny web page Results icon: ... -
Page 105: Export And Import Settings
Export and Import Settings 8. Export and Import Settings Export Data and Settings 1. With the Progeny connected to your PC, select (Settings) from the Progeny web browser screen to display the Settings screen. 2. Select Export>Export All Data and Settings (Figure ). - Page 106 Export and Import Settings Figure 70. Progeny Settings Screen 1006232_RevD...
-
Page 107: Maintenance And Troubleshooting
Information and Serial Number for troubleshooting. Cleaning Your Instrument Maintaining a clean Progeny Analyzer helps ensure that cross-substance scanning issues do not occur. After scanning open-air samples or after the lens aperture becomes soiled, clean your instrument with pre-packaged sanitary wipes featuring at least 70% Isopropyl alcohol cleaning solutions. -
Page 108: Verifying The Instrument Serial Number
(Back) to return to the Main screen. Verifying the Instrument Serial Number When troubleshooting Progeny Analyzers, you may need to verify that the serial number listed on the instrument settings Information screen matches the hardware serial number on your instrument’s Serial Number label. -
Page 109: Appendix A. Operating Specifications
Appendix A. Operating Specifications Appendix A. Operating Specifications It is recommended that you review these specifications before operating your RAD Progeny Analyzer. Optical Specifications Specification Value Operation process Raman spectroscopy Range – spectral ~200-2500 cm-1 (1087-1450 nm) Laser (excitation wavelength):... -
Page 110: Environmental Specifications
User configured libraries of organic/industrial solvents and chemicals, pharmaceuticals, household chemicals, and other toxic substances RAD supplied (optional): For more information, contact RAD or your local Rigaku representative. Software RAD Progeny Software For upgrades, contact RAD or your local Rigaku representative. -
Page 111: Appendix B. Nose Cone Positions
Appendix B. Nose Cone Positions Appendix B. Nose Cone Positions 1006232_RevD... -
Page 112: Appendix C. Statements Of Compliance
Progeny 1064: In order to use the Progeny instrument in contexts that require compliance with the 21 CFR Part 11, all users must first be granted user accounts or given appropriate administrative access as determined by an organization’s primary system administrator. - Page 113 Progeny 1064: This article addresses validation in a way that is not limited to the instrument. As a result, the validation process for Progeny instruments includes factory calibration, routine calibration, instrument self-test, and the provided documentation for implementing operating qualification of instrument results.
- Page 114 Requirement: § 11.10 (f) Use of operational system checks to enforce permitted sequencing of steps and events, as appropriate. Progeny 1064: In contexts that require compliance with the 21 CFR Part 11, the instrument can be configured to have a strictly enforced workflow that will not allow operation outside of the permitted sequencing of steps.
- Page 115 Requirement: § 11.30 Controls for open systems. Progeny 1064: In contexts that require compliance with the 21 CFR Part 11, the instrument is configured as a closed system by default. As a result, organization policies and procedures for controls for open systems are not relevant.
- Page 116 Requirement: § 11.200 (a)(1) Electronic signatures that are not based upon biometrics shall (1) employ at least two distinct ID components such as identification code and password. Progeny 1064: The instrument uses both a user name and a password to identify each user at instrument login.
- Page 117 Progeny 1064: The instrument creates electronic signatures only for the user name and password combinations of users with the Administrator permission level. For other users, access to features that require electronic signatures is restricted.
-
Page 118: United States Pharmacopeia (Usp) Chapter <1120> - Raman Spectroscopy Statement Of Compliance
Raman measurements. Because Progeny instruments are intended for material identification in pharmaceutical environments, only aspects that apply to qualitative analysis are discussed. Progeny instruments are not calibrated for Intensity axis and are not qualified for transfer of quantitative methods between instruments. - Page 119 Progeny instruments meet wavenumber tolerances established by RAD with input from 3rd party consultants. Progeny instruments can be installed and qualified using an IQOQPQ procedure to ensure that performance criteria meet wavenumber tolerances specified by RAD. Verification of the intensity scale is unnecessary since quantitative analytical methods are not intended to be transferred between instruments.
-
Page 120: Appendix D. Regulatory Statements
Appendix D. Regulatory Statements Appendix D. Regulatory Statements “Regulatory Statements” contains all required regulatory statement and includes: FCC and Industry Canada Statements Export Regulation Statements EC Statements European WEEE Recycling and RoHS FCC and Industry Canada Statements This equipment has been tested and found to comply with the limits for a Class A digital instrument, pursuant to Part 15 of the FCC Rules. -
Page 121: European Weee Recycling And Rohs
Das Produkt ist durch folgendes Symbol gekennzeichnet: Rigaku Analytical Devices hat Vereinbarungen mit Verwertungs/Entsorgungsfirmen in allen EU- Mitgliedsstaaten getroffen, damit dieses Produkt durch diese Firmen wiederverweret order entsorgt warden kann. Füer mehr infromationen bitte kontaktieren sie Rigaku Analytical Devices oder Ihre öertliche Vertretung. Conformité DEEE Ce produit doit être conforme à... - Page 122 Appendix D. Regulatory Statements Rigaku Analytical Devices s’est associé avec une ou plusieurs compagnies de recyclage dans chaque état membre de l’union européenne et ce produit devrait être collecté ou recyclé par celles-ci. Pour de plus amples renseignements, veuillez contacter Rigaku Analytical Devices ou bien ses représentants locaux.
Need help?
Do you have a question about the Progeny and is the answer not in the manual?
Questions and answers