Table of Contents
Advertisement
Quick Links
Advertisement
Table of Contents

Subscribe to Our Youtube Channel
Related Manuals for XM Satellite Radio XM SureConnect


Summary of Contents for XM Satellite Radio XM SureConnect
- Page 1 XM SureConnect Vehicle Installation...
-
Page 2: Fcc Information
It is the responsibility of the user to use the power cable with the ferrite beads. The user is cautioned that changes or modifications not expressly approved by XM Satellite Radio Inc. can void the user’s authority to operate this device. -
Page 3: Table Of Contents
FCC Information ..........2 Installing the XM SureConnect Overview ......4 Installation Locations . -
Page 4: Installing The Xm Sureconnect Overview
Installing the XM SureConnect Overview To install the XM SureConnect, first find a suitable location that works in your vehicle. You need to determine the location of your vehicle’s FM Antenna and properly route the XM SureConnect cables to your FM antenna. -
Page 5: Installation Locations
Installation Locations... -
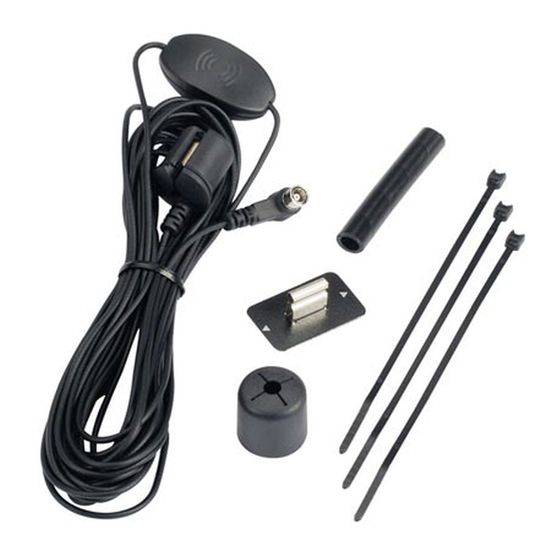
Page 6: Installation Setup
2 feet from the end of the input cable (see Figure 1a). Tuck any excess input cable and the coupler module behind dash or in another hidden location for a professional looking installation. Connect the XM SureConnect input cable to the XM radio or vehicle dock antenna input. - Page 7 Installation Setup Connecting the Components External Antenna Internal on-glass antenna no boot necessary power car dock boot XM antenna glass contact input bracket cable XM car coupling antenna module coupling clip outside output cable inside your vehicle Figure 1a Figure 1b Figure 1c...
-
Page 8: External Fm Antenna Coupling Clip Installation
Option 1: External FM Antenna Coupling Clip Installation S S t t e e p p 1 1 : : If you have an external or roof mount FM antenna, attach the Coupling Clip directly to the base of the antenna as illustrated in Figure 2. Cover the Clip with the rubber boot provided to protect and secure the clip. -
Page 9: External Fm Antenna Routing
External FM Antenna Routing XM car antenna In the front, route the cable across the weather seal near the bottom coupler of the door to reduce water leaks. clip Once inside the car tuck the XM receiver SureConnect output cable into the door jam up to the dash or under the carpet as shown in Figure 3. -
Page 11: Internal On Glass Antenna Coupling Clip Installation
Option 2: Internal On Glass FM Antenna Coupling Clip Installation Identifying the On Glass FM Antenna U U s s e e f f u u l l I I n n f f o o r r m m a a t t i i o o n n f f o o r r S S t t e e p p 1 1 : : C C A A U U T T I I O O N N : : Do not attach the contact bracket to the rear defogger elements. - Page 12 Internal On Glass FM Antenna Coupling Clip Installation 3. The FM antenna will have a single contact point and the Defogger will have two, which are typically on opposite sides of the window. (The contact points may be hidden behind interior liners or exterior glass tinting but the key is to locate where the elements go off the window edge.
- Page 13 Internal On Glass FM Antenna Coupling Clip Installation adhesive pads antenna element in glass contact strip no boot required contact bracket with arrows for alignment Figure 6...
-
Page 14: Internal On Glass Antenna Routing
Internal On Glass FM Antenna Routing coupler clip with contact Step 2: bracket XM car internal on antenna In the rear, route the XM glass receiver antenna coupler SureConnect output cable module from the antenna element, along the window edge, down to the window liner. -
Page 15: Additional Information
Additional Information N N o o t t e e : : When routing the XM SureConnect cable use pre-existing wire channels whenever possible to avoid loose wires on the interior of the vehicle which are susceptible to damage and to maintain a professional looking installation.
Need help?
Do you have a question about the XM SureConnect and is the answer not in the manual?
Questions and answers