Table of Contents
Advertisement
Advertisement
Table of Contents

Subscribe to Our Youtube Channel
Related Manuals for MOBIWIRE MobiPhone


Summary of Contents for MOBIWIRE MobiPhone
- Page 1 MobiP hone USER MANUAL...
-
Page 2: Table Of Contents
TABLE OF CONTENTS 1. FIRST STEPS 1.1 Inserting a SIM card 1.2 Inserting the battery 1.3 Charging your phone 1.4 Switching on your phone 1.5 Using the keyboard 1.6 Understanding the battery charge level 2. DAILY USES 2.1 Launching a call 2.2 Opening your call log 2.3 Writing an SMS 2.4 Opening your inbox... -
Page 3: First Steps
FIRST STEPS First, make sure your phone is powered off. If not, long press the red key to switch it off 1.1 Inserting a SIM card Remove the battery cover. Insert the MicroSIM card as indicated on the image below. WARNING: If you have a NanoSIM, you need to use a MicroSIM adaptater. -
Page 4: Inserting The Battery
1.2 Inserting the battery Remove the battery cover. Place the battery as indicated on the image below. Replace the battery cover on the phone. -
Page 5: Charging Your Phone
1.3 Charging your phone To charge your Mobiphone, place the phone on its cradle as indicated below. 1.4 Switching on your phone Press and hold the red key to switch on the phone. -
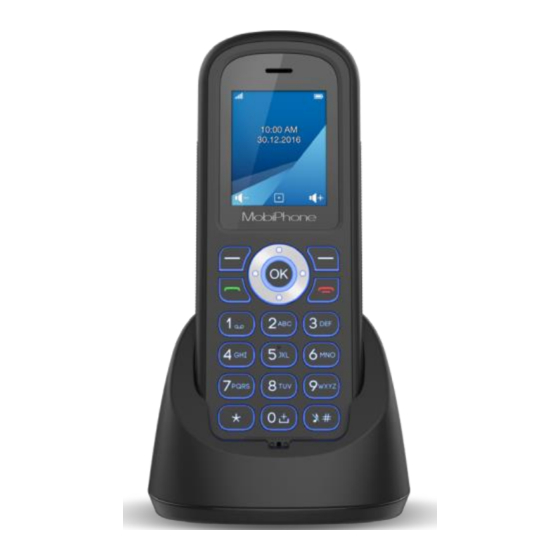
Page 6: Using The Keyboard
1.5 Using the keyboard To see the menus of the phone, press the validation key. Use the navigation pad to move across the menus. -
Page 7: Understanding The Battery Charge Level
1.6 Understanding the battery charge level To see the battery charge level, refer to the battery icon in the upper right corner. The battery level is displayed as such: The battery icon flashes if the battery charge level is low. Once the icon started flashing, you can still use the phone for about an hour. -
Page 8: Daily Uses
DAILY USES All the basic tasks are explained in this section. These are the tasks: - Launching a call - Opening the call log - Writing an SMS - Opening inbox - Opening sent messages - Adding a contact - Calling voicemail 2.1 Launching a call To launch a call, you can directly dial a number or choose a contact in the Phonebook. -
Page 9: Opening Your Call Log
Press the green Press the red key or select to hang up Options and select Call. 2.2 Opening your call log To open your call log Dialled calls Select Dialled calls Select Call Center in in the list. the menus. -
Page 10: Writing An Sms
Received calls Missed calls Select Received calls Select Missed calls in the list. in the list. 2.3 Writing an SMS To write an SMS Select Messaging in Select Write the menus. message. Type your message. -
Page 11: Opening Your Inbox
Select Enter Select Options and Send to. number. If the contact is in the Phonebook, select Add from Phonebook. Select Options and Send. 2.4 Opening your inbox To get to your inbox Select Messaging in Then select Inbox. the menus. -
Page 12: Opening Sent Messages
2.5 Opening sent messages To see your sent messages Select Messaging in Select Sent the menus. messages. 2.6 Adding a contact To add a contact to your phonebook From the idle screen, Then, select Save. type a number. Choose between saving the contact on the SIM card or on the Phone. -
Page 13: Calling Your Voicemail
Type the name of the Select Save. contact, and select Options. 2.7 Calling your voicemail To call your voicemail: From the idle screen, Or press and hold type 021700700 the "1" key to and press the green directly call your voicemail. -
Page 14: Using Speakers
2.8 Using speakers Once in a call, you When H-Held is can use the speakers displayed, press by pressing the upper the upper right key right key. to stop using the speakers. 2.9 Using earphones Plug your earphones to the jack plug of your phone. To hang up a call, press the button on the wire of your earphones. -
Page 15: Settings
SETTINGS Use the Settings menu to change : - Language - Date and time - Ringtone - Wallpaper - Restore default settings 3.1 Choosing your language Select Settings in the Select Language. menus. Select the desired language. Press the validation key or the upper left key. -
Page 16: Setting Date And Time
3.2 Setting date and time To set the time and date Select Settings in the Select Time and menus. date. Select Set time/date. Once you have set the time and date, press the upper left key to Save. -
Page 17: Setting The Ringtone
3.3 Setting the ringtone To set the ringtone Select Settings in the Select Ringtone. menus. Use the navigation Press the validation pad to select Ring1 in key and select a the group Ringtone. ringtone in the list. -
Page 18: Choosing Your Wallpaper
3.4 Choosing your wallpaper To choose your wallpaper Select Settings in the Select Display. menus. Select Wallpaper. Select an image in the list and press the validation key. -
Page 19: Own Area Code
3.5 Own Area Code Select Call Center in Select Call Settings. the menus. Select Own Area Enter your own area Code. code and select OK. -
Page 20: Restoring Default Settings
3.6 Restoring default settings To restore the default settings Select Settings in the Select Restore menus. settings. Type 0000 in the "Input phone password" field. Press the validation key or the upper left key. - Page 21 NOTES...
- Page 22 www.mobiwire.com...
Need help?
Do you have a question about the MobiPhone and is the answer not in the manual?
Questions and answers