Table of Contents
Advertisement
Advertisement
Table of Contents

Related Manuals for Catchbox Catchbox Plus


Summary of Contents for Catchbox Catchbox Plus
- Page 1 Plus User Manual Copyright 2018 Catchbox SIA...
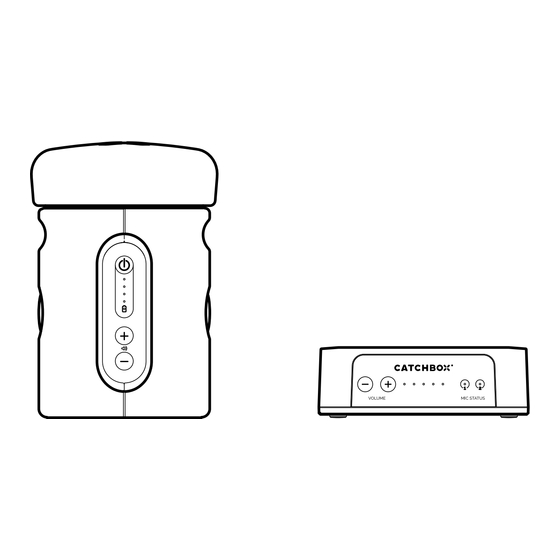
- Page 2 Catchbox Catchbox Plus Catchbox Plus Cover Transmitter Receiver Catchbox Wireless Catchbox Charger Presenter Mic...
-
Page 3: Table Of Contents
Contents 1 Safety Instructions....................4 2 Quick Start ....................... 6 Setting Up the Catchbox ................... 6 Throwing the Catchbox .................... 13 Speaking into the Catchbox ..................14 3 Product Description .................... 15 Overview ........................15 DECT Wireless Standard Overview................ 16 4 General System Specifications ................ -
Page 4: Safety Instructions
Changes or modifications to the equipment not expressly approved by manufacturer can void the warranty and user’s authority to operate the equipment. • Wireless Charger uses strong electromagnetic field to operate. Keep the the equipment away from metallic objects as those can heat up and cause injury or property damage. Catchbox Plus... - Page 5 Catchbox Plus...
-
Page 6: Quick Start
Use Case C Catchbox with Catchbox with a Catchbox with an Audio an Audio System Computer System and a Computer To reduce setup time, each Catchbox Plus Receiver and Catchbox Plus Transmitter unit have been paired before being shipped. Catchbox Plus... - Page 7 Use Case A Catchbox with an Audio System 1. Plug the included Power supply to AC mains outlet and connect it to the Receiver's micro-USB socket. 2. Plug the included audio cable to the Receiver's balanced audio output and connect it to the input of your Audio System (mixer board, amplifier or other audio device).
- Page 8 1. Plug the included USB data cable to to the computer’s USB port and connect it to the Receiver’s micro-USB socket. 2. Turn on both the Transmitter and the Receiver. 3. Go to your computer’s audio settings and enable the input signal from Catchbox. See detailed instructions on Page 26. POWER & AUDIO...
- Page 9 2. Plug the included audio cable to the Receiver's balanced audio output and connect it to the input of your Audio System. 3. Turn on both the Transmitter and the Receiver. 4. Go to your computer's audio settings and enable the input signal from Catchbox. See detailed instructions on Page 26. POWER...
- Page 10 LEDs on the front panel will turn on. Connect the Receiver to the power souce. Turn On the Receiver using the switch on the back panel of the device. The LEDs in the front panel will turn on. Catchbox Plus...
- Page 11 Step 4 Adjust the volume using the volume buttons on the Transmitter and on the Receiver. Avoid excessive volume. Do not exceed 70 dBa for airborne noise. Catchbox Plus...
- Page 12 Always properly lock the Transmitter unit, with the attached foam cap, into the Cover before use. Improperly locking the Transmitter, or a failed locking mechanism, will result in the Transmitter unit coming out during use, potentially leading to serious injury and/or property damage. Catchbox Plus...
-
Page 13: Throwing The Catchbox
Throwing the Catchbox To throw the Catchbox microphone, find someone in the audience who wants to ask a question or make a comment. Make sure that the person and those around him or her are aware of the situation and are prepared to catch. -
Page 14: Speaking Into The Catchbox
Speaking into the Catchbox To use the Catchbox, simply speak into the foam cap located on top of the Transmitter. An optimal distance of 20 cm / 8 in will provide the clearest sound while not blocking the face of the person speaking. -
Page 15: Product Description
3 Product Description Overview Catchbox Plus is a complete wireless microphone system designed for use in meeting rooms and event spaces with audiences of up to 1000 people with the wireless range of up to 100 m / 330 ft (Line of Sight). -
Page 16: Dect Wireless Standard Overview
Catchbox Plus system. The wireless range of Catchbox Plus product is 100 m / 330 ft under ideal working conditions (Line of Sight). However, indoor obstacles like walls, furniture and people may reduce the effective range. -
Page 17: General System Specifications
Catchbox Catchbox Transmitter Cover Receiver Wireless Charger Presenter Mic Included components: • Catchbox Plus Transmitter (one or two) • Catchbox Cover (one or two) • Catchbox Plus Receiver with power supply • Audio cable • Micro-USB audio data cable •... -
Page 18: Transmitter Specifications
180 x 180 x 180 mm / 7 x 7 x 7 in Audio frequency response 50-12000 Hz Battery type Lithium-ion, rechargeable Battery life (full charge) 14 h Charging time 6 h (Wireless Charger) or 3 h (USB cable) Frequency response Note: Frequency response is measured with attached foam cap Catchbox Plus... -
Page 19: Receiver Specifications
Power supply 5V 1A USB micro Analog audio output TRS 6.3 mm / 1/4 in jack - balanced USB micro, USB-Audio protocol, no codec Digital audio output installation required Balanced Audio Output Schematic Both audio outputs operate simultaneously Catchbox Plus... -
Page 20: Wireless Charger Specifications
190 x 190 x 28 mm / 7.4 x 7.4 x 1.1 in Wireless charging protocol Proprietary Wireless Charger is optimized for charging only Catchbox products and will not charge other electronic devices such as mobile phones. Don’t place electronic devices with the Wireless Charger as doing so may damage the Wireless Charger and/or device placed on it. -
Page 21: Presenter Mic Specifications
Weight 80 g / 2.8 oz Dimensions 82 x 60 x28 mm / 3.2 x 2.4 x 1.1 in Audio frequency response 50-12000 Hz Battery type Lithium-ion, rechargeable Battery life (full charge) Charging time 2 h (USB cable) Catchbox Plus... -
Page 22: Catchbox Cover Specifications
Catchbox Cover Specifications Parts 1) Opening for transmitter unit 2) Magnetic lock Specifications Weight 200 g / 7 oz Dimensions 18 x 18 x 18 cm / 7 x 7 x 7 in Catchbox Plus... - Page 23 Catchbox Plus Microphone Unit Specifications Weight 365 g / 12.8 oz Dimensions 18 x 18 x 18 cm / 7 x 7 x 7 in Catchbox Plus...
-
Page 24: Operations
5 Operations Opening the Catchbox Microphone The locking mechanism is composed of two magnets that attract each other when correctly aligned. Remove the Transmitter from the outer Cover by twisting it 90 degrees and pulling upwards. This motion will misalign the internal magnets and allow for easy removal of the Transmitter unit. -
Page 25: Locking The Transmitter To The Cover
Always properly lock the Transmitter unit, with the attached foam cap, into the Cover before use. Improperly locking the Transmitter, or a failed locking mechanism, will result in the Transmitter unit coming out during use, potentially leading to serious injury and/or property damage. Catchbox Plus... -
Page 26: Setting Up The Receiver
(purchased separately). Please refer to the wiring diagram of the Receiver’s balanced audio output (page 19). Use only the included Power supply to power the Receiver. Using other manufacturers’ equipment may cause malfunction and/or damage the Receiver. Catchbox Plus... - Page 27 Receiver’s micro-USB socket. The connection will provide both power and audio communication. Go to your computer’s audio settings and enable the input signal from Catchbox. On Chrome devices Go to Settings -> Audio settings Change the Input to “Catchbox USB audio device” Catchbox Plus...
- Page 28 On Mac Go to System Preferences -> Sound -> Output Select “Catchbox USB audio device” On Windows Go to Control Panel -> Sound -> Recording Select “Catchbox USB audio device” Catchbox Plus...
-
Page 29: Setting Up The Transmitter
LEDs will briefly light up indicating the volume level. If the battery is critically low the Transmitter will not turn on and an LED will blink rapidly.In this case the battery can only be charged with the AC Power adapter Catchbox Plus... - Page 30 LEDs will briefly light up indicating the battery charge level. Hardware reset Press and hold the power button for approx. 10s. Green LED will light up indicating that device is powered. Catchbox Plus...
-
Page 31: Pairing The Transmitter And The Receiver
Pairing the Transmitter and the Receiver Catchbox Plus Receiver can be paired with up to two Transmitters simultaneously. To reduce the setup time each Transmitter and Receiver unit have been paired in the factory before shipping. Pairing two devices Make sure that both devices are turned on and located within 3m / 10 ft distance from each other. -
Page 32: Charging The Transmitter With The Usb Cable
Always use the included Power supply to charge the Transmitter. Other devices may provide insufficient amount of power which will result in long charging time. Catchbox Plus... -
Page 33: Charging The Transmitter With The Wireless Charger
Place the Transmitter (securely attached inside the Cover) in its natural position to start the charging. Always ensure there are no foreign objects located between the Catchbox and the surface of the Wireless Charger. If all LEDs are blinking it indicates an error. Please see section Troubleshooting (page 40) Always use the included Power supply to power the Wireless Charger. -
Page 34: Setting Up The Presenter Mic
To mute and unmute the Presenter Mic, fast click the power button on the side of the device. If the battery is critically low the Presenter Mic will not turn on and the LED will blink red a few times. Catchbox Plus... - Page 35 Green blinking Not yet paired to a receiver Green & red blinking rapidly In pairing mode Green Power on, paired to a Receiver Low on battery (less then 2h operating time left) Green pulsating Charging Red blinking On mute Catchbox Plus...
-
Page 36: Pairing The Presenter Mic And The Receiver
Pairing the Presenter Mic and the Receiver Catchbox Plus Receiver can be paired with up to two Transmitters simultaneously. To reduce the setup time each Transmitter and Receiver unit have been paired in the factory before shipping. Pairing two devices Make sure that both devices are turned on and located within 3 m / 10 ft distance from each other. -
Page 37: Charging The Presenter Mic
When LED is steadily lit green the battery is fully charged POWER Always use the included Power supply to charge the Presenter Mic. Other devices may provide insufficient amount of power which will result in long charging time. Catchbox Plus... -
Page 38: How To Wear The Presenter Mic
How to wear the Presenter Mic Wear it around your neck using the lanyard. Wear it attached to clothing (e.g. belt or pocket). Catchbox Plus... -
Page 39: Setting The Lanyard On The Presenter Mic
2. Safety breakaway Use only the included Lanyard with the Presenter Mic. Make sure the safety breakaway point is on the side of the lanyard or on the back of the neck of the user, so it can function properly. Catchbox Plus... -
Page 40: Troubleshooting
Volume level is too high. replace the cable and/or adapter. Decrease the volume on the Transmitter or the Receiver. Audio feedback Catchbox microphone is situated too Move Catchbox microphone away from close to the loudspeakers. the loudspeakers. Volume level is too high. - Page 41 Transmitter and the Wireless Charger. Catchbox on the Wireless Charger. blinking Catchbox is not properly placed on Place Catchbox at the center of the the Wireless Charger. Wireless Charger. The Transmitter is placed on the Place the Transmitter in Cover and place Wireless Charger without a Cover.
-
Page 42: Maintenance, Storage, And Disposal
7 Maintenance, Storage, and Disposal Proper maintenance and storage of the Catchbox Plus wireless system will help ensure the product remains operational and safe to use. Improper maintenance or storage, in turn, can lead to equipment failure which can cause serious injury during use. Always refer to this user manual for proper maintenance, storage, and disposal instructions and do not throw away this user manual. - Page 43 To dispose of an old battery send the product back to the manufacturer or consult your local waste management professional. • Never throw away the battery or the product to a regular garbage container. Always use the specialized waste containers for electronics or batteries. Catchbox Plus...
-
Page 44: Certification
8 Certification The Catchbox Plus wireless system consists of: • Catchbox Plus Transmitter (Model #: CBPLTX001) • Catchbox Plus Receiver (Model #: CBPLRX001) • Catchbox Wireless Charger (Model #: CBWCH0001) • Presenter Microphone (Model #: CBPRTX001) Catchbox Plus Transmitter (Model #: CBPLTX001) - Page 48 www.catchbox.com...
Need help?
Do you have a question about the Catchbox Plus and is the answer not in the manual?
Questions and answers