Advertisement
Quick Links
SUPERSEDES: New
Plant ID# 001-3997
Application:
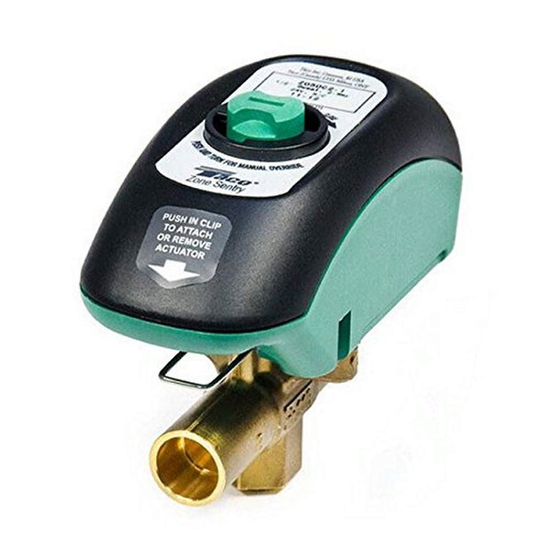
Taco Zone Sentry Zone Valves can be used in a wide vari-
ety of heating and (non condensing) cooling applications,
primarily designed for use with baseboard, fan coils, radia-
tors, convectors, air handlers, heat pumps and radiant
applications. Refer to the Product Specifications section for
choosing the correct style valve for your application.
General Installation Information / Operation:
The Zone Sentry is the most technologically advanced
zone valve ever made. It's also simple to install and oper-
ate. The valve body can be installed in any position and
in any orientation. The actuator's electrical connections
must be mounted over the port that requires flow when
power is applied to the actuator. (See Figure 1.) The back
of the valve makes for a simple, secure and fast wiring
hook-up. A green LED light shows full functionality of the
valve's operation and thermostat status. Under a no power
situation the manual override button located on the top
of the valve allows the ball to be rotated up to 90°.
Figure 1
ELECTRICAL
CONNECTION
A
B
C
NO CALL
Before mounting the body refer to Figure 2 for any clear-
ance requirements.
Figure 2
W
A
L
L
Zone Sentry 3-way Diverting Valve
A
B
C
NO CALL
CALL
ELECTRICAL
CONNECTION
CALL
3
⁄
" CLEARANCE
4
3
1
⁄
" CLEARANCE
8
Instruction Sheet
CAUTION: Actuator must be removed from
the valve body before soldering (see
Figure 3). Ball valve must be in the full open
position to the port that is being soldered.
Figure 3: Operator
Removal
Step 1:
Push in and hold
release clip at the
front of the actuator.
CAUTION: Installation should only be per-
formed by a qualified professional.
Use of a solder with a melting point below 600°F is rec-
ommended. Do not overheat! Make sure the ball valve is
in the FULL OPEN position to the port that is being sol-
dered. Direct flame tip away from the center of the valve.
Cool valve quickly with a wet rag to prevent overheating.
Solder build-up on the ball valve may prevent proper
opening and closing of the valve.
Valve body may be submerged for leak testing before the
actuator is attached.
Step by Step Valve Installation:
1. Remove actuator from the valve body. Push in and
hold the release clip at the front of the actuator, pull
the actuator away from the body (approx.
Figure 3.)
2. Open the valve to the full open position of the first
port to be soldered (port A or B).
3. Clean and prepare the valve and pipe using the
proper techniques required prior to soldering.
4. Fit the valve into the piping system.
5. Solder the port of the valve that you placed in the
full open position, directing the flame away from
the center of the valve.
6. Turn the opening of the valve to the second port to
be soldered. (the opposite port of the one just com-
pleted.)
7. Repeat step 5 for the second port.
8. Solder the third port (bottom port). This port is
always in the full open position.
9. Immediately cool the valve with a wet towel.
102-426
EFFECTIVE: April 1, 2011
Step 2:
Move actuator away from the
valve body approximately 3⁄4"
to disengage locking posts
and stem.
L
OCKING
POST
3
⁄
"). (See
4
Advertisement

Subscribe to Our Youtube Channel
Related Manuals for Taco Zone Sentry


Summary of Contents for Taco Zone Sentry
- Page 1 Plant ID# 001-3997 Application: CAUTION: Actuator must be removed from Taco Zone Sentry Zone Valves can be used in a wide vari- the valve body before soldering (see ety of heating and (non condensing) cooling applications, Figure 3). Ball valve must be in the full open primarily designed for use with baseboard, fan coils, radia- position to the port that is being soldered.
- Page 2 Installing the Actuator on the Valve Body: 2. When the capacitor is charging the green LED light will FLASH. 1. Position the actuator so that the “D” shaped valve stem aligns with the “D” shaped drive cavity in the 3. Once the capacitor is charged the green LED will operator stop flashing but remain ON, at this point the valve’s actuator will rotate the ball valve.
- Page 3 NOTE 1: Some power robbing thermostats require the use of a resistor (always use the resistor provid- ed by the thermostat manufacturer with the Zone Sentry). Consult the thermostat instructions for the resistor installation. NOTE 2: The plug-in quick connects can be disconnected from the valve actuator for ease of wiring.
- Page 4 Copyright 2011 TACO, INC., 1160 Cranston Street, Cranston, RI 02920 Telephone: (401) 942-8000 FAX: (401) 942-2360. TACO (Canada), Ltd., 8450 Lawson Road, Unit #3, Milton, Ontario L9T 0J8. Telephone: 905/564-9422. FAX: 905/564-9436. TACO, Inc. Visit our web site at: http://www.taco-hvac.com...
Need help?
Do you have a question about the Zone Sentry and is the answer not in the manual?
Questions and answers