Advertisement
Advertisement

Related Manuals for CUMMINS ALLISON JetScan 150


Summary of Contents for CUMMINS ALLISON JetScan 150
- Page 1 Getting started JetScan ® Currency scanner User guide | | 1...
-
Page 2: Safety Information, Power Specifications
Turn power OFF and unplug power cord from machine before cleaning. Do not attempt repairs. Repairs must be made by authorized Cummins Allison personnel. Use grounded plug and properly grounded outlet. Read and understand all instructions before use. Improper voltage levels can cause equipment malfunction, damage electrical components, and void warranty. -
Page 3: Table Of Contents
• Configurable strap limits. • Cumulative counting. • A setting for recounting documents without impacting totals. For information on options and device configuration, contact a Cummins Allison representative. ECB certification software version To verify European Central Bank (ECB) certification software version: CRNCY 1. -
Page 4: Machine Diagram
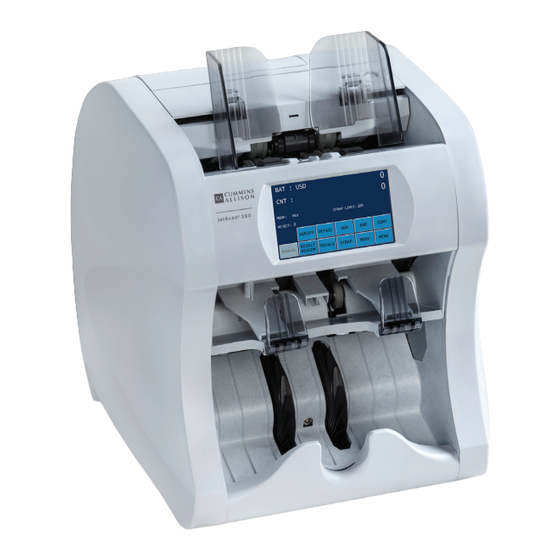
Machine diagram Thickness adjustment dial located behind hopper extension Adjustable hopper guides Hopper Touch-panel display Reject pocket Stacker wheels Pocket sensors Pocket Power switch (on back of unit) 4 | JetScan 150 currency scanner | Machine diagram ®... - Page 5 Communication port diagram Communication ports are located on the back of the machine. USB H Debug LAN/Ethernet Display Printer Only connect LAN/Ethernet cable to LAN/Ethernet port. Use of any other cable may damage equipment. Hopper Machine is auto-start capable. Feed rollers in hopper rotate inward.
- Page 6 Thickness adjustment dial The dial located on top of the machine adjusts the tightness of the feeder through which notes pass during operation. The dial has positive and negative adjustment numbers, with 0 at the center of the adjustment range. For normal feeding, start with 0 at the top of the dial.
-
Page 7: Getting Started
Getting started This section outlines basic features and functions of the JetScan 150 currency scanner. Powering ON/OFF High voltage inside. Risk of electric shock. Turn power OFF and unplug power cord from machine before cleaning. Do not attempt repairs. Repairs must be made by authorized Cummins Allison personnel. - Page 8 Touch-panel display: Main screen Main screen key Description Press to prompt the SELECT NEW CURRENCY screen and activate the preferred currency for processing. CRNCY CRNCY may appear on the main screen or MAIN SUB- MENU, depending on the configuration in SETUP. Press to enable the verify function, which allows notes to be processed off-line.
- Page 9 Main screen key Description Press to start the motor. CONT Press to prompt a screen that is used to input mutilated notes that could not be processed. Press ADD and then press the specific denomination to enter the value of a note. Press ADD repeatedly to enter MANUAL that note more than once.
- Page 10 Operating modes Pressing MODE from the main screen displays all modes available for use. Mode key Description Scans for the first denomination processed (target), and STRGR diverts all other denominations to the reject pocket. A (STRANGER) grand total is provided. Scans all denominations without presorting.
- Page 11 Mode key Description When ORIENT is selected in addition to STRGR or MIX mode, the machine diverts non-oriented notes to the ORIENT reject pocket. The first note processed determines the orientation. When FACE/ORIENT is selected in addition to STRGR or MIX mode, the machine diverts non-faced and FACE/ORIENT non-oriented notes to the reject pocket.
- Page 12 Strap counts and strap limits To view current strap limits and counts, press STRAP on the main screen. The STRAP SETTINGS screen is displayed (similiar to the following example). Strap limits may be set for each denomination in all operating modes, except for MIX, MIX/FACE and MIX/ORIENT.
- Page 13 Printed reports When an optional printer is connected to and configured on the machine, reports: • Automatically print after batches are ended. • Can be generated on demand by pressing DETAIL or TOTALS on the main screen and then pressing PRINT on the respective screens below. To generate a report listing rejected notes in a batch, press REJECT REASON on the main screen.
-
Page 14: Stopping Conditions And Recovery Steps
Stopping conditions and recovery steps The following conditions cause the machine to stop and require action by the user. Notes at limit Conditions • The number of notes in the pocket reached the pocket limit selected in SETUP. • The number of notes in the pocket reached the preset strap limit. - Page 15 Condition Notes or foreign material are jammed in the paper path. Action To clear a jam, follow these procedures: Do not use tools or metal devices to remove jammed notes from paper path. Use of tools or metal devices could cause machine damage and void existing warranty.
-
Page 16: Daily Cleaning Procedures
Daily cleaning procedures Daily cleaning is recommended to ensure maximum productivity and reliability. Recommended cleaning materials Simple Green, the recommended cleaning agent, can be an eye irritant. Avoid eye contact. If eye contact occurs, flush eye(s) with cool water for 5 minutes –... - Page 17 Turn the power OFF (rocker panel to 0). Disconnect the power cord. Lift the lever on the back of the machine to disengage the upper transport plate. Use a dry microfiber towel to clean the black start sensor located in the center of the feeder plate. Use a Simple Green Safety Towel to clean all rubber sections of the feed rollers located on the upper transport and feeder plates.
- Page 18 Use a dry microfiber towel to wipe buildup off of the image sensors. Close the upper transport plate. Use a dry microfiber towel or vacuum to remove any remaining dust in the pocket. Pinch the tabs on the back of the unit, and guide the panel downward to access the lower transport path.
- Page 19 Avoid damaging touch-panel display. Only clean touch-panel display with dry microfiber towel as directed. Clean the touch-panel display with a dry microfiber towel. Clean remaining hard-plastic exterior surfaces as necessary with a Simple Green Safety Towel. Carefully reconnect the power cord. Turn the power ON (rocker panel to I).
- Page 20 This manual contains proprietary information of Cummins Allison. It is intended solely for the information and use of parties authorized by Cummins Allison to maintain the equipment described herein. Such proprietary information may not be used, reproduced, or disclosed to any other parties for any other purpose without express written permission of Cummins Allison.
Need help?
Do you have a question about the JetScan 150 and is the answer not in the manual?
Questions and answers