Table of Contents
Advertisement
Quick Links
Advertisement
Table of Contents

Related Manuals for Flyability ELIOS


Summary of Contents for Flyability ELIOS
- Page 1 ELIOS User manual v4 Flyability...
- Page 3 Flyability does not warrant that the Product will be free from defects. In case of defect, You shall pursue available remedies to You according to the Agreement. The warranty shall exclude defects due to misuse, non-observation of the User Manual, moisture or liquids, proximity or exposure to heat, excessive strain, abuse, neglect, misapplication, repairs or modifications made by anyone other than Flyability.
-
Page 5: Table Of Contents
Transport Elios Controller binding Connect a camera operator GCS to pilot GCS Trimming Elios Troubleshooting After changing a propeller Elios can’t reach its upright orientation After changing the propellers Elios has a lack of thrust Contact us My Flyability Incident report... -
Page 6: Safety
It may result in serious injuries for the person and damage the robot. Using other devices in combination with Elios other than approved by Flyability (e.g. batteries, § battery chargers, etc.) is prohibited. Any unapproved modification of the drone is prohibited. -
Page 7: Environmental Awareness
Moreover, Flyability can’t ensure the robot flight capability and stability outside of a range of temperature of 0°C (32ºF) and +35°C (95ºF). Wind has serious effect on Elios. If the wind is higher than 3m/s (6.7mph), it should be piloted §... -
Page 8: Checklists
MS or RA and appropriate measures must be taken (gloves, eye protection, mask, etc.). ☐ Do you have the correct Personal Protective Equipment [PPE]? Even if Elios is safe to fly close to human, whilst in operation some precaution might be taken. The following PPE must always be wear: Gloves... -
Page 9: Pre-Flight Checklist
☐ Start the screen recording ☐ Arm Elios ☐ Wait for the upright position. If last for more than 5s, disarm and turnoff Elios. Check the ☐ troubleshooting or contact Flyability Make sure the camera is recording ☐ ☐ Check its flying behavior (up/down, left/right, forward/backward, CW/CCW rotation) ☐ Open Elios cockpit, you are Go flight. -
Page 10: After Flight Checklist
Figure 3.1: System overview As the operator, you will enjoy a full control of Elios through the Ground Control System (GCS). A tablet allows the operator to have a live video feed transmitted by Elios. A post mission analysis software Flyability Inspector provides a simple solution to visualize the recorded full HD optical video and the thermal video. - Page 11 3 degrees of rotation. Camera SD Card The Camera SD Card records the full HD optical video feed whilst Elios is flying. Please only use the provided SD card marked Video. Log SD Card The Log SD Card records the thermal video feed as well as plenty of telemetry data.
-
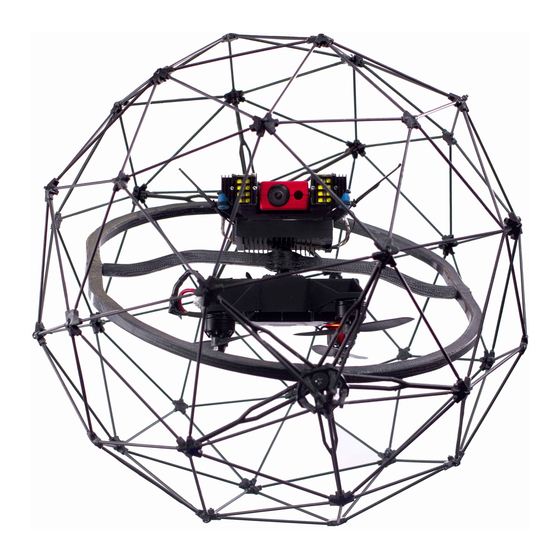
Page 12: Ground Control System
Figure 3.2: Elios overview 3.1.1 Battery and charging LiPo batteries are very sensitive and dangerous devices. Please read carefully the “Battery Handling, Recharge and Transport” manual available in the my.flyability.com platform to know more about the proper use of the batteries. - Page 13 Set the Exposure time if the camera is in manual low ISO mode or in manual high ISO mode. While FN button pressed: Set the onboard lighting intensity High Speed button When pressed, Elios is in High Speed mode. Its airspeed limitation is put up to 7m/s. USB port Connection to the provided tablet HDMI port...
- Page 14 3.2.2 Tablet The tablet offers you a nice interface to help you through your mission. It will allow you to see the live video feed transmitted by the Elios’ camera. Figure 3.4: Tablet overview Power & lock button Power on/off the tablet and lock the screen...
-
Page 15: Camera Operator Gcs (Option)
Figure 3.7: Camera operator controller overview Power button: Turns the Controller on/off and display the battery level of the controller Status indicator Indicates the connection status between the controller and Elios Battery level indicator Display the current controller’s battery level Camera pitch... -
Page 16: Amplified Deported Antenna System (Option)
In remote environment, the need of deporting the antenna can offer a more reliable communication link between the GCS and Elios. It can be used to inspect confined space without enter by placing only the Amplified Deported Antenna System (ADAS) inside. This option can be provided by Flyability. -
Page 17: Flying With Elios
Used to connect the battery to the signal booster. The signal booster uses the same battery than Elios. 4. Flying with Elios This section covers how to set up the GCS and Elios. It will also give the necessary instructions to do your first flight with the Elios system. 4.1 Setting up the ground control system 4.1.1... -
Page 18: Setting Up Elios
4.2 Setting up Elios 4.2.1 Mount the SD cards Please, only use the LOG SD card provided by Flyability Place the two SD cards in their corresponding slots. You can refer to the annotation located on the SD cards and on Elios’ top. - Page 19 Using the provided lens cleaner, follow those steps to clean properly the Full HD Optical Camera Lens before each flight. Using the brush side, remove all the dust from the lens. Using the dry cleaner side, remove all the grease and fingerprints from the optic. Figure 4.3: Lens cleaner overview...
- Page 20 Slight the Battery into the Battery Holder. Secure the latter using the strap. To plug the battery, simply slide the battery connector all the way into the Elios’ Power connector. Figure 4.4: Battery insertion and connection Once the battery is connected, Elios is on and ready to be armed.
-
Page 21: Elios Control
Slide back the left stick to the bottom right Figure 4.5: Arming sequence Once armed, Elios is performing a maneuver to go to its upright position. If after 5 seconds, Elios is not in a stable upright position, disarm Elios and contact Flyability. - Page 22 4.3.2 Disarm Once Elios landed on the ground or safely held in the hand of the operator, it is possible to stop the motors. To do so, perform one of the following sequence: Place the left stick on the bottom right...
- Page 23 Elios orientation and maneuver are defined regarding to the inner frame. It is very important that whilst piloting, the operator makes an abstraction of the cage. The control of Elios is mapped to the control sticks by default in mode 2. It is defined as follow: Controller...
- Page 24 4.3.4 Camera Control The left wheel of the Controller allows you to change the pitch of the cameras. The left dial controls Elios camera’s pitch. To the left makes the camera pointing downwards. To the right makes the camera pointing upwards.
-
Page 25: Flight Data Logging And Video Recording
This logging also allows you to also to retrieve telemetry while post processing your mission using Flyability inspector. 4.4.2 Video recording The video recording starts as soon as Elios is armed and stops when Elios is disarmed. It is so to always have a video footage of your flight. -
Page 26: Tablet Interface
4.5 Tablet interface 4.5.1 Main menu The main menu is composed of 3 different applications: Google Keep – a checklist reminder, that will help you going through the different checklist § before, after and during the flight Floating stopwatch, that will allow you to know how long did you fly and avoid to deplete the §... - Page 27 Do not pay attention to warnings from DJI GO. They are not relevant. Never update the application or the controller unless asked by Flyability. The DJI GO application is used to see the live video feed streamed by the robot. When the tablet is connected, simply tap on “Camera view”, for the live video feed.
-
Page 28: Dji Go
4.6 DJI GO 4.6.1 DJI GO overview Figure 4.13: DJI GO interface overview DJI GO displays telemetry feedback from the robot. The pilot can directly see to the following information: Flight time The Flight telemetry gives the time spent flying since the robot was turned on in [s]. State of charge Display the robot’s battery state of charge in [%]. - Page 29 On the left, quality of the uplink control communication signal. On the right, quality of the downlink video and telemetry communication signal. The other displayed information are not relevant to the use of Elios. Please do not pay attention to them.
-
Page 30: Elios Cockpit
Connection progress Figure 4.16: Main screen when no robot is connected The main screen is the one on which you land when running the app. By default, it contains a Flyability logo and some information on the edges. At this point, the application is waiting for a controller and robot to connect. When the connection is established, the logo is replaced by the video from the camera and flight information appears on the sides. - Page 31 4.7.2 Elios cockpit overview Figure 4.17: Elios cockpit overview Link quality RC: signal strength of the uplink communication (From the GCS to the aircraft) Robot: Signal strength of the downlink communication (From the aircraft to the GCS) Connection status If “UnknownAircraft connected” and “Handshake OK” are displayed, the robot and the GCS are properly communicating together.
- Page 32 4.7.3 Avoid connection issue between Elios cockpit and the controller Unfortunately, the connection between Elios cockpit and the controller often fails when the robot is restarted. Avoid this issue, you must follow those steps when you change the robot’s battery.
-
Page 33: Failsafe
4.8 Failsafe Loss of communication If the communication link between Elios and the GCS is lost. The aircraft will automatically enter in an emergency landing mode. Meaning, it will land on the ground, wait 30s and shut downs the motors. - Page 34 The altitude is based on a barometer. In some cases, the pressure in a given environment will § not be stable. As a result, Elios will not be able to maintain its height. To have a better control, the pilot can disable the Automatic Altitude Control mode to have a direct control on the motors’...
-
Page 35: Setting Up The Amplified Deported Antenna System (Option)
4.10 Setting up the amplified deported antenna system (option) It is very important that the ADAS controller is powered after the whole relay antenna is set up. Not follow these steps may result in serious damage on the ADAS controller. 4.10.1 Without deported antenna Connect the external antennas to the ADAS controller external antenna connector. -
Page 36: Post Mission Data Analysis
After a flight, you can review the recorded footage using one of the method presented below. 5.1 Flyability Inspector Flyability Inspector is a software developed by Flyability offering you a simple interface to analyze all the data gathered during a mission. Unfortunately, the software is compatible with windows 8+ only. - Page 37 The timeline on the bottom of the window will directly show you the points of interest. The right of the screen displays the telemetry information from the flight data. Figure 5.2: Flyability inspector overview Note: Unfortunately, due to some software development delay, the Thermal image and the creation date matching between the log are not available now.
-
Page 38: Quicktime Player
5.2 QuickTime player Available on Windows and MacOS, QuickTime is a nice tool to visualize the full HD optical video recorded during operations. 5.2.1 Download You can download QuickTime on Apple.com 5.2.2 Utilization Open a video "File > Open File ..." Figure 5.3: QuickTime interface At anytime, you can pause the video by pressing the Spacebar. -
Page 39: Vlc Media Player
5.3 VLC media player Download and install the latest version of VLC http://www.videolan.org/vlc/. § Open a video § Anytime, if you find an interesting element, you can pause pressing the . You can § move picture by picture using the key. -
Page 40: Maintenance
Be careful, the robot has two kinds of propellers. Propeller 5040R shall be placed on the front left and bottom right motors, propeller 5040 on the front right and bottom left motors. The propellers’ labels must be the upper side of the latter regarding Elios’ upright orientation. Now re-screw with strength the nut. -
Page 41: Repair The Cage
6.2 Repair the cage 6.2.1 Change a pentagon To change a pentagon, cut the surrounding zip ties with the cutter plier and remove the damaged pentagon. Place the new pentagon and attach it with new zip ties. Be careful to place the zip ties’ ratchet on the inner side of the cage. -
Page 42: Cleaning The Robot
6.4 Transport Elios Elios should never be transported with a battery on it. To avoid any movement of the robot during the transportation, Elios shall be attached to its cage. To do so, follow these steps: Make sure no battery are inside the aircraft Close the battery strap Pass the transportation strap through the battery strap, the ring and a pentagon as shown below. -
Page 43: Controller Binding
Figure 6.3: Accessing transmitter link button Place the controller and Elios at 1.5 m from each other. Turn on Elios, and the controller and connect the tablet to it. Launch the DJI GO app, and go to Camera View >... -
Page 44: Connect A Camera Operator Gcs To Pilot Gcs
Figure 6.6: Accessing transmitter link button Insert and connect a battery in the aircraft. Place the controller and Elios at 1.5 m from each other. Turn on the controller to be bind Press and hold simultaneously the FN button, the High Speed button and the Camera home button. -
Page 45: Trimming Elios
6.7 Trimming Elios If Elios is drifting a lot in a particular direction in the horizontal plan, it is possible to trim the control of the aircraft. Make sure that the drift direction is consistence regardless of the aircraft orientation in the room. -
Page 46: Troubleshooting
7.2 After changing the propellers Elios has a lack of thrust If after changing a propeller or all of them, Elios has issue to maintain its altitude or if the battery is emptied very quickly, make sure the propellers are put in the correct position (R mark propeller on R... -
Page 47: Contact Us
Updated manuals and troubleshooting § Knowledge base § Software and Firmware upgrades § Contact form to simplify interaction with Flyability § An invitation mail has been sent to you whilst ordering Elios to create your account. If not, please contact us at support@flyability.com. -
Page 48: Incident Report
All the data you will provide us will be confidential and only treated by Flyability. All data will be removed from our servers as soon as your problem is solved. - Page 49 8.2.3 Adding content to an open request If you already have an open request. For example, you sent us an email and we asked you to send us some complementary files. Go to "My activity" and click on the corresponding discussion. Figure 8.4: Access existing request By clicking on the attachment box, you will be able to browse and select the file you want to upload.
-
Page 50: Flyability Professional Service
8.3 Flyability Professional Service If a question remains unanswered or you need to contact directly one of our agent, Flyability Professional Service is here for you: Flyability S.A. Av. de Sevelin, 18 1004 Lausanne Switzerland Email: support@flyability.com Tel: +41 21 311 55 00... -
Page 51: Specification
9. Specification Flight mode Types Manual thrust control Automatic Altitude Control High Speed Mode Availability Switch between modes at any time Fail safe Auto-landing on low-battery or signal lost Flight system Dimension fits in <400mm sphere Motors 4 electric brushless motors Takeoff weight 700gr incl.battery, payload &... - Page 52 Android Optimized for Tablet provided with UAV system Operating system Post flight video, thermal and log analysis Name Flyability inspector Type Video and thermal video viewer (frame by frame) Flight log analysis including point of interests recorded during flight Export of screenshots (and flight data)
- Page 53 Content subject to change To download latest version Check on my.flyability.com...
Need help?
Do you have a question about the ELIOS and is the answer not in the manual?
Questions and answers