
Subscribe to Our Youtube Channel
Related Manuals for jbc CV-E


Summary of Contents for jbc CV-E
- Page 1 INSTRUCTION MANUAL Page English Español Deutsch 中文 Compact Desoldering Station with Pneumatic Pump Ref. CV-E...
-
Page 2: Packing List
Packing List The following items should be included: CSV Control Unit ........1 unit Micro Desoldering Iron ......1 unit Ref. CSV-1E (120V) Ref. DS360-A CSV-2E (230V) CSV-9E (100V) Power Cord ....1 unit Sponge ....... 1 unit Brass Wool ....1 unit Ref. - Page 3 Filters ....1 unit Ref. 0008446 Ref. MV-A Ref. 0781046 Manual ......1 unit Suction Filter ....1 unit Module Cable Ref. 0016887 Ref. 0821830 connector ...... 1 unit Ref. 0010207 w w w.jbctools.com Compact Desoldering Station with Pneumatic Pump Ref. CV-E...
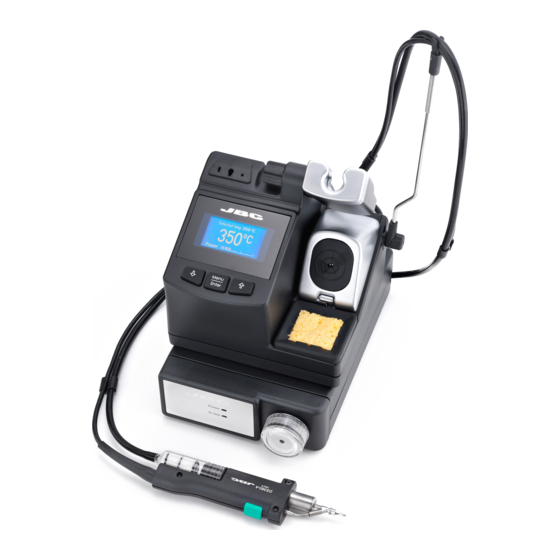
- Page 4 Features Cable collector Adjustable Stand: Intelligent Heat Management Process Screen Brass wool tip cleaner with antisplash membrane Micro Desoldering Iron Ref. DS360-A Equipotential connection Main switch Fuse Power Socket USB-B Module Cable Air pressure range Ref. 0010207 supply (4 - 6 bar)* Suction Filter Ref.
- Page 5 If the tip is very dirty, and rewetting. JBC recommends first cleaning it with the wiper to remove excess solder. Wiper A temperature resistant receptacle for removing excess solder by gently...
- Page 6 Removing the splashguard: 1. Unlock the splashguard. 2. Lift off. Lock More cleaning options (not supplied): Inox Wool Metal Brush Ref. CL6205 Ref. CL6220 Provides a superior When used carefully, it cleaning of the tip. provides a more thorough cleaning. Wiper Tapping: Wiping:...
- Page 7 w w w.jbctools.com Changing the Tip 1. Remove the tip by using a flat-nosed pliers. Twist the tip and pull. 2. Insert the new tip and follow the same steps conversely. Important: Change tips only when the tool is hot. Do not hold the tip in a spring clamp.
- Page 8 Changing the Heating Element 1. Pull off the filter and the solder collector. 2. Remove the fixing screw and then the heating element. 3. Insert the new heating element following the same steps conversely. Heating element Ref. DSV-DS Fixing screw Solder Collector Filter Changing the Pump Filters...
- Page 9 Update the station software via USB connection: Cable USB AB Updater JBC Manager www.jbctools.com/manager.html Manage and monitor as many stations as your PC can handle by using the JBC Manager. You can export data to another PC. any JBC station Cable...
- Page 10 Operation The JBC Exclusive Heating System This revolutionary technology is able to recover tip temperature extremely quickly. This allows the user to work at a lower temperature. As a result, tip life increases by 5. 1. Work 2. Sleep 3. Hibernation...
- Page 11 w w w.jbctools.com Control Process Work Screen Fixed temp 3 5 0 Displays a specific fixed temp. Shown when you have Levels ºC 2 5 0 3 5 0 4 0 0 selected temp. levels. The values must be adjusted Selected temp.
- Page 12 (HMP) or plastics (e. g. more power (e.g. multila- Min. temp. by default is riveting). yered or high dissipation 200ºC (392ºF). This is consi- boards), JBC strongly dered to be a proper starting recommends using other point for leaded applications. aids like preheaters. Metronome Useful for setting a work rate This activates a beep sound.
- Page 13 w w w.jbctools.com Tool Settings Parameter description Warnings Recommendations Ideal for soldering more than Fix one temperature Fix a value within the one component at a specific temperature range of the sta- temperature. The station will tion (180-450ºC/356-840ºF). reject any attempt to change the temperature.
- Page 14 It provides a more precise (± 90°F) to achieve zero error. ges the cartridge type, the adjustment between the JBC strongly recommends parameter should be reset to selected temperature and the the use of TID-A or TIA-A 0°C/F or to the value needed actual one.
- Page 15 If necessary use a tool to lever it off. and return it to the station. - Replace any defective or damaged pieces. Use original JBC spare parts only. - Repairs should only be performed by a JBC authorized technical service.
- Page 16 Safety It is imperative to follow safety guidelines to prevent electric shock, injury, fire or explosion. - Do not use the units for any purpose other than soldering or rework. Incorrect use may cause fire. - The power cord must be plugged into approved bases. Be sure that it is properly grounded before use.
-
Page 17: Specifications
w w w.jbctools.com Specifications CV-1E 120V 50/60Hz. Input fuse: 2A. Output: 23,5V. Control Unit model: CSV-1E CV-2E 230V 50/60Hz. Input fuse: 1A. Output: 23,5V. Control Unit model: CSV-2E CV-9E 100V 50/60Hz. Input fuse: 2A. Output: 23,5V. Control Unit model: CSV-9E - Weight: 2.8 Kg (6.2 lb) - Dimensions: 150 x 175 x 145 mm - Output Peak Power: 40W... - Page 19 MANUAL DE INSTRUCCIONES Estación Micro Desoldadora con bomba Neumática Ref. CV-E...
- Page 20 Composición Los siguientes artículos deben estar incluidos: CSV Control Unit Micro Desoldering Iron Unidad de control CSV ...... 1 unidad Micro Desoldador ....... 1 unidad Ref. CSV-1E (120V) Ref. DS360-A CSV-2E (230V) CSV-9E (100V) Power Cord Sponge Brass Wool Cable de Red ..1 unidad Esponja ....
- Page 21 Ref. 0008446 Ref. MV-A Manual ....1 unidad Suction Filter Module Cable Ref. 0016887 Filtro de aspiración .. 1 unidad Cable del módulo ..1 unidad Ref. 0821830 Ref. 0010207 w w w.jbctools.com Compact Desoldering Station with Pneumatic Pump Ref. CV-E...
- Page 22 Características Recogecable Soporte Ajustable: Gestión inteligente del calor Pantalla de control Limpiador de puntas Micro Desoldering Iron Micro Desoldador Ref. DS360-A Conexión Equipotencial Interruptor de red Fusible Entrada de Red Conector USB-B Module Cable Rango de presión del aire Cable del suministrado (4 - 6 bar)* módulo Ref.
- Page 23 w w w.jbctools.com Soporte Ajustable Recogecable (Ref. CC3702) Ajuste el soporte de la herra- Coloque el cable en el recogedor para mantener ordenada su mienta para adaptarlo a su área de trabajo. posición de trabajo. Limpiador de puntas Elija la opción que se ajuste mejor a sus necesidades y mejore la transferencia térmica de la punta. Splashguard Protector anti-salpicaduras Antisplash Membrane Membrana protectora...
- Page 24 Si necesita extraer el protector anti-salpicaduras, siga los siguientes pasos: 1. Gire el pomo. 2. Retire el protector anti-salpicaduras. Pomo Otras opciones de limpieza (no incluidas): Inox Wool Metal Brush Lana inoxidable Cepillo de metal Ref. CL6205 Ref. CL6220 Proporciona una Si se usa con cuidado, limpieza superior de la proporciona una limpieza...
- Page 25 w w w.jbctools.com Cambio de puntas 1. Extraiga la punta con la ayuda de unos alicates de nariz plana. Gire la punta y estire. 2. Inserte la nueva punta y siga los mismos pasos a la inversa. Importante: Cambie la punta sólo cuando la herramienta No sujete la punta por la parte del muelle.
- Page 26 Cambio de elemento calefactor 1. Extraiga el filtro y el colector de soldadura. 2. Quite el tornillo de fijación y retire el elemento calefactor. 3. Inserte el nuevo elemento calefactor y siga los mismos pasos a la inversa. Heating element Elemento calefactor Ref.
- Page 27 Actualice el programa (software) a través de la conexión USB: Cable USB AB Updater JBC Manager · Gestor JBC www.jbctools.com/manager.html Gestione y monitorice tantas estaciones como su ordenador permita utilizando el JBC Manager (Gestor JBC). Puede exportar los datos a otros PCs. cualquier estación JBC Cable USB AB Manager Settings Configuración del gestor...
- Page 28 Funcionamiento El Exclusivo Sistema Calefactor de JBC Esta tecnología revolucionaria es capaz de recuperar la temperatura extremadamente rápido. Esto permite al usurio trabajar con temperaturas más bajas. Y como resultado, la vida de la punta puede incrementarse hasta 5 veces.
- Page 29 w w w.jbctools.com Control del proceso Pantalla de trabajo Se muestra cuando se fija una Fixed temp 3 5 0 temperatura específica. Levels ºC 2 5 0 3 5 0 4 0 0 Se muestra cuando se activan los niveles de temperatura. Selected temp.
- Page 30 (p. ej. riveting). requiere más potencia (p. Configurado por defecto a ej. PCBs multicapa o de 200ºC ya que se considera gran disipación). JBC re- un valor adecuado para em- comienda utilizar la ayuda pezar a soldar con la mayoría del precalentador.
- Page 31 w w w.jbctools.com Configuración de la Herramienta (Tool Settings) Descripción del parámetro Recomendaciones Advertencias Fijar una temperatura Ideal para trabajos en los que Fije un valor dentro del rango se deben soldar más de un de temperatura de la estación componente a una tempera- 180-450ºC (356-840ºF).
- Page 32 (±90°F) hasta conseguir error debe resetear este pará- seleccionada en la estación cero. JBC recomienda usar metro a 0°C/F o ajustarlo y la temperatura real en la los termómetros TID-A o al cartucho a utilizar.
- Page 33 2. Coloque el nuevo fusible en su sitio Si fuera necesario, utilice una palanca. presionando ligeramente. - Cambie cualquier pieza defectuosa o dañada. Utilice solamente recambios originales de JBC. - Cualquier reparación sólo podrá ser realizado por un servicio técnico oficial JBC.
- Page 34 Seguridad Es necesario cumplir estas normas de seguridad para prevenir cualquier choque eléctrico, heridas, fuego o explosiones. - No utilice el equipo para otros fines que no sea la soldadura o reparación. El uso incorrecto puede causar fuego. - El cable de red debe enchufarse en bases homologadas. Asegúrese de que está conectado a tierra correctamente antes de su uso.
- Page 35 w w w.jbctools.com Especificaciones CV-1E 120V 50/60Hz. Fusible de entrada: 2A. Salida: 23,5V. Unidad de Control: CSV-1E CV-2E 230V 50/60Hz. Fusible de entrada: 1A. Salida: 23,5V. Unidad de Control: CSV-2E CV-9E 100V 50/60Hz. Fusible de entrada: 2A. Salida: 23,5V. Unidad de Control: CSV-9E - Peso: 2,8 Kg (6.2 lb) - Dimensiones: 150 x 175 x 145 mm - Potencia máxima: 40W...
- Page 37 BEDIENUNGSANLEITUNG Entlötkolben Station mit Pneumatische Pumpe Ref. CV-E...
- Page 38 Packliste Die folgenden Artikel sollten enthalten sein: CSV Control Unit Micro Desoldering Iron CSV Steuereinheit ......1 Einheit Mikro-Entlötkolben ......1 Einheit Ref. CSV-1E (120V) Ref. DS360-A CSV-2E (230V) CSV-9E (100V) Power Cord Sponge Brass Wool Netzkabel ....1 Einheit Schwamm ....
- Page 39 Ref. 0008446 Saugvorrichtung ..1 Einheit Ref. MV-A Handbuch ....1 Einheit Suction Filter Module Cable Ref. 0016887 Saugfilter ....1 Einheit Modulkabel ....1 Einheit Ref. 0821830 Ref. 0010207 w w w.jbctools.com Compact Desoldering Station with Pneumatic Pump Ref. CV-E...
- Page 40 Merkmale Kabelausleger Verstellbare Ablage: Intelligentes Heizmanagement Prozess- Steuerung Spitzenreinigungssystem Micro Desoldering Iron Mikro-Entlötkolben Ref. DS360-A Potenzialausgleichs- buchse Hauptschalter Sicherung Netzsteckdose USB-B Anschluss Module Cable Luftdruck Modulkabel Suction (4-6 bar) Ref. 0010207 Filter Saugfilter Ref. 0821830...
- Page 41 w w w.jbctools.com Verstellbare Ablage Kabelausleger (Ref. CC3702) Stellen Sie die Werkzeugablage Fixieren Sie das Kabel am Aufleger und stellen ihn so ein, um passend auf Ihre Arbeitsposi- Kabelsalat zu vermeiden. tion ein. Spitzenreinigungssystem Wählen Sie die Option aus, die am besten Ihre Reinigungsbedürfnisse erfüllt. Splashguard Antisplash Membrane Schutzmembran...
- Page 42 Wenn Sie den Spritzschutz entfernen müssen, befolgen Sie folgende Schritte: 1. Entriegeln Sie den Spritzschutz. 2. Nehmen Sie ihn heraus. Weitere Optionen für den Spritzschutz (nicht im Lieferumfang enthalten): Inox Wool Metal Brush Edelstahlwolle Metallbürste Ref. CL6205 Ref. CL6220 Sorgt für eine bessere Bei sorgfältiger Reinigung an der Spitze.
- Page 43 w w w.jbctools.com Wechseln der Spitze 1. Entfernen Sie die Spitze mit einer Flachzange. Drehen Sie die Spitze und ziehen sie heraus. 2. Setzen Sie die neue Spitze ein und führen Sie dieselben Schritte in umgekehrter Reihenfolge durch. Wichtig: Wechseln Sie Spitzen nur, wenn das Werk- Halten Sie die Spitze nicht an der Federklam- zeug warm ist.
- Page 44 Wechsel des Heizelements 1. Ziehen Sie den Filter und den Lotauffänger ab. 2. Lockern Sie die auf der Abbildung gezeigte Befestigungsschraube und entnehmen Sie das Heiz element. 3. Setzen Sie das neue Heizelement ein und führen Sie dieselben Schritte in umgekehrter Reihenfol ge durch.
- Page 45 JBC Updater www.jbctools.com/software.html Aktualisieren Sie die Stations-Software über USB-Verbindung: Kabel USB AB Updater JBC Manager www.jbctools.com/manager.html Verwalten und überwachen Sie mit dem JBC Manager an einen PC angeschlossene Stationen: jede JBC Station Cable USB AB Manager Settings Ändern Sie Einstellungen für eine Gruppe von JBC-Stationen gleichzeitig.
- Page 46 Betrieb Das exklusive Heizsystem von JBC Diese revolutionäre Technik ist dazu in der Lage, außerordentlich schnell die Spitzentemperatur zu erreichen. Dies ermöglicht es dem Benutzer, mit einer niedrigeren Temperatur zu arbeiten. Daraus ergibt sich eine fünfmal längere Spitzenstandzeit. 1. Arbeit 2.
- Page 47 w w w.jbctools.com Prozess-Steuerung Arbeitsbildschirm Zeigt eine spezifische Fixed temp 3 5 0 Fixtemperatur an. Levels ºC 2 5 0 3 5 0 4 0 0 Angezeigt, wenn Sie Temperaturstufen ausgewählt Selected temp. 3 5 0 haben. Der Arbeitsbildschirm liefert in Echtzeit wertvolle “Temp.
- Page 48 Standard Min.temp. beträgt ten oder Platten mit hoher 200 ºC (392 ºF). Diese wird als Wärmeabfuhr), empfiehlt ein geeigneter Ausgangspunkt JBC nachdrücklich andere für mit Blei arbeitende Anwen- Hilfsmittel wie Vorheizgeräte dungen angesehen. zu verwenden. Nützlich für die Vorgabe einer...
- Page 49 w w w.jbctools.com Werkzeug-Einstellungen Empfehlungen Warnungen Parameterbeschreibung Ideal zum Löten von me- unzutreffend Eine Temperatur festlegen Einen Wert innerhalb des hreren Bauteilen mit einer Temperaturbereichs der bestimmten Temperatur. Die Station festlegen (180-450 Station wird jeden Versuch ºC/356-840 ºF). der Temperaturänderung abweisen.
- Page 50 Werte innerhalb ±50 °C Temp Anpass Sorgt für eine präzisere (± 90 °F) einstellen, um Wenn der Nutzer Anpassung zwischen der Nullfehler zu erreichen. JBC das Kartuschenmodell ausgewählten Temperatur empfiehlt nachdrücklich die wechselt, sollte dieser und der derzeitigen. Benutzung von TID-A oder Parameter auf 0 ºC/F oder...
- Page 51 Halterung und setzen Sie sie erneut in die notwendig, benutzen Sie ein Werkzeug, Station ein. um sie herauszudrücken. - Jedes defekte oder schadhafte Teil austauschen. Nur Original-Ersatzteile von JBC verwenden. - Reparaturen dürfen nur von dem Vertragskundendienst von JBC durchgeführt werden.
- Page 52 Sicherheit Die Sicherheits-Leitlinien müssen unbedingt eingehalten werden, um elektrischen Schlag, Verletzung, Feuer oder Explosion zu vermeiden. - Die Anlage für keinen anderen Zweck verwenden als zum Löten oder Entlöten. Unsachgemäße Verwendung kann Feuer hervorrufen. - Das Netzkabel muss in zugelassene Steckdosen eingesteckt werden. Vergewissern Sie sich vor der Benutzung, dass sie korrekt geerdet ist.
-
Page 53: Technische Daten
w w w.jbctools.com Technische Daten CV-1E 120V 50/60Hz. Eingangssicherung: 2A. Ausgang: 23,5V. Steuereinheit Modell: CSV-1E CV-2E 230V 50/60Hz. Eingangssicherung: 1A. Ausgang: 23,5V. Steuereinheit Modell: CSV-2E CV-9E 100V 50/60Hz. Eingangssicherung: 2A. Ausgang: 23,5V. Steuereinheit Modell: CSV-9E - Gesamtgewicht des Geräts: 2,8 Kg (6.2 lb) - Abmessungen: 150 x 175 x 145 mm - Spitzenausgangsleistung: 40W - Temperaturauswahl: 180-450 °C (356-840 °F) (±5%) - Page 54 产品描述 需包含以下部件: CSV 控制主机 .......... 1 件 微型拆焊烙铁 ..........1 件 Ref. CSV-1E (120V) Ref. DS360-A CSV-2E (230V) CSV-9E (100V) 电源线 ......1 件 海绵 ........1 件 铜丝球 ......1 件 Ref. 0009417 (100V/120V) Ref. S0354 Ref. CL6210 0009401 (230V)
- Page 55 (5 件) Ref. 0008466 Ref. 0010259 Ref. C360002 Ref. C360004 残锡收集管 清洁刷 滤网 Ref. 0008297 (2 件) (2 件) Ref. 0008473 Ref. 0008467 气动抽吸模块 ....1 件 过滤棉盒 ..1 件 过滤棉 ..1 件 排气滤网 ..1 件 Ref. MV-A Ref. 0005966 Ref. 0781046 Ref. 0008446 盒装50片过滤棉 1件10片过滤棉 操作手册 ......1 件 吸力过滤器 ...... 1 件 模块连接线 ...... 1 件 Ref. 0016887 Ref. 0821830 Ref. 0010207 w w w.jbctools.com Compact Desoldering Station with Pneumatic Pump Ref. CV-E...
- Page 56 产品特性 集线器 可调式支架: 智能热管理 操作控制 焊嘴清洁系统 微型拆焊烙铁 Ref. DS360-A 电位连接 主开关 保险丝 电源插座 USB-B 接口 空气压力 模块连接线 Ref. 0010207 (4-6 bar) 吸力过滤器 Ref. 0821830...
- Page 57 w w w.jbctools.com 可调式支架 集线器 (Ref. CC3702) 调节工具支架, 满足工作位 将电线放置在集线器上, 避免工作位置受到电线干扰。 置需求。 焊嘴清洁系统 选择最适合您的焊接清洁需求的选择。 防溅罩 Ref. 0017576 防溅层 可防止在使用铜丝清洁球 Ref. 0017574 的时候残锡的飞溅。 防止溅锡确保工作环境的整洁。 铜丝球 Ref. CL6210 有效清洁方法。 在清洁 后到下次焊接前对焊 嘴加锡保养, 以防焊嘴 氧化。 如果烙铁头非常脏, 建议 先刮掉多余的锡。 擦板 Ref. CL0160 耐高温凹槽可以让操作者通过轻轻拍打 或擦拭去除多余的焊锡。...
- Page 58 如果需要拆下保护罩, 请按照以下步骤进行: 1. 松开保护罩扣锁。 2. 撤走保护罩。 其他防溅罩选项 (不包括) : 不锈钢丝球 金属刷 Ref. CL6205 Ref. CL6220 为焊嘴提供更深层的 如果使用得当, 清洁 可提供更彻底的清洁。 擦板 敲击 擦拭 海绵 轻轻敲击除去多余的残锡。 使用槽口擦拭任何残留的锡粒。 Ref. S0354 最温和的清洁方法。 工作时用蒸馏水润湿海绵避 免焊嘴磨损。...
- Page 59 w w w.jbctools.com 更换焊嘴 1. 用扁嘴钳卸下焊嘴。 扭动焊嘴并拉出。 2. 插入新的焊嘴并逆行相同步骤。 重点: 只有当工具是热的时候才可更换焊嘴。 不要按住弹簧夹末端。 兼容烙铁头 CS和CV拆焊台适用于C360烙铁头工作范围。找到最适合你的焊接需求的款式, 请登录 www.jbctools.com C360-001 C360-002 C360-003 ØA: 1 ØA: 1.2 ØA: 1.4 ØB: 0.8 ØB: 0.8 ØB: 1 Ømax.pin: 0.4 Ømax.pin: 0.6 Ømax.pin: 0.8 C360-004 C360-007 C360-006 ØA: 1.4 ØA: 1.9 ØA: 3 ØB: 1 ØB: 1.4 ØB: 1.5 Ømax.pin: 0.8 Ømax.pin: 1.2 Ømax.pin: 1.3 焊嘴选择 记住尽可能选择符合您应用的最大的焊嘴: 吹嘴内直径 > 引脚直径。 吹嘴内直径...
- Page 60 更换加热芯 1. 取下滤网和残锡收集管。 2. 卸下固定螺丝如图所示并拆下加热芯。 3. 插入新加热芯并逆行相同步骤。 加热芯 Ref. DSV-DS 固定螺丝 残锡收集管 滤网 更换吸锡泵滤网 吸滤器 重点: 不要用尖锐物品打开 Ref. 0821830 吸滤器以免损坏。 棉滤网 Ref. 0781046 密封圈 Ref. 0007717 滤网盖 排气滤网 Ref. 0008446 Ref. 0004710 备用滤网 Ref. 0005966...
- Page 61 USB 接口 自我们官网下载最新软件, 确保您的焊台处于最佳状态。 JBC 更新程序 (JBC Updater) www.jbctools.com/software.html 通过USB接口更新软件。 USB AB 连接线 JBC Updater JBC 管理员 (JBC Manager) www.jbctools.com/manager.html 通过该程序使用电脑管理和跟踪多台焊台。 可将数据导出到其他电脑上。 任何JBC 焊台 USB AB 连接线 端口 管理员设置 同时更换一组JBC焊台设置 JBC Manager 记录设置 创建实时焊接过程图表, 包括功率和温度数据...
- Page 62 操作 JBC 专属加热系统 革命性技术, 可以令烙铁头温度快速回升。 这意味着用户可以在较低温度下操作, 并提高焊接质量。 之后, 烙铁头温度在睡眠和休眠模式下降低, 可令其寿命延长五倍。 1. 工作 2. 睡眠 (Sleep) 3. 休眠 (Hibernation) 长时间放置 在支架上 当工具从支架下取下时, 当工具放置在支架上时, 长时间没有使用后, 电源会切 烙 铁 头温 度 会加 热 到 选 定 温 温度会下降到 断, 工具会冷却到室温。 度。 预置睡眠温度。 睡眠后工具...
- Page 63 w w w.jbctools.com 流程控制 工作屏 显示特定固定温度 Fixed temp 3 5 0 Levels ºC 2 5 0 3 5 0 4 0 0 显示已选温度等级 固定温度 Selected temp. 3 5 0 工作屏提供工具 实时有用信息。 温度修正 提供所选温度和实际温度之 电源 P o w e r 5 % 间的更精确的修正。...
- Page 64 温度超过 400°C (750°F) (750°F)。 对于大多数无铅应 会损坏电路板及其组件。 用来说这已被视为足够高温。 主机的温度范围在180- 甚至于焊嘴与焊点更短时 450ºC (356-840ºF)。 更改 间的接触, 使助焊剂无法 温度限制用于不常见的应用, 发挥正常功效, 严重降低 如低/高熔点锡焊 (HMP) 或 烙铁头寿命。 如果焊点需 者塑料应用 (比如铆合) 。 要更大功率 (比如多层板 或者高散热板) , JBC强烈 最低温度 推荐配合使用其他辅助产 设定进行工作的最低温度。 品如预热台。 默认的最低温度为200ºC (392ºF).。 对于有铅应用来说 这被视为适当的起始温度。 节奏提示 可用来设定在重复作业时的 不适用 在每1-50秒重复的一种蜂鸣 工作速率。 蜂鸣声提醒您必须 声。 开始焊接的时间段。...
- Page 65 w w w.jbctools.com 工具设置 警告 参数描述 建议 固定一个温度 非常适合需要在特定温度下 不适用 固定一个温度值范围在 焊接多个组件。 主机将拒绝 (180-450ºC/356-840ºF) 任何更改温度的意图。 。 温度等级设置 这允许在3个不同温度之间快 不适用 类似于 “固定一个温度” 的参 速切换。 根据您的焊接应用 数。 在这种情况下, 用户可以 允许的温度值来设置。 根据不同的功率要求设置最 多3个温度值。 睡眠延时 因为我们的工具可以仅在2 设置工具在置放架上起并保 秒内从默认睡眠模式升到工 持所选温度到进入睡眠模式 作温度, 此参数预设为0分 的时间。 焊嘴温度随即降到 钟。 一旦工具被回放到置放 睡眠温度 (默认150ºC/302ºF 架上, 温度将自动降到睡眠 或者 260ºC/500ºF 只适用于 温度, 延长焊嘴寿命并防止 拆焊)。...
- Page 66 增大默认值将加速焊 眠模式的时间。 默认设置 氧化。 嘴的氧化和缩短其使用寿 为10分钟。 这段时间之后, 放置到置放架之前对工具 命。 电源被切断, 焊嘴温度降至 做加锡保养也有助于保护涂 室温。 层, 防止焊嘴氧化, 延长焊嘴 寿命。 温度修正 设置数值在±50°C (± 90°F) 当用户更换烙铁头 提供所选温度和实际温度之 以实现零失误。 JBC强烈推荐 类型, 此参数须重设至 间的更精确的修正。 使用TID-A或TIA-A测温仪以 0°C/F 或者适合该烙铁 获得精确的读数。 头的温度值。 比如, 为 C245966 (粗类型) 设置的 修正值为+20°C (+36°F), 之后用户更换到C245030 (较细类型) 而没有重设修 正值, 在C245030不需要 调整温度的情况下, 用户 实际上在低20°C (+36°F) 的温度下作业。...
- Page 67 维护 在维护或储存之前需确保设备已经冷却。 定期清洁 - 用玻璃清洁剂或抹布清洁主机屏幕。 使用抹布清洁外壳和工具。 酒精只可用来清洁金属部件。 - 定期检查工具金属件及支架, 确保清洁, 确保主机可以保持探测到工具状态。 - 储存前, 保持烙铁头清洁并加锡保养以防 氧化。 生锈或航脏的表面会减少传递到焊点的热 量。 - 定期检查电线和管子。 - 按如下图示更换熔断保险丝: 1. 推动黑色盖子取下保险丝。 如有必要可使 2. 将新的保险丝放入保险丝盒, 并将其放入 用工具。 工作台。 - 更换任何受损的元件。 仅使用JBC原装配件。 - 修理必须由JBC专业技术服务人员进行。...
- Page 68 安全 必须遵守安全准则, 以防止电击, 人身伤害, 火灾或爆炸。 - 不要使用本产品用于焊接或返修以外的任何目的。 不正确使用可能造成火灾。 - 电源线必须插入核准的电源。 确保使用前妥善接地。 拔掉电源时握住插头, 而不是电线。 - 请勿在带电部件上操作。 - 该工具在不使用时应放置在支架上, 以激活休眠模式。 烙铁头, 金属部分和支架即使在焊台被切断电源时仍旧是热的。 小心轻放, 包括调整支架位置时。 - 设备开着时, 切勿无人看管。 - 请勿覆盖通风口。 热量可引起易燃物品引燃。 - 使用 “无残渣” 类锡丝, 避免与皮肤或眼睛接触, 以防刺激。 - 小心焊接时产生的烟雾。 - 保持工作场所干净整洁。 操作时, 为避免造成人身伤害, 请穿戴适当的防护眼镜和手套。 - 残锡液易引起灼伤, 请小心处理。 - 本产品允许八岁以上儿童, 肢体, 感官或心智有残缺的人士, 以及缺乏经验的人士使用, 但必须提供必要的监护及指导, 并且了解本产品可能涉及的危险。 切勿让儿童把玩。 - 没有监管,...
- Page 69 w w w.jbctools.com 技术规格 CV-1E 120V 50/60Hz. 输入保险丝: 2A. 输出: 23,5V. 主机款式: CSV-1E CV-2E 230V 50/60Hz. 输入保险丝: 1A. 输出: 23,5V. 主机款式: CSV-2E CV-9E 100V 50/60Hz. 输入保险丝: 2A. 输出: 23,5V. 主机款式: CSV-9E - 重量: 2.8 Kg (6.2 lb) - 尺寸: 150 x 175 x 145 mm - 最高输出功率: 40W - 温度范围: 180-450°C (356-840°F) (±5%) - 空置温度稳定性 (静止空气): ±1.5 ºC / ±3 ºF - 焊接接地电阻: <2 ohms - 焊接接地电压: <2mV RMS - 工作室温: 10-40 ºC / 50-104 ºF - USB 连接焊台-PC MV-A - 重量: 0.7 Kg (1.55 lb) - 尺寸: 145 x 55 x 225 mm - 空气压力: 4-6 bar - 真空: 90% / 680 mmHg / 26.8 inHg - 流量: 15 SLPM 符合CE标准 防静电 “趋肤效应” 保护外壳...
- Page 70 Exploded View · Despiece · Explosionszeichnung · 分解图...
- Page 71 w w w.jbctools.com...
- Page 72 Warranty Garantía Garantie JBC’s 2 year warranty covers Esta garantía de 2 años cubre Die 2-Jahres-Garantie von JBC this equipment against all este equipo contra cualquier ersteckt sich auf das Gerät bei manufacturing defects, including defecto de fabricación, Herstellungsfehlern, einschließlich the replacement of defective incluyendo la sustitución de partes...
Need help?
Do you have a question about the CV-E and is the answer not in the manual?
Questions and answers