Table of Contents
Advertisement
Quick Links
Advertisement
Table of Contents

Related Manuals for Allflex RS420


Summary of Contents for Allflex RS420
- Page 1 RS420 Portable Stick Reader USER MANUAL Version 1.0...
-
Page 2: Packaging List
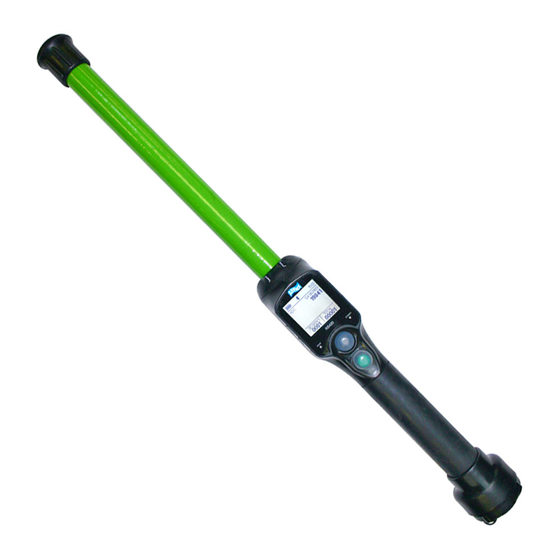
Description The RS420 reader is a rugged portable hand-held scanner and telemeter for RFID tags specifically designed for livestock applications. The reader fully complies with ISO standards ISO11784 / ISO11785 for FDX-B and HDX technologies. In addition to its tag reading functions, the reader can store up to 100,000 IDs in different work sessions, each associated with a time/date stamp, in its internal memory and transmit hem to a personal computer via an USB interface, a RS232 interface or a Bluetooth®... - Page 3 Figure 1 - Reader features and user interface. Table 1 – Reader features and description of use Item Feature Description of use Antenna Emits activation signal and receives transponder signal. Fiberglass Tube Enclosure Rugged and watertight enclosure. Audible beeper Beeps once on first transponder reading and 2 short beeps for repeat. Large graphical readout with Displays information about current reader status.
-
Page 4: Operation
Operation Getting Started It is necessary first to fully charge the Battery Pack as described below and to have a few electronic identification ear tags or implants available for testing. It is very important to carry out the three steps described in this section before using the reader (see “Battery handling instructions”... - Page 5 Plug the power cord into the cable socket located at the end of the data-power cable. Plug the adapter into a power outlet. The icon of the battery level indicates that the battery pack is in charge (the level bars flash inside the icon) and gives the battery charge level.
- Page 6 Power on instructions Press the green button on the reader handle to power on the reader. The main screen will appear on the display: Item Feature Description of use Battery level The battery level shows the fully charged level as well as the charge level during the charge mode.
- Page 7 Read Range Performance Figure 2 illustrates the reading zone of the reader, within which tags can be successfully detected and read. Optimum read distance occurs depending upon the orientation of the tag. Tags and implant read best when positioned as shown below. Figure 2 - Optimum Read Distance Tag Orientation Item Legend...
- Page 8 Read a RFID transponder Scanning animals Place the device near the animal identification tag to be read, then press the green button in order to activate the reading mode. The screen backlight switches on and the red light is flashing. During the reading mode, move the reader along the animal to scan the transponder ID.
- Page 9 Note 2 –The ‘Date and Time Stamp’, and the sound/vibration features are options that can be turned on or off according to your specific applications. Each time a tag is scanned, the identification code is transmitted automatically via the USB cable, the RS232 cable or Bluetooth®.
-
Page 10: Wireless Synchronization
Wireless synchronization A reader which is in the vicinity of a second reader is very likely to transmit its activation signal during the listening pause of the second reader and vice versa. The result is that neither reader will be able to receive the HDX telegram. Wireless synchronization can be used to control the coordination of readers. -
Page 11: Managing The Menu
Managing the menu Using the menu With the reader powered on, press the black button for over 3 seconds. The device lists on the screen, the following features: Item Sub-Menu Definition Back Return to the main screen Session Enter into the session management sub-menu. Bluetooth Enter into the Bluetooth management sub-menu. - Page 12 Once, the sub-menu “compare session” is selected, the device lists the following options: Item Sub-Menu Definition Back Return to the main screen Select List all sessions saved inside the reader and select the comparison compare session used to compare the read ID codes. Disable Disable the comparison.
- Page 13 Item Feature Description of use Name Name of the reader. Addr Address of the Bluetooth® module. Pairing Device address with which the reader is paired (reader is in master mode) or SLAVE when the reader is in slave mode. Security On/Off –...
- Page 14 Once, the sub-menu “profile” is selected, the device lists the following options: Item Sub-Menu Definition Back Return to the main screen Store profile Store a profile. When the profile is saved, a message “Profile X saved!” is displayed. If there is no free profile, the message “no free profile”...
- Page 15 Once, the sub-menu “vibrator” is selected, the device lists the following options: Item Sub-Menu Definition Back Return to the main screen Disabled Disable the vibrator Enabled Enable the vibrator Note 15 - A short vibration indicates that the reader has previously read the tag during the current session.
-
Page 16: About The Reader
Select the protocol used by ALLFLEX’S readers RS320 and RS34 RS340. Note 18 – All commands of ALLFLEX’S reader are implemented but all functionalities are not implemented (see specifications Protocol_Document_V1.0). Once, the sub-menu “language” is selected, the device lists the following options:... -
Page 17: Using Usb Interface
Connect the reader to a PC This section is meant to describe how to connect the reader to hand held computer (PDA) or to a personal computer (PC). The device can be connected to a PC in 3 ways: a wired USB connection, a wired RS-232 connection or by wireless Bluetooth®... -
Page 18: Using Serial Interface
Using serial interface The serial port allows the device to send and receive data via an RS-232 connection. To make RS-232 operate, you need to connect the reader with a PC or a PDA with the data- power cable. The RS232 serial interface comprises a 3-wire arrangement with a DB9F connector, and consists of transmit (TxD/pin 2), receive (RxD/pin 3), and ground (GND/pin 5). - Page 19 If you are using a PDA, it will require software (Not supplied by the manufacturer). Your software supplier will explain how to connect the PDA. Note 22 - We advise that to achieve successful Bluetooth® connection with your reader, simply follow the implementation methods listed (see the following). Note 23 - If these implementation methods are not followed, the connection may become inconsistent, thus causing other reader related errors.
- Page 20 With the reader turned on, select one of these options. The Bluetooth® program should open a window within one minute showing all Bluetooth enabled devices in the area. Click on the reader you want to connect to and follow the steps provided by the program. READER NAME Passkey enabled The program may ask you to provide a “Pass Key”...
- Page 21 If this fails use the following links, search the reader in the peripheral list and connect it. You have to add an outgoing port that makes a connection to the device. Follow the steps described in the links below. For Windows XP: http://support.microsoft.com/kb/883259/en-us For Windows 7: http://windows.microsoft.com/en- US/windows7/Connect-to-Bluetooth-and-other-wireless-or- network-devices...
-
Page 22: Power Management
Power Management Reader Power Sources The reader contains a 7.4VDC – 2600mAh Li-Ion rechargeable battery pack, which serves as its primary power source. Add expected hours/scans of a fully charged battery. Alternately, the reader can be powered by the following methods: 1. - Page 23 Step 2: Connect to the reader Remove the protective cap which covers the reader’s cable connector, and which guards the reader against foreign material contamination. Install the data-power cable by engaging the connector and rotating the lock-ring. Then connect the other end of the battery cable into the power socket located at the end of the reader’s data-power cable Step 3: Checking the reader...
-
Page 24: Battery Handling Instructions
At the top of the screen, the icon of the battery level shows the discharge level as well as the charge level during the charge mode. Display Summary Good. Quite good. Slightly depleted, but sufficient Depleted. Recharge the battery. “LOW BATTERY” Depleted. - Page 25 Caution 1. Do not use or leave the battery in high heat environments (for example, at strong direct sunlight or in a vehicle in extremely hot weather). Otherwise, it can overheat ignite or battery performances will be degraded, thus shortening its service life. 2.
-
Page 26: Accessories For The Reader
Accessories for the reader Battery pack fast charger The fast charger is used to charge up to 2 Battery Packs simultaneously in 3 hours. A light indicates the status of each battery charging. Green light Red light Charger status Not Charging – Standby or Shutdown Bad-Battery fault Normal Charging Temperature fault... - Page 27 Plastic Carry Case Durable Plastic Carry Case is available as an optional extra or is included in the “Premium Kit” Package.
-
Page 28: Specifications
Specifications General Norms: ISO 11784 and full ISO 11785 for FDX-B and HDX tags IP67 User interface: Graphical display 128x128 dots 2 keys Buzzer and Vibrator Serial port, USB port and Bluetooth® module USB interface: CDC class (Serial emulation) and HID class. Bluetooth®... -
Page 29: Limited Product Warranty
Reader physical integrity The device has been built from rugged and durable materials to withstand use in harsh environments for long periods of time. However, the reader contains electronic components that can be damaged if they are deliberately exposed to extreme abuse. This damage can adversely affect, or stop the reader's operation. -
Page 30: Regulatory Information
Regulatory information USA-Federal Communications Commission (FCC) This device complies with part 15 of FCC rules. Operation is subject to the following two conditions: (1) This device may not cause interference, and (2) this device must accept any interference, including interference that may cause undesired operation of the device. This equipment has been tested and found to comply with the limits for a Class B digital device, pursuant to Part 15 of FCC Rules. -
Page 31: Regulatory Compliance
Regulatory Compliance ISO 11784 & 11785 This device complies with the standards set forward by the International Standardization Organization. Specifically with standards: 11784: Radio frequency identification of animals -- Code Structure 11785: Radio frequency identification of animals -- Technical Concept. FCC NQY-30002 IC 4246A-30002 CE Marking... - Page 32 Dallas Ft. Worth Airport, Texas 75261- 2266 United States of America (800) 989-TAGS [8247] (972) 456-3686 (972) 456-3882/FAX www.allflexusa.com Allflex International Do Brasil Ltda. Allflex Argentina S.A. Rua Monte serrat, 1097 Las Heras 1588 CEP 03312-001 1641 Martinez Tatuape, SP, Brazil...
Need help?
Do you have a question about the RS420 and is the answer not in the manual?
Questions and answers