
Subscribe to Our Youtube Channel
Related Manuals for PRESIDENT MC Kinley TXPR600


Summary of Contents for PRESIDENT MC Kinley TXPR600
- Page 1 12/24 V Manuel d’utilisation / Manual del usuario Owner’s manual / Instrukcja obsługi...
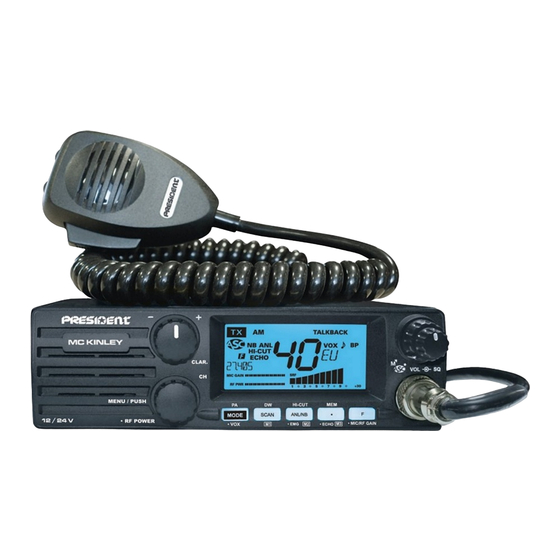
- Page 2 Votre PRESIDENT MC KINLEY en un coup d'œil Un vistazo a vuestro PRESIDENT MC KINLEY Your PRESIDENT MC KINLEY at a glance Twój PRESIDENT MC KINLEY...
-
Page 3: Table Of Contents
SOMMAIRE SUMARIO INSTALLATION ....................5 INSTALACIÓN ..................23 UTILISATION ....................7 UTILIZACIÓN ....................25 FONCTIONS À L’ALLUMAGE DU POSTE ..........12 FUNCIÓN AL ENCENDER LA EMISORA ..........29 MENUS .....................12 MENÚS .....................30 CARACTÉRISTIQUES TECHNIQUES ............17 CARACTERÍSTICAS TÉCNICAS ..............34 GUIDE DE DÉPANNAGE ................17 GUÍA DE PROBLEMAS ................35 COMMENT ÉMETTRE OU RECEVOIR UN MESSAGE ......17 COMO EMITIR O RECIBIR UN MENSAJE ..........35 GLOSSAIRE ....................18... - Page 4 ATTENTION ! Avant toute utilisation, prenez garde de ne jamais émettre sans avoir branché l’antenne (connecteur B situé sur la face arrière de l’appareil), ni réglé le TOS (Taux d’Ondes Stationnaires)! Sinon, vous risquez de détruire l’amplificateur de puissance, ce qui n’est pas couvert par la garantie.
-
Page 5: Installation
électronique la plus performante. Grâce à l’utilisation de technologies de pointe garantissant des qualités sans précédent, votre PRESIDENT MC KINLEY est un nouveau jalon dans la convivialité et la solution par excellence pour le pro de la CB le plus exigeant. Pour tirer le meilleur parti de toutes ses possibilités, nous vous conseillons... - Page 6 (1) dans le sens des aiguilles d’une montre jusqu’à entendre un “clic”. Votre PRESIDENT MC KINLEY est muni d’une protection contre d) Tournez le bouton du squelch SQ (2) au minimum (position M). les inversions de polarité. Néanmoins, avant tout branchement, e) Réglez le volume à...
-
Page 7: Utilisation
être désactivée par rotation du bouton dans le sens Remarque : Afin d’éviter les pertes et atténuations dans les câbles des aiguilles d’une montre. Dans ce cas le réglage du squelch de connexion entre la radio et ses accessoires, PRESIDENT recom- redevient manuel. disparaît de l’afficheur. - Page 8 3) AFFICHEUR RF POWER (combinaison 12 / 9 + 5) En mode TX, le RF POWER permet de Il permet de visualiser l’ensemble des fonctions d’augmenter/diminuer puissance de sortie. Appuyer et maintenir appuyée la pédale d’émission PTT (12). Appuyer sur les touches •(9) et CH (5). «RF POWER» s’affiche. Utiliser le rotateur CH (5) pour ajuster le niveau à...
- Page 9 Le RÉGLAGE DU VOX active automatiquement la fonction VOX. (9 + 6 pression brève) «VOX» apparaît dans l’afficheur. La fonction VOX permet d’émettre en parlant dans le micro d’ori- Remarque : L’appareil sort automatiquement du RÉGLAGE DU gine (ou dans le micro vox optionnel) sans appuyer sur la pédale VOX au bout de 10 secondes si aucune touche n’est pressée ou à...
- Page 10 «EMG» disparaît de l’afficheur. Le numéro du canal en cours et le canal prioritaire s’affichent alternativement. L’icône «EMG» s’affiche également en même Voir CANAL PRIORITAIRE 1 et 2 pages 15. temps que le canal prioritaire. Le canal en cours peut être modifié pendant la double veille.
- Page 11 Pour effacer une mémoire : RF GAIN (combinaison 9 + 10) Éteindre l’appareil. Réglage de la sensibilité en réception. Position maximum dans Maintenir l’une des touches M1 (7), M2 (8) ou M3 (9) et allumer le cas de réception de communications longue distance. Vous l’appareil.
-
Page 12: Fonctions À L'allumage Du Poste
NIVEAU DU TALKBACK 4. À ce stade, confirmer la sélection en éteignant puis en allumant (combinaison 12 / 5) à nouveau l’appareil. Quand la fonction TALKBACK est active, maintenir la pédale PTT Voir les bandes de fréquences pages 70 à 72 / tableau de (12) appuyée et tourner le bouton rotateur CH (5) pour ajuster le configuration page 74. - Page 13 3. Tourner le rotateur CH (5) ou utiliser les touches UP/DN (13) du 1. Tourner le bouton rotatif CH (5) ou utiliser les touches UP/DN (13) microphone pour changer la couleur. du microphone pour sélectionner le menu CONTRAST. 2. Appuyer sur le bouton CH (5) pour valider.
- Page 14 / désactiver oF la fonction. Le PRESIDENT MC KINLEY peut être utilisé tant avec un microphone 4a. Une nouvelle pression brève sur le bouton CH (5) permet de valider electret que dynamique 6 broches PRESIDENT (voir câblage du rester dans les MENUS.
- Page 15 2. Appuyer sur le bouton CH (5) pour valider. Le poste passe auto- 10) RÉGLAGE DE LA TONALITÉ matiquement en mode sans presser la touche PTT (12) et le La fonction TONE permet de changer la tonalité en réception. 11 calibrage commence.
- Page 16 7. Si aucune touche n’est pressée, l’appareil sort des MENUS I n : la modulation du microphone est transmise au haut-parleur bout de 10 secondes ou par une nouvelle pression longue sur la externe du Public Address connecté au jack PA.SP. (D). Le signal touche F (7).
-
Page 17: Caractéristiques Techniques
E) CARACTÉRISTIQUES TECHNIQUES F) GUIDE DE DÉPANNAGE 1) GÉNÉRALES 1) VOTRE POSTE N’ÉMET PAS OU VOTRE ÉMISSION EST DE - Canaux : 40 MAUVAISE QUALITÉ - Modes de modulation : AM / FM / USB / LSB Vérifiez que : - Gamme de fréquence : de 26,965 MHz à... -
Page 18: Glossaire
Appuyer sur la pédale de votre micro, et lancer le message «At- : Continuous waves (morse) : Liaison longue distance tention stations pour un essai TX» ce qui vous permet de vérifier : Dual watch (double veille) la clarté et la puissance de votre signal et devra entraîner une : Frequency modulation (modulation de fréquence) réponse du type «Fort et clair la station». - Page 19 SUPÉRIEURS : Canaux au-dessus des 40 canaux autorisés : Faible, petit TANTE VICTORINE : Télévision QRPP : Petit garçon TONTON : Amplificateur de puissance QRPPette : Petite fille : Téléphone : Transmettez plus vite : Interférences TV : Nom de la station VISU : Se voir QRRR...
-
Page 20: Garantie
3 ans est proposée systématiquement pour l’achat et l’utilisation d’une c’est très important pour vous car cela permet d’identifier votre appareil lors de son passage antenne de la marque PRESIDENT, amenant la durée totale de la garantie à 5 ans, et sur justi- éventuel dans nos ateliers. -
Page 21: Déclaration De Conformité Eu Simplifiée
DÉCLARATION DE CONFORMITÉ EU SIMPLIFIÉE Par la présente, Groupe President Electronics, déclare que l’équipement radio CB: Marque : PRESIDENT Type: TXPR600 Nom Commercial : MC KINLEY Est conforme à la directive 2014/53/UE. Le texte intégral de la déclaration de conformité de l’UE est disponible à... - Page 22 President Electronics Ibérica S.A.U. Declara bajo su responsabilidad, que este aparato cumple con lo dispuesto en la Directiva 2014/53/UE del Parlamento Europeo y del Consejo de 16 de Abril de 2014. ¡ ATENCIÓN ! Antes de la utilización tengan cuidado de nunca emitir sin haber previamente conec- tado la antena (conector “B”...
-
Page 23: Instalación
Gracias a la utilización de tecnología punta que garantiza una calidad sin precedentes, su PRESIDENT MC KINLEY representa un nuevo hito en la facilidad de uso y la solución por excelencia para el pro más exigente de CB. Para sacar el máximo partido de todas sus posibilidades, le aconsejamos... - Page 24 3) CONEXIÓN DEL ALIMENTADOR d) Gire el botón del squelch SQ (2) al mínimo (posición M). Su PRESIDENT MC KINLEY está provista de una protección contra e) Ajuste el botón del volumen (1) a un nivel conveniente. las inversiones de polaridad.
-
Page 25: Utilización
Observación: Con el fin de evitar las pérdidas y las atenuaciones hasta el punto exacto, todos los ruidos de fondo desaparecerán. en los cables de conexión entre la radio y sus accesorios, PRESIDENT Es un ajuste que se ha de hacer con precisión, pues colocado en recomienda una longitud de cable inferior a 3m. - Page 26 Modulación de amplitud/ AM: Comunicación sobre el terreno El gráfico de barras principal indica el nivel de recepción y la potencia emitida. los pequeños gráficos de barras visualizan los con relieves y obstáculos a media distancia (el más utilizado). niveles del Mic Gain, RF Gain y RF Power. Modulación de Frecuencia/FM: Comunicación cercana en terreno llano y libre.
- Page 27 2. Pulse la tecla •VOX (6) para pasar Presione la palanca PTT (12) o la tecla SCAN (7) para salir al ajuste siguiente. de la 3. Una vez que el VOX está correctamente ajustado, pulse la tecla función BARRIDO DE LOS CANALES. •VOX (6) durante 1 segundo para validar salir...
- Page 28 CANALES DE EMERGENCIA Para llamar a una memoria: (9 + 8 presión breve) Presionar la tecla MEM (9) durante un segundo. Si la función PITIDO Presione brevemente la tecla • (9) y luego la tecla •EMG (8) para DEL TECLADO está activa, suena un pitido. «MEM» parpadea. combinar estas dos teclas.
-
Page 29: Función Al Encender La Emisora
Gire el conmutador rotativo CH (5) para ajustar TALKBACK el nivel con el (combinación 12 / 10) gráfico de barras. La función TALKBACK permite escuchar su propria modulación Pulse el botón CH (5) durante 1 segundo para validar el ajuste. en el altavoz del equipo. -
Page 30: Menús
5. Si no se presiona ninguna tecla, el equipo sale de los MENÚS figuración diferente al país de uso. En algunos países se necesita una licencia para su uso. Véase la tabla de la página 75. después de 10 segundos. desaparece de la pantalla. - Page 31 3. Gire el conmutador rotativo CH (5) o use los botones UP/DN (13) 3. Gire el conmutador rotativo CH (5) o use los botones UP/DN (13) en el micrófono para cambiar el valor del dimmer. en el micrófono para activar on/desactivar of la función.
- Page 32 *Compruebe que el volumen del pitido esté ajustado a un nivel adecuado. El PRESIDENT MC KINLEY se puede utilizar tanto con un micrófono Véase el § AJUSTE DE LA ROE página 24. electret como con un micrófono dinámico PRESIDENT de 6 con- tactos (Véase el cableado del micrófono en la página 73).
- Page 33 4. Presione nuevamente el botón CH (5) para validar 2. Presione el botón CH (5) para confirmar. El primer parámetro, el el valor del nivel. El segundo parámetro, el atraso (DELAY) parpadea. modo de modulación, parpadea en la pantalla. 5. Gire el conmutador rotativo CH (5) o use los botones UP/DN (13) 3.
-
Page 34: Características Técnicas
2. Presione el botón CH (5) para confirmar. El tipo de PA parpadea 3. Gire el conmutador rotativo CH (5) o use los botones UP/DN (13) en la pantalla. en el micrófono para mostrar 3. Gire el conmutador rotativo CH (5) o use los botones UP/DN (13) 4. -
Page 35: Guía De Problemas
3) RECEPCIÓN 3) LA EMISORA NO SE ILUMINA - Sensibilidad máxima a 20 dB Verificar el alimentador. sinad : 0,5 µV - 113 dBm (AM/FM) Verificar que no haya una inversión en los hilos al nivel de la aco- 0,28 µV - 118 dBm (BLS/BLI) metida. - Page 36 TERMINOS DEL ARGOT CEBEISTA TRASMATA : Radioescucha : Transmisor A.L. : Amplificador lineal VERTICAL : Encontrarse en persona ARMONICOS : Hijos VIA BAJA : Teléfono AVE MARIA : Amplitud de modulación VITAMINARSE : Comer, cenar BARBAS : Interferencias de canales próximos WISKIES : Watios BARRA MOVIL...
-
Page 37: Declaración De Conformidad Eu Simplificada
EU SIMPLIFICADA NOTA: El Código Q es la fusión de las dos definiciones, como pregunta y como respuesta, es una sola definición aceptada en CB. Por este medio, Groupe President Electronics, declara que el equipo de radio CB: Marca: PRESIDENT... -
Page 38: Garantía
5 años, y cuando el justificante sea remitido al Servicio Postventa de Departamento de Calidad PRESIDENT, dentro de los 30 días siguientes a la compra. La garantía es valida en el país de compra. • Para un mejor servicio recorte la parte lateral de esta tarjeta y devuélvanosla debidamente cum- plimentada hasta 30 días después de la fecha de compra. - Page 39 WARNING ! Before using, be careful never to transmit without first having connected the antenna (connection “B” situated on the back panel of the equipment) or without having set the SWR (Standing Wave Ratio) ! Failure to do so may result in destruction of the power amplifier, which is not covered by the guarantee.
-
Page 40: Installation
PRESIDENT range gives you access to top performance CB equipment. With the use of up-to-date technology, which guarantees unprece- dented quality, your PRESIDENT MC KINLEY is a new step in personal communication and is the surest choice for the most demanding of professional CB radio users. - Page 41 3) POWER CONNECTION Go to channel 20 by using the rotary CH knob (5) or UP/DN buttons Your PRESIDENT MC KINLEY is protected against an inversion of (13) on the microphone. polarities. However, before switching it on, you are advised to 5) ADJUSTMENT OF SWR (Standing wave ratio) check all the connections.
-
Page 42: How To Use Your Cb
ASC: AUTOMATIC SQUELCH CONTROL as close as possible to the CB (use a maximum of 40 cm cable, type President CA 2C). Worldwide patent, a PRESIDENT exclusivity. b) To adjust the SWR meter: Turn the SQ knob (2) anti-clockwise into ASC position. - Page 43 5) CHANNEL SELECTOR CH ~ RF POWER PA (Public Address) (long press) CHANNEL SELECTOR CH Long press PA key (6) to alternate between mode. An external loud speaker can be connected to the unit Turn the rotary CH knob (5) to move up or down a channel.
- Page 44 squelch level) and from 0 (without anti-vox) to 9 (low level). Default The current channel number and the emergency channel are value: OFF. displayed alternately. The “EMG” icon also appears along with the emergency channel. The selected channel can be changed Delay time SET-T: allows avoiding the sudden cut of the transmission during dual watch.
- Page 45 9) “•” Key ~ MEMORY ~ ECHO ~ M3 ECHO (9 + 9 short press) “•” Key Press the • key (9) , flashes, then briefly press the •ECHO key (9) (short press) activate the ECHO function. “ECHO” appears in the display. A activates FUNCTION Pressing the •...
-
Page 46: Function Turning On The Unit
11) 6 PIN MICROPHONE PLUG The display shows the corresponding frequency. For example “27.205” for channel 40. See SPAN menu page 48. The plug is located on the front panel of the transceiver and makes See § CHANNEL SELECTOR CH on page 43. the setting of the equipment into the dashboard easier. - Page 47 4a. Short press the CH knob (5) again to validate stay 3. Turn the rotary CH knob (5) or use the UP/DN buttons (13) on the your choice and in the MENU. The parameter stops flashing and, if the function has microphone to change the value of the dimmer.
- Page 48 7) MICROPHONE TYPE prevent his correspondent that it was his turn to talk. The word PRESIDENT MC KINLEY can be used with both a PRESIDENT electret “Roger” has been replaced by a significant beep. There comes and dynamic 6-pin microphone (see microphone wiring on page “Roger beep”...
- Page 49 2. Press the CH knob (5) button to confirm. The radio automatically 1. Turn the rotary CH knob (5) or use the UP/DN buttons (13) on the switches to mode without pressing the PTT switch (12) and microphone to select the TONE menu.
- Page 50 1. Turn the rotary CH knob (5) or use the UP/DN buttons (13) on the mode, press PTT switch to display “PA LEVEL”. Then turn the the audio level of the PA. microphone to select the EMG 2 menu. rotary CH knob (5) to adjust Items 2 to 7 are identical to those in EMERGENCY 1 SET.
-
Page 51: Technical Characteristics
E) TECHNICAL CHARACTERISTICS F) TROUBLE SHOOTING 1) GENERAL 1) YOUR CB RADIO WILL NOT TRANSMIT OR YOUR - Channels : 40 TRANSMISSION IS OF POOR QUALITY - Modulation modes : AM / FM / USB / LSB Check that the antenna is correctly connected and that the SWR - Frequency ranges : from 26.965 MHz to 27.405 MHz is properly adjusted. -
Page 52: Glossary
H) GLOSSARY CB LANGUAGE Advertising : Flashing lights of police car Below you will find some of the most frequently used CB radio Back off : Slow down expressions. Remember this is meant for fun and that you are by Basement : Channel 1 no means obliged to use them. -
Page 53: Simplified Eu Declaration Of Conformity
Part your hair : Behave yourself - police ahead Pull your hammer back : Slow down Rat race : Congested traffic Hereby, Groupe President Electronics, declares that the CB Rubberbander : New CBer Sail boat fuel : Wind radio equipment :... -
Page 54: Warranty
PRESIDENT, and if said antenna is at the origin of the breakdown. An exten- Thank you for your trust in the PRESIDENT quality and experience. We recommend that you read sion of 3 years warranty is proposed systematically for the purchase and use of a PRESIDENT this manual carefully so that you are completely satisfied with your purchase. - Page 55 UWAGA ! Przed użyciem należy zwrócić uwagę, aby nigdy nie rozpoczynać transmisji bez uprzedniego pod- łączenia anteny (połączenie „B” znajdujące się na tylnym panelu urządzenia) lub bez ustawiania SWR (współczynnik fali stojącej) ! Nieprzestrzeganie tego może spowodować zniszczenie wzmacniacza mocy, który nie jest objęty gwarancją.
-
Page 56: Instalacja
Witamy w świecie nowej generacji radia CB. Nowa gama produktów PRESIDENT zapewnia dostęp do najwyższej klasy sprzętu CB. Dzięki zastosowaniu nowocze- snej technologii, która gwarantuje bezprecedensową jakość, PRESIDENT MC KINLEY to nowy krok w osobistej komunikacji i najpewniejszy wybór dla najbar- dziej wymagających profesjonalnych użytkowników radia CB. - Page 57 4) PODSTAWOWE CZYNNOŚCI DO WYKONANIA PRZED Antena stała powinna być zainstalowana w jak najbardziej otwartej (nieosło- PIERWSZYM UŻYCIEM ZESTAWU (bez nadawania i bez niętej) przestrzeni. Jeśli jest przymocowana do masztu, prawdopodobnie użycia przełącznika „push-to-talk” (naciśnij, by mówić) na konieczne będzie pozostawienie jej w miejscu zamocowania, przy spełnieniu mikrofonie): obowiązujących wymogów prawnych (należy zasięgać profesjonalnej pora- dy). Wszystkie anteny i akcesoria PRESIDENT są zaprojektowane tak, aby a) Podłącz mikrofon. zapewnić maksymalną wydajność dla każdego radiotelefonu pozostającego b) Sprawdź połączenia antenowe. w zasięgu. c) Włącz zestaw, obracając pokrętło VOL (1) zgodnie z ruchem wskazówek zegara. 3) PODŁĄCZENIE ZASILANIA d) Przekręcić pokrętło SQ blokady (2) na minimum (pozycja M).
-
Page 58: Jak Używać Cb Radio
Tę regulację należy anteny. wykonywać precyzyjnie, ponieważ jeśli zostanie ustawiony na maksimum (całkowicie zgodnie z ruchem wskazówek zegara), tylko najsilniejsze sygnały OSTRZEŻENIE: Aby uniknąć strat i tłumienia w kablach używanych do będą odbierane. połączenia radia z jego akcesoriami, PRESIDENT zaleca użycie kabla o długości mniejszej niż 3 m. 3) WYŚWIETLACZ Radio CB jest teraz gotowe do użycia. Pokazuje wszystkie funkcje: B) JAK UŻYWAĆ CB RADIO 1) WŁĄCZANIE / WYŁĄCZANIE (ON / OFF) - GŁOŚNOŚĆ... - Page 59 4) PRECYZYJNE DOSTROJENIE (CLARIFIER) Górna i dolna wstęga / USB-LSB: używany do komunikacji na duże odle- głości (w zależności od warunków propagacji, czyli rozprzestrzeniania się Funkcja CLAR. pozwala na odchylenie częstotliwości podczas odbioru LSB fal radiowych). / USB w celu poprawy czytelności głosu korespondenta. PA (funkcja megafonu) (długie naciśnięcie) 5) WYBÓR KANAŁU CH ~ RF POWER Naciśnij i przytrzymaj przycisk PA (6) w celu przełączenia pomiędzy trybami WYBÓR KANAŁU CH i PA. Obracać pokrętłem CH (5), aby zmienić kanał w górę lub w dół. Sygnał Zewnętrzny głośnik można podłączyć do urządzenia za pomocą wtyku PA dźwiękowy jest emitowany za każdym razem, gdy zmieniany jest kanał, jeśli na tylnej ściance PA.SP. (D).
- Page 60 Czas opóźnienia „SET-T”: pozwala uniknąć nagłego przerwania transmisji, poprzez dodanie opóźnienia na końcu wypowiadanej kwestii. Poziom można Patrz: § PAMIĘĆ strona 61. regulować od 1 (krótkie opóźnienie) do 9 (duże opóźnienie). Wartość domyślna: 8) ANB / ANL ~ HI-CUT ~ KANAŁY AWARYJNE ~ M2 VOX SETTING automatycznie aktywuje funkcję VOX. „VOX” pojawi się na ANB / NL (krótkie naciśnięcie) wyświetlaczu. ANL / NB (automatyczny ogranicznik szumów / eliminator szumów): filtry te Uwaga: Urządzenie automatycznie wyjdzie z funkcji USTAWIENIA VOX bez redukują szumy tła i zakłócenia w odbiorze. zapisywania parametrów ustawień, jeśli po 10 sekundach nie zostanie Wciśnij przycisk ANL/NB (8), aby przełączać się między następującymi 4 naciśnięty żaden przycisk lub jeśli zostanie naciśnięty dowolny przycisk.
- Page 61 10) F ~ MIC GAIN ~ RF GAIN Uwaga: Przycisk • (9) jest zawsze powiązany z innym przyciskiem. Naciśnięcie samego przycisku nie da żadnego efektu, z wyjątkiem migotania komunikatu przez 10 sekund. Zobacz jeszcze konfiguracja U na stronie 59. PAMIĘĆ (MEMORY) Patrz § TALKBACK na stronie 62. (długie naciśnięcie) Patrz § WŁĄCZENIE FUNKCJI W URZĄDZENIU strona 62. Ten model CB radia umożliwia zapamiętanie 3 kanałów z następującymi atrybutami: NB / ANL (on / off), HI-CUT (on / off), AM / FM / USB / LSB.
-
Page 62: Włączanie Funkcji W Urządzeniu
RF POWER 1. Włącz zasilanie, naciskając klawisz F (10). Litera odpowiadająca bieżącej konfiguracji miga na wyświetlaczu. Zobacz § RF POWER, strona 59. 2. Aby zmienić konfigurację, obróć pokrętło CH (5) na urządzeniu lub użyj MIC GAIN przycisków UP/DN (13) na mikrofonie. 3. Po wybraniu konfiguracji naciskaj klawisz F (10) przez 1 sekundę. Litera Zobacz § MIC GAIN, strona 61. odpowiadająca konfiguracji jest stale wyświetlana i rozlega się sygnał po- twierdzenia. - Page 63 1. Obracaj pokrętłem CH (5) lub użyj przycisków UP/DN (13) na mikrofonie, Naciśnij pokrętło CH (5) i przytrzymaj przez 3 sekundy, aby wejść do MENU. aby wybrać menu COLOR. Pojawia się symbol 2. Naciśnij pokrętło CH (5), aby potwierdzić. Kolor miga na wyświetlaczu. 1. Obracaj pokrętło CH (5) lub użyj przycisków UP/DN (13) na mikrofonie, aby 3. Obróć pokrętło CH (5) lub użyj przycisków UP/DN (13) na mikrofonie, aby wybrać menu CONTRAST. zmienić kolor. 2. Naciśnij pokrętło CH (5), aby potwierdzić. Wartość kontrastu miga na wy- świetlaczu. 3. Obróć pokrętło CH (5) lub użyj przycisków UP/DN (13) na mikrofonie, aby zmienić wartość kontrastu. 4a. Naciśnij krótko przez CH (5), aby zatwierdzić wybraną wartość i pozostać w 4a. Naciśnij krótko przez CH (5), aby zatwierdzić wybrany kolor i pozostać w MENU. MENU. 4b. Naciśnij przez jedną sekundę przycisk CH (5), aby zatwierdzić wybraną 4b. Naciśnij przez jedną sekundę przycisk CH (5), aby zatwierdzić wybrany kolor wartość i wyjść z MENU. Symbol znika z wyświetlacza. i wyjść z MENU. Symbol znika z wyświetlacza.
- Page 64 4. Naciśnij przycisk PTT (12), aby wyjść z KALIBRACJI SWR. MENU. Symbol znika z wyświetlacza. 5. Jeśli żaden klawisz nie zostanie naciśnięty, urządzenie wychodzi z MENU * Sprawdź, czy głośność sygnału jest ustawiona na odpowiedni poziom. po 10 sekundach. Symbol znika z wyświetlacza. Zobacz REGULACJA SWR - strona 57. Domyślnym ustawieniem span jest: of. 9) REGULACJA ECHA 7) TYP MIKROFONU Naciśnij pokrętło CH (5) i przytrzymaj przez 3 sekundy, aby wejść do MENU. PRESIDENT MC KINLEY może być używany zarówno z mikrofonem elek- Pojawia się symbol tretowym PRESIDENT, jak i z mikrofonem dynamicznym 6-pinowym (zob.
- Page 65 1. Obracaj pokrętło CH (5) lub użyj przycisków UP/DN (13) na mikrofonie, aby 2. Naciśnij pokrętło CH (5), aby potwierdzić. Naciśnij przycisk CH (5), aby wybrać menu ECHO SET. potwierdzić. Pierwszy parametr - tryb modulacji - miga na wyświetlaczu. 2. Naciśnij pokrętło CH (5), aby potwierdzić. Komunikat: LEVEL (poziom echa) 3. Obracaj pokrętło CH (5) lub użyj przycisków UP/DN (13) na mikrofonie, aby miga na wyświetlaczu. ustawić tryb modulacji dla kanału alarmowego 1: AM, FM, USB, LSB lub FM 3. Obracaj pokrętło CH (5) lub użyj przycisków UP/DN (13) na mikrofonie, UK (tylko w konfiguracji U). ustawić wartość poziomu od 1 do 32 (poziom domyślny: 13). 4. Ponownie naciśnij pokrętło CH (5), aby potwierdzić. Tryb modulacji przestaje 4. Ponownie naciśnij pokrętło CH (5), aby potwierdzić wartość poziomu. Drugi migać, drugi parametr - kanał - miga na wyświetlaczu.
-
Page 66: Charakterystyka Techniczna
A) GNIAZDO ZASILANIA PRĄDEM STAŁYM - DC (13,8 V / 4a. Naciśnij krótko przez CH (5), aby potwierdzić wybór typu PA i pozostać w MENU. 27,6 V) 4b. Naciśnij przez jedną sekundę przycisk CH (5), aby potwierdzić wybór typu B) ZŁĄCZE ANTENOWE (SO-239) PA i wyjść z MENU. Symbol znika z wyświetlacza. C) ZEWNĘTRZNE GNIAZDO GŁOŚNIKA (8 Ω, Ø 3,5 mm) 5. Jeśli żaden klawisz nie zostanie naciśnięty, urządzenie wychodzi z MENU D) GNIAZDO JACK GŁOŚNIKA (8 Ω, Ø 3,5 mm) po 10 sekundach. Symbol znika z wyświetlacza. -
Page 67: Rozwiązywanie Problemów
- Czułość blokady szumów : min. 0,2 μV - 120 dBm Zwolnij przełącznik PTT (12) i poczekaj na odpowiedź. Powinieneś otrzymać odpowiedź w stylu „GŁOŚNO I WYRAŹNIE „. maks. 1 mV - 47 dBm Jeśli używasz kanału wywoławczego (19) i nawiązałeś z kimś komunikację, - Tłumienie częstotliwości powszechną praktyką jest wybranie innego dostępnego kanału, aby nie lustrzanej : 60 dB blokować kanału wywoławczego. - Odporność na intermodulację : 70 dB - Pobór prądu : 400 mA (nominal) ~ 500 mA H) SŁOWNICZEK F) ROZWIĄZYWANIE PROBLEMÓW Poniżej znajdziesz niektóre z najczęściej używanych wyrażeń radiowych CB. Podane są wyłącznie w celach informacyjnych i nie jesteś w żaden sposób 1) TWOJE RADIO CB NIE FUNKCJONUJE PRAWIDŁOWO zobowiązany do korzystania z nich. W nagłych wypadkach powinieneś być... -
Page 68: Uproszczona Deklaracja Zgodności Ue
SW : Fale krótkie : Nadajnik CB ZGODNOŚCI UE UHF : Częstotliwość ultra wysoka USB : Wstęga górna (przy modulacji amplitudowej jednowstęgowej) VHF : Bardzo wysoka częstotliwości Niniejszym Groupe President Electronics oświadcza, że sprzęt radiowy: Marka: PRESIDENT Typ: TXPR600 Nazwa Handlowa: MC KINLEY jest zgodny z dyrektywą 2014/53/UE. Pełny tekst deklaracji zgodności UE jest dostępny pod nastę- pującym... -
Page 69: Ogólne Warunki Gwarancji
Oferuje się przedłużenie gwarancji o 3 lata przy równoczesnym rancyjnego, a po ewentualnej odsprzedaży urządzenia, przekazane nowemu właścicielowi w zakupie i używaniu anteny PRESIDENT, co wydłuża całkowity czas trwania gwarancji do 5 lat. W celu umożliwienia identyfikacji sprzętu. - Page 70 TABLEAU DES FRÉQUENCES pour EU / EC / U (CEPT) TABLEAU DES FRÉQUENCES pour U (ENG) TABLA DE FRECUENCIAS para EU / EC / U (CEPT) TABLA DE FRECUENCIAS para U (ENG) FREQUENCY TABLE for EU / EC / U (CEPT) FREQUENCY TABLE for U (ENG) TABELA CZĘSTOTLIWOŚCI dla EU / EC / U (CEPT) TABELA CZĘSTOTLIWOŚCI dla U (ENG)
-
Page 71: Tabela Częstotliwości
TABLEAU DES FRÉQUENCES pour d TABLA DE FRECUENCIAS para d FREQUENCY TABLE for d TABELA CZĘSTOTLIWOŚCI dla d N° du canal Fréquences N° du canal Fréquences N° du canal Fréquences N° du canal Fréquences Nº Canal Frecuencia Nº Canal Frecuencia Nº... -
Page 72: Tableaux Des Fréquences
TABLEAU DES FRÉQUENCES pour PL TABLEAU DES FRÉQUENCES pour In TABLA DE FRECUENCIAS para PL TABLA DE FRECUENCIAS para In FREQUENCY TABLE for PL FREQUENCY TABLE for In TABELA CZĘSTOTLIWOŚCI dla PL TABELA CZĘSTOTLIWOŚCI dla In N° du canal Fréquences N°... - Page 73 PRISE MICRO 6 BROCHES TOMA DE MICRO DE 6 CONTACTOS 6-PIN MICROPHONE PLUG WTYK MIKROFONU 6-PIN Modulation Modulación Modulation Modulacja TX - UP/DOWN TX - UP/DOWN TX - UP/DOWN TX - UP/DOWN Masse Masa Ground Masa Alimentation Alimentación Power Supply Zasilanie...
-
Page 74: Normes • F
NORMES • F - NORMAS • F - NORMS • F - NORMY • F Remarque : Dans la configuration U en mode FM : Pour sélectionner la bande de fréquences ENG, appuyer une seconde sur la touche F (10) jusqu’à ce que «UK» apparaisse dans l’afficheur. - Page 75 Dernière mise à jour de ce tableau sur le site : www.president-electronics.com, rubrique «les Postes Radio-CB» puis, «La CB PRESIDENT et l’Europe». Le rogamos encontrar la última versión de esta información en nuestro sitio web www.president-electronics.com en la página «Emisoras de radio-cb» / «PRESIDENT y la reglamentación en Europa».
- Page 76 PRINTED IN VIETNAM SIEGE SOCIAL/HEAD OFFICE - FRANCE Route de Sète - BP 100 - 34540 BALARUC Site Internet : http://www.president-electronics.com U01UT567ZZA(0) E-mail : groupe@president-electronics.com...
Need help?
Do you have a question about the MC Kinley TXPR600 and is the answer not in the manual?
Questions and answers