Advertisement
Quick Links
Advertisement

Subscribe to Our Youtube Channel
Related Manuals for Cli-mate CLI-DH20-E


Summary of Contents for Cli-mate CLI-DH20-E
- Page 1 Air Dehumidification System Instruction Book – CLI-DH20-E...
-
Page 2: Table Of Contents
RECOMMENDS instructions for correct performance of unit. SAFETY FIRST • This appliance should be At Cli-Mate we are very used in conjunction with safety conscious. We design a safety switch. and manufacture consumer • This appliance is not... - Page 3 • Do not operate any • Unplug from outlet when appliance with a damaged not in use and before cord or plug or after the cleaning. Never plug in appliance malfunctions, or or unplug unit with wet has been damaged in any hands.
- Page 4 SPECIAL • Keep the unit away from fire, flammable gas, PRODUCT combustible products INSTRUCTIONS or vapours, and corrosive substances. • This appliance is designed • Do not operate the unit for household use only. without filters. Do not use this unit outdoors, in wet •...
- Page 5 IMPORTANT • Empty the water when water reservoir is full or SAFEGUARDS not in use for a prolonged FOR ALL period. ELECTRICAL • Recommended operating temperature range is APPLIANCES minimum 5°C • Unwind the power cord (RH 40%) and maximum fully before use.
- Page 6 • The installation of anyway. Return the a residual current entire appliance to device (safety switch) the nearest authorised is recommended to Cli-Mate Service Centre provide additional safety for examination and/ protection when using or repair. electrical appliances. It is advisable that •...
-
Page 7: Components
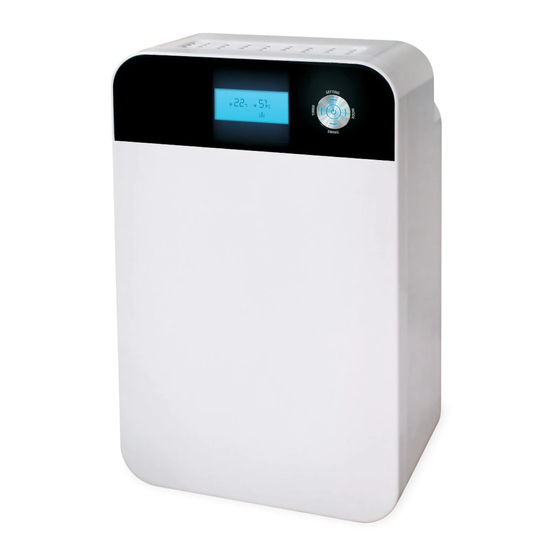
Components A. Dry Air Outlet G. Continuous Drainage Outlet (For hose connection) B. Control Panel H. Water Reservoir C. LCD Display I. Continuous Drainage Hose* D. Handle * Continuous drainage hose is an extra drainage E. Humid Air inlet option; hose does not need to be connected if using F. - Page 8 Components CONTROL PANEL Timer Power To set automatic ON/OFF timer at 1 to 24 hour Turns unit ON/OFF. settings. Mode Swing Allows selection of desired working mode, the Turns air deflector ON/OFF to allow better corresponding indicator light will illuminate. distribution of air output.
-
Page 9: Functions
Press power button to turn dehumidifying mode will be cancelled. unit off. 3. MODE button sets up Continuous/ Automatic dehumidifying modes and Fan speed. PRODUCT SPECIFICATIONS CLI-DH20-E AIR DEHUMIDIFICATION SYSTEM DEHUMIDIFICATION 20 LITRES/DAY DEHUMIDIFYING CAPACITY 0.83 kg/hour AIR CIRCULATION 140 cbm/hour... - Page 10 To set automatic ON timer, press TIMER NOTE button when unit is powered OFF or on When the ambient relative humidity is 5% standby mode, select the desired time for higher than the selected relative humidity ratio unit to start operating in 1 to 24 hours. Timer symbol will be displayed on screen, percentage (RH%), the unit will switch on and and unit will automatically switch on when...
- Page 11 SAFETY FEATURES Automatic Defrosting Failure of Humidity & Temperature Sensor To ensure the unit operates and performs as When the connection wire between the stated, the unit has been designed with an humidity and temperature sensor is Automatic defrost function as frost can be disconnected, the humidity icon will blink produced on the surface of the evaporator in...
- Page 12 Optional Continuous Drainage Installation 1. Ensure that unit is OFF and unplugged from wall socket. 2. Remove water reservoir out and connect water drain hose to spigot (continuous drainage outlet) as shown Water spigot 3. The other end of this hose must be placed over a water drain.
-
Page 13: Care & Cleaning
Care & Cleaning CAUTION: Before carrying out any STORAGE maintenance or cleaning of the unit, make If not using the unit for a prolonged period, sure that the power to the unit is turned off and switch off and unplug the unit, empty the water power cord is removed from the power socket. -
Page 14: Troubleshooting
Troubleshooting PROBLEM POSSIBLE CAUSES EASY SOLUTION • • No Power. Unit is not plugged into Check connection to wall socket. • wall socket. Check indicator lights to determine • One of the units product safety which safety feature has been features has been activated. - Page 15 Notes...
- Page 16 Breville is a registered trademark of Breville Pty. Ltd. A.B.N. 98 000 092 928. Copyright Breville Pty. Ltd. 2018. Due to continued product improvement, the products illustrated/photographed in this brochure may vary slightly from the actual product. CLI-DH20-E ANZ – A18...
Need help?
Do you have a question about the CLI-DH20-E and is the answer not in the manual?
Questions and answers