Table of Contents
Advertisement
Available languages
Available languages
Operator's Manual
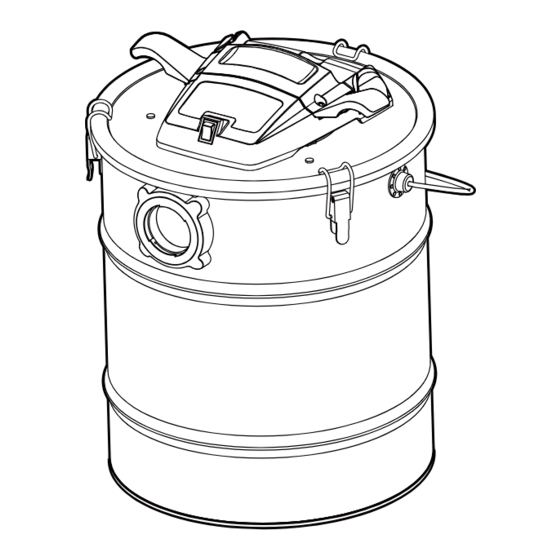
Ash Vacuum
Model No. 125.16819
CAUTION: Before using this
product, read this manual and
follow all its Safety Rules and
Operating Instructions.
Sears Brands Management Corporation, Hoffman Estates, IL 60179 U.S.A
www.craftsman.com
• Safety
• Unpacking, Assembly
& Operation
• Maintenance
• Parts
• Español - página 13
Advertisement
Chapters
Table of Contents

Related Manuals for Craftsman 125.16819


Summary of Contents for Craftsman 125.16819
- Page 1 Operator’s Manual Ash Vacuum Model No. 125.16819 • Safety • Unpacking, Assembly CAUTION: Before using this & Operation product, read this manual and • Maintenance follow all its Safety Rules and • Parts Operating Instructions. • Español - página 13 Sears Brands Management Corporation, Hoffman Estates, IL 60179 U.S.A...
-
Page 2: Warranty
For 90 DAY commercial and commercial services or if rented to another person. For 90 DAY commercial and rental use terms, see the Craftsman warranty web page. rental use terms, see the Craftsman warranty web page. -
Page 3: Polarized Plug
or without the filter installed. outlet and remove the filter. Remove the • Do not allow to be used as a toy. Close vacuumed material from the ash filter. attention is necessary when used by or near children. CAUTION: In case of excessive •... -
Page 4: Extension Cords
WARNING: • This vacuum is intended for removing loose, cool ash from the ash collection areas of stoves and fi replaces. Do not vacuum soot. Soot is a combustible material generally found in deposits along exhaust areas and chimneys. • Do not vacuum up hot, burning, or red hot objects (e.g. cigarettes, charcoal, ashes) •... -
Page 5: Table Of Contents
Introduction This ash vacuum is intended for Read this operator's manual to vacuuming dry materials, including familiarize yourself with the product fi ne dust such as cool ash. features and to understand the specifi c usage of this ash vacuum. Table of Contents Section Page... -
Page 6: Assembly & Operation
Assembly & Operation Remove entire contents of carton and check for parts inside the collection tank. Check each item against the Carton Contents List. If any parts are missing or damaged please call 1-888-331-4569 for replacement. Carton Content List Key Description ......Qty. Ash Vacuum ...... - Page 7 Assembly & Operation (Continued) Unpacking Your Ash Vacuum & General Assembly WARNING: Do not plug in power cord to power outlet, make sure plug is disconnected before assembling the ash vacuum. 1. Remove the ash vacuum from the 6. Insert the aluminum wand into the package.
-
Page 8: Maintenance
Maintenance Removing and Cleaning the Filter WARNING: Always disconnect the plug from the power outlet before removing the power head from collection tank. 1. Verify that the power cord is 6. Carefully remove the pre-fi lter from disconnected from the outlet. (Fig. 1) the tank and clean the ash or dirt 2. -
Page 9: Filter Installation
Maintenance (Continued) Filter Installation 1. Install the cartridge fi lter so that it is cartridge fi lter is pressed against the fl ush with the vacuum power head switch. lid. Make sure that the cartridge fi lter 2. Place fi lter cage on the top of is pushed in until it stops against the cartridge fi... -
Page 10: Troubleshooting
Troubleshooting WARNING: TO REDUCE THE RISK OF ELECTRIC SHOCK UNPLUG BEFORE TROUBLESHOOTING. Problem Possible Causes Corrective Action 1) Check power supply – cord, 1) Lack of power. breakers, fuses. 2) The filter is not installed 2) Check the filter assembly Vacuum will not operate. -
Page 11: Repair Parts
Repair Parts 125.16819 Ash Vacuum Always order by part number, not by key number. Always mention the model number when ordering parts. The model number is found on the serial plate located on the vacuum. To order parts, call 1-888-331-4569. - Page 12 Repair Parts (Continued) Ash Vacuum...
- Page 13 Manual Del Usuario Aspiradora De Cenizas Núm. de modelo 125.16819 • Seguridad • Desembalaje, Armado PRECAUCIÓN: Antes de usar este y Funcionamiento producto, lea este manual y siga • Mantenimiento todas las reglas de seguridad e • Componentes instrucciones de operación.
- Page 14 PRUEBA DE VENTA. Para conocer la cobertura de la garantía y obtener un reemplazo gratuito, visite el sitio Web: www. craftsman.com/warranty Esta garantía no cubre los bolsos, filtros, mangueras o accesorios, los cuales son piezas desechables que pueden desgastarse debido al uso normal dentro del periodo de garantía.
- Page 15 • No exponer a la lluvia. Almacenar en • No ponga objetos sobre las aberturas interiores. de ventilación. No utilizar si las • No desconecte jalando el cable. Para aberturas están bloqueadas; mantenga desconectarlo tire del enchufe, no del las aberturas de ventilación libres de cable.
- Page 16 Enchufe Polarizado Tenga en cuenta las siguientes Para reducir el riesgo de descargas advertencias que aparecen en la carcasa eléctricas, este producto posee un del motor de su aspiradora: enchufe polarizado (con un conector más ancho que el otro). Este enchufe calzará NO REQUIERE CONEXIÓN A en el tomacorriente de pared polarizado TIERRA CON DOBLE AISLACIÓN.
- Page 17 Cables De Extensión Al utilizar un cable de extensión con su aspiradora, utilice la siguiente tabla para determinar el tamaño A.W.G. (American Wire Gauge) necesario. Antes de usar la aspiradora, asegúrese de que esté en buena condición operativa, incluyendo al cable de alimentación. Además, asegúrese de que el cable esté en buenas condiciones antes de usarlo.
-
Page 18: Introducción
Introducción Esta aspiradora está hecha para aspirar Lea el manual del usuario para materiales secos, incluyendo polvo fi no familiarizarse con las funciones del y cenizas frías. producto y para comprender el uso específi co de esta aspiradora. Tabla De Contenidos Sección Página Sección... -
Page 19: Armado Y Funcionamiento
Armado Y Funcionamiento Saque el contenido de la caja y saque las piezas que estén dentro del tanque colector. Revise cada elemento en contraste con la Lista de contenidos de la caja. Si faltan piezas o si están dañadas, llame al 1-888-331-4569 para solicitar un cambio. - Page 20 Armado Y Funcionamiento (Continuación) Desempaque De Su Aspiradora Y Armado General ADVERTENCIA: No conecte el cable al tomacorriente y asegúrese de que el cable esté desconectado antes de armar la aspiradora. 1. Saque la aspiradora de cenizas del en la manguera para aspirar en empaque.
-
Page 21: Mantenimiento
Mantenimiento Extracción Y Limpieza Del Filtro ADVERTENCIA: Desconecte siempre el enchufe del tomacorriente antes de sacar el cabezal de alimentación del tanque colector. 1. Compruebe que el cable de 6. Saque cuidadosamente el pre- alimentación esté desconectado del fi ltro del tanque y limpie las cenizas tomacorriente. -
Page 22: Instalación Del Filtro
Mantenimiento (Continuación) Instalación Del Filtro 1. Instale el fi ltro de cartucho de el interruptor. (Fig. 1 & 2) Asegúrese manera tal que esté nivelado con la de que el fi ltro de cartucho esté tapa del cabezal de alimentación. presionado contra el interruptor. -
Page 23: Resolución De Problemas
Resolución De Problemas ADVERTENCIA: PARA EVITAR EL RIESGO DE SUFRIR DESCARGAS ELÉCTRICAS, DESCONECTE LA ASPIRADORA ANTES DE INTENTAR RESOLVER LOS PROBLEMAS. Problema Posibles Causas Acción Correctiva 1) Revise el cable de 1) No hay energía. alimentación, disyuntores, fusibles. 2) El filtro no está instalado 2) Revise el conjunto de piezas La aspiradora no funciona. -
Page 24: Piezas De Reparación
Piezas De Reparación 125.16819 Aspiradora De Cenizas Ordene siempre utilizando el número de pieza, no el número clave. Al ordenar piezas, mencione siempre el numero del modelo. El numero del modelo se encuentra en la placa de serie de la aspiradora. Para ordenar piezas, llame al 1-888-331-4569. - Page 25 Piezas De Repuesto (Continuación) Aspiradora De Cenizas...
- Page 26 Para respuestas a preguntas o problemas, y ordenar piezas o pedir servicio para la reparación de su equipo. To help us help you, register your product at www.craftsman.com/registration Para poderte ayudar mejor, registra tu producto en www.craftsman.com/registration Join the Craftsman Club today!
Need help?
Do you have a question about the 125.16819 and is the answer not in the manual?
Questions and answers