Table of Contents
Advertisement
Advertisement
Table of Contents

Summary of Contents for Cellebrite UNIVERSAL FORENSIC EXTRACTION DEVICE Standard
- Page 1 UNIVERSAL FORENSIC EXTRACTION DEVICE USER MANUAL UFED Standard UFED Ruggedized...
- Page 3 UFED SYSTEM UNIVERSAL FORENSIC EXTRACTION DEVICE USER MANUAL June 2009 | version 4b...
- Page 4 This manual is delivered subject to the following conditions and restrictions: This manual contains proprietary information belonging to CelleBrite Ltd. Such information is supplied solely for the purpose of assisting explicitly and properly authorized users of the UFED. No part of this content may be used for any other purpose, disclosed to any person or firm, or reproduced by any means, electronic or mechanical, without the express prior written permission of CelleBrite Ltd.
-
Page 5: Table Of Contents
Table of Contents Introduction ....................1 Chapter 1. Overview ......................... 1 1.1. UFED Configuration: Ruggedized and Standard Versions ....3 Chapter 2. UFED Kit Contents ......................3 2.1. UFED Device Overview ....................5 2.2. Ruggedized UFED Carrying Case ................6 2.3. - Page 6 Upgrade from PC ......................45 11.3. Upgrade from Web ...................... 47 11.4. Automatic Upgrade from Web ..................49 11.5. Appendix A: Battery Replacement (Ruggedized Only) ............ 52 Appendix B: Technical Specifications ................53 Cellebrite UFED System - Software Update Log..............54...
-
Page 7: Chapter 1. Introduction
1,600 handset models, including Symbian, Microsoft Mobile, Blackberry and Palm OS devices. Cellebrite UFED enables SIM ID cloning, allowing you to extract phone data while preventing the cellular device from connecting to the network. The UFED can extract data from a phone, or directly from the SIM card. - Page 8 Chapter 1 –Introduction The UFED Report Manager software on your PC creates detailed reports of the extracted data that can be used as evidence. Reports include full extraction details as well as MD5 hash information that proves that the data is original and untouched.
-
Page 9: Chapter 2. Ufed Configuration: Ruggedized And Standard Versions
Chapter 2. UFED Configuration: Ruggedized and Standard Versions 2.1. UFED Kit Contents The UFED comes equipped with all you need for mobile phone analysis. You can choose from either of two kit types: Standard Kit and Ruggedized Kit. Standard Kit Ruggedized Kit The following table lists the features and accessories that come with each kit. - Page 10 Chapter 2 –UFED Configuration: Ruggedized and Standard Versions Kit Features Standard Kit Ruggedized Kit Convenient vinyl Hard-side plastic casing Kit Carrying Case carrying case with secure latches √ √ UFED Device Rubber casing with UFED Device Casing Standard dataport flap coverings √...
-
Page 11: Ufed Device Overview
Chapter 2 –UFED Configuration: Ruggedized and Standard Versions 2.2. UFED Device Overview Power Supply (Connect to power adapter) LCD Display Function Keys (F1 for help. F2 for select/deselect all) ON/OFF Power Button Target-side Connectors (For extraction to USB disk drive) SIM / Smart Card Slots (Slot for reading SIM cards and smart cards) -
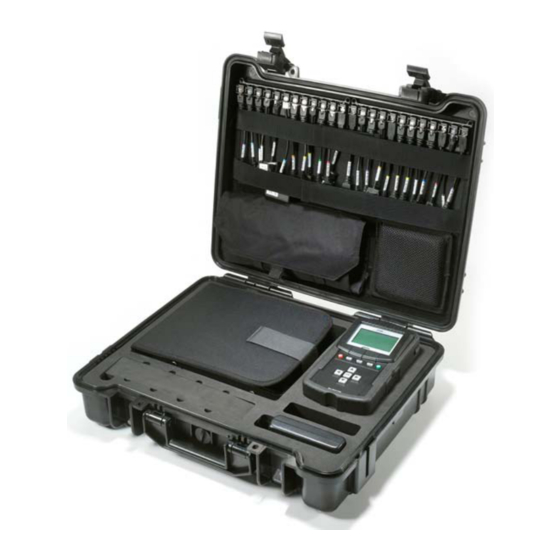
Page 12: Ruggedized Ufed Carrying Case
Chapter 2 –UFED Configuration: Ruggedized and Standard Versions 12. Serial connection (not in use) 13. Ethernet port (Connect to network for automatic updates and for uploading data to a network hosted PC) 14. Mini-USB Port (Connect to a PC via mini-USB cable, for extraction to PC) 15. -
Page 13: Ruggedized Ufed Rubber Casing
Chapter 2 –UFED Configuration: Ruggedized and Standard Versions 2.4. Ruggedized UFED Rubber Casing The Ruggedized UFED device is encased in a rubber casing, to hold the battery house and to protect the UFED from dirt, dust, sand or other contaminants. To replace the casing on the UFED, refer to Appendix A. -
Page 14: Power And Battery Options
Chapter 2 –UFED Configuration: Ruggedized and Standard Versions 2.5. Power and Battery Options The UFED device can be powered by an AC power supply, a car power supply, or by battery power. (NOTE: car power supply and battery pack come with the Ruggedized Kit only.) Battery Power To run the UFED on battery power, flip the power switch to the right (“BAT”) position. - Page 15 Chapter 2 –UFED Configuration: Ruggedized and Standard Versions Inserting or Removing Battery Please refer to Appendix A for instructions on installing, removing or exchanging the battery pack. User Manual...
-
Page 16: Chapter 3. Getting Started
Chapter 3. Getting Started 3.1. Initial Setup 2.1.1 Unpacking the UFED Unpack the UFED device from the kit (See Chapter 1). Connect the power supply adapter to the UFED. “Please Wait” appears briefly on the screen, followed by a screen showing the version numbers. When starting the UFED for the first time, you need to set the date, time and GMT. -
Page 17: Ufed Menu Navigation
Chapter 3 –Getting Started 3.2. UFED Menu Navigation The UFED shows menu options on the display. ▲▼ • Use the keys to move between options. ► • To select an option, press or the OK key. ◄. • To return to the previous menu, press When additional help is available, a help icon will appear in the upper left of the screen. -
Page 18: Chapter 4. Extract Phone Data
Chapter 4. Extract Phone Data 4.1. Overview Select Extract Phone Data from the main menu in order to copy data from a phone (the source) to a PC, USB or SD card (the target). Use this function to extract phonebook, SMS text messages, pictures, etc. from mobile phone memory to a USB disk drive, SD card or directly to a The UFED guides you each step of the way during this process. -
Page 19: Extract Phone Data To Usb Disk Drive Or Sd Card
Chapter 4 –Extract Phone Data 4.3. Extract Phone Data to USB Disk Drive or SD Card Follow the steps below to perform a data extraction from a mobile phone to a USB disk drive or an SD card. 1. Main Menu Select Extract Phone Data from the main menu. - Page 20 Chapter 4 –Extract Phone Data 4. Source Memory Select the source memory location you wish to extract. ▲▼ Use the keys to move between options. Press OK to select the currently highlgithed option, or press F2 ► to select all. Press to continue.
- Page 21 Chapter 4 –Extract Phone Data 6. Target Selection Select USB (or SD) as the target location where the content will be copied to. NOTE: If you extract to PC, the content goes directly into the UFED Report Manager software. If you extract to USB or SD, the content is stored in a separate directory on the storage device.
- Page 22 Chapter 4 –Extract Phone Data number is displayed. • If connecting via Bluetooth, refer to Chapter 6 for details. • If connecting via IrDA (Infrared), place the phone with its infrared port directly in front of the UFED’s source or target infrared port. Make sure that the phone is powered on, and the data connector is clean.
- Page 23 Chapter 4 –Extract Phone Data Smartphone / PDA Installation If the phone is a Smart Phone or PDA, you may need to install a client application on the phone. ► Press to continue. Completion Upon the completion of the process the UFED- displays a message.
-
Page 24: Extract Phone Data To A Pc
Chapter 4 –Extract Phone Data 4.4. Extract Phone Data to a PC The UFED system includes UFED Report Manager software, which you can use to upload the extracted phone data from the UFED to your PC. 1. Main Menu and Phone Definitions Select Extract Phone Data from the main menu, and then select the phone vendor, model, memory location and... - Page 25 5. Run the UFED Report Manager Run the UFED Report Manager software on your PC by choosing Start/Programs/Cellebrite Mobile Synchronization/UFED Report Manager. User Manual...
- Page 26 Chapter 4 –Extract Phone Data 6. Read Data from Phone Click the Read phone icon. • If connecting the phone via cable, the UFED informs you which cable number to use. Find the cables in the cable organizer, according to the numbers indicated on the cable. •...
-
Page 27: Chapter 5. Extract Sim/Usim Data
Chapter 5. Extract SIM/USIM Data Your UFED is equipped an integrated SIM/USIM card reader. It is located at the bottom of the UFED, as shown below. FRONT VIEW OF UFED DEVICE You can use this SIM reader to extract data directly from the SIM card instead of via the phone, or when the SIM card is not accessible via the phone. - Page 28 Chapter 5 –Extract SIM/USIM Data The procedure for transferring data to a SIM card is similar to the data extraction procedure from a phone described in Chapter 4. Select Extract SIM Data from the main menu. Insert the SIM card as described above, and continue exactly as described for phone extraction in Chapter 3.
-
Page 29: Chapter 6. Clone Sim Id
Cellebrite’s UFED (Universal Forensics Extraction Device) is capable of SIM ID Cloning utilizing the existing built in SIM Reader, providing your organization with valuable new functionality. The SIM ID Cloning capabilities of Cellebrite’s UFED System solve many key problems facing forensic examiners today: •... -
Page 30: Flowchart
Chapter 6 –Clone SIM ID 6.2. Flowchart 6.3. SIM Cloning – Steps 1. Main Menu Select Clone SIM ID from the main menu. ▲▼ Use the keys to move between ► options. Press OK or to continue. 2. Select Source Select Clone an existing SIM Card from the Select Source menu. - Page 31 Chapter 6 –Clone SIM ID 3. Insert Source SIM Insert the SIM card that you wish to clone, with the gold side facing down and the cut corner facing outwards. The slot for the SIM card is located at the bottom of the UFED device. 4.
-
Page 32: Manually Creating A Clone Sim Card - Steps
Chapter 6 –Clone SIM ID 6. Finished The UFED next completes the SIM Cloning process. ICCID and IMSI data is shown on screen. At this point, you can insert the cloned SIM card into the phone, and continue evaluating the phone. 6.4. - Page 33 Press OK or to continue. 6. Insert Target Card The UFED then asks you to insert the target card. Insert the Cellebrite UFED SIM ID blank card into the SIM reader, with the gold side facing down and the ►...
- Page 34 Chapter 6 –Clone SIM ID 7. Finished The UFED next completes the SIM Cloning process. ICCID and IMSI data is shown on screen. At this point, you can insert the cloned SIM card into the phone, and continue evaluating the phone. UFED System...
-
Page 35: Chapter 7. Smart Phones/Pda Support
Chapter 7. Smart Phones/PDA Support When extracting data from Smart Phones or PDA’s, you will be asked to upload a client application from the UFED to the phone. This application enables access to the phone memory. NOTE: Application upload is not necessary for Blackberry and Symbian 3 edition phones. -
Page 36: Chapter 8. Using Bluetooth Connectivity
Chapter 8. Using Bluetooth Connectivity On some phones, the UFED enables you to use Bluetooth instead of data cables for the extraction process. When you choose Bluetooth for the connectivity type, follow these instructions: 8.1. Phone Settings On the mobile phone, you must enable the phone to connect via Bluetooth, by turning Bluetooth capabilities on. -
Page 37: Chapter 9. Ufed Report Manager Software
In order to install the UFED Report Manager, first make sure that Microsoft Dot Net 2.xx is installed on your PC. If it is not, you can find the dotnetfx.exe file on the Cellebrite CD. Install this file and follow the installation instructions. - Page 38 2. Run UFED Report Manager on PC Launch the UFED Report Manager program on your PC. It can be found on the Start menu under Programs / Cellebrite Mobile Synchronization/ UFED Report Manager. 3. Connect the UFED to the PC using mini-...
-
Page 39: Data Analysis
Chapter 9 –UFED Report Manager Software 9.3. Data Analysis The following icons are shown on the left of the window. Under each icon, the number of items of each type is shown The Optional Information Icon allows you to enter any optional or mandatory fields, as specified in the Tools Settings. - Page 40 Chapter 9 –UFED Report Manager Software The Audio icon gives a list of each audio file. The Ringtones icon gives a list of each ringtone. UFED System...
-
Page 41: Ufed Report Manager Menu
Print Sends the report to a printer. Auto Updates Cellebrite occasionally distributes updated versions for the UFED Report Manager software. For your convenience, you can set your PC to automatically check the network for new updates. -
Page 42: Reports
Chapter 9 –UFED Report Manager Software Tools Settings Change the default settings of the contacts in the report (Last name/first name order), for viewing or printing purposes. UFED Settings Choose formatting options for forensic reports, and specify optional information to be included in reports. - Page 43 Chapter 9 –UFED Report Manager Software • Name – The name of the field as it will appear in the report • Type – Choose between Text, Multi-Line Text or List. If it is a List, you also specify the possible values of the list and the default value, in the field on the right of the window.
- Page 44 Chapter 9 –UFED Report Manager Software Entering Optional Information According to the settings defined in the Forensics Settings screen, the user will be prompted for the optional information when producing a report. Click on the Optional Information tab, and enter the information in the fields provided.
-
Page 45: Chapter 10. Services
Chapter 10. Services The Services option on the main menu allows you to perform various administrative tasks for the UFED. 10.1. Upgrade The Upgrade process enables you perform software upgrades for the UFED. This process is detailed in full in Chapter 1. 10.2. -
Page 46: Help
Chapter 10 – Services 10.4. Help • Phone Specific Help - Allows you to view various help information about specific phones • Generate File – Allows you to generate and export the full help info to a USB disk drive 10.5. -
Page 47: Ufed Settings
Chapter 10 – Services save time by eliminating prompts during the extraction process. • Estimated Transfer Time - Turns on or off the extraction time estimation, which appears during the extraction process. • Help Instructions – Sets how to expose the "help" instructions to the user. -
Page 48: Admin Settings
Chapter 10 – Services Mobile Client Settings • Client Covert mode – Rename the application client name from "Cellebrite.sis/exe" to "AAA.sis/exe". Client Uninstall Reminder – When enabled, the UFED will prompt the user to uninstall the client from the examined smartphone. -
Page 49: Chapter 11. Upgrade
Chapter 11. Upgrade 11.1. Overview Cellebrite continuously updates its UFED software, providing support for new phone devices as they are released by the various phone vendors. The Upgrade process installs these various updates on your UFED device. The UFED application is constructed of three main files: 1. -
Page 50: Upgrade From Usb Disk Drive Or Sd Card
Upgrade 11.2. Upgrade from USB Disk Drive or SD Card 1. Main Menu Select Services. ► Press OK or to continue. 2. Services Menu Select Upgrade. ► Press OK or to continue. 3. Upgrade Menu For a manual upgrade, you have two options: •... -
Page 51: Upgrade From Pc
Chapter 11 - Upgrade 4. Select Upgrade Source Choose USB Disk Drive or SD Card, according to where you have copied the upgrade files. ▲▼ Use the keys to move between ► options. Press OK or to continue. 5. Upgrade The UFED will display the available upgrade files. - Page 52 Press OK or to continue. 2. Run the Upgrade Program on the PC Run the Upgrade Program, via “Start / Programs / Cellebrite / Upgrade Program.” 7. Select Upgrade Type On your PC, select the upgrade type, according to the type that you chose in step 1 8.
-
Page 53: Upgrade From Web
Chapter 11 - Upgrade 9. Start the upgrade process Start the upgrade process by performing the steps that are requested by the software’s dialog box displayed on your PC. Upgrade The UFED now performs the upgrade. Do not interrupt the UFED until the full process is complete. - Page 54 Upgrade 1. Configure HTTP Settings (one time only) To upgrade from the web, first make sure that the FTP/HTTP settings are initialized properly. For most network environments, the UFED comes preconfigured properly. In some cases where network environments require proxies and userid/passwords, set these settings as described in Section 11.5 2.
-
Page 55: Automatic Upgrade From Web
Chapter 11 - Upgrade 4. Upgrade The UFED now performs the upgrade, by fetching the upgrade files from the HTTP server. Do not interrupt the UFED until the full process is complete. 5. Finish After finishing the upgrade process, the UFED displays a message indicating that it completed the update. - Page 56 Upgrade • Disabled – The UFED will not perform any Auto Upgrade: Method automated upgrades • FTP – The UFED will access an FTP site in order to get upgrade files • HTTP – The UFED will use HTTP to access upgrade files Auto Upgrade: Choose how often you want the UFED to check for...
- Page 57 Chapter 11 - Upgrade HTTP Settings Similar to the FTP settings, when the upgrade method is HTTP HTTP Proxy Similar to FTP Proxy settings, when the upgrade Settings method is HTTP. • App – The application version • Full and Tiny – The software image versions •...
-
Page 58: Appendix A: Battery Replacement (Ruggedized Only)
Appendix A: Battery Replacement (Ruggedized Only) Appendix A: Battery Replacement (Ruggedized Only) Open battery compartment located on the back of the UFED by pushing on the release latch in the direction of the arrow. Attach connector: Remove the old battery an unplug the connector, noting the orientation of the connector. -
Page 59: Appendix B: Technical Specifications
Appendix B: Technical Specifications Appendix B: Technical Specifications Power Supply Input: AC 100-240V, 50/60Hz (UFED Ruggedized) : Output: DC 15V, 3.3A Power Supply Input: AC 100-240V, 50/60Hz (UFED Standard) : Output: DC 12V, 2A Interfaces: RJ-45 (source phone) RJ-45 (target side) USB (source phone) USB (target phone) Mini DIN to PC COM Port... -
Page 60: Cellebrite Ufed System - Software Update Log
Software updates are emailed from Cellebrite monthly to contacts on an email distribution list. If your organization is not receiving updates on a regular basis, would like to add additional emails for distribution, need instructions, or technical support for the process, please contact Cellebrite Current App.
Need help?
Do you have a question about the UNIVERSAL FORENSIC EXTRACTION DEVICE Standard and is the answer not in the manual?
Questions and answers