Advertisement
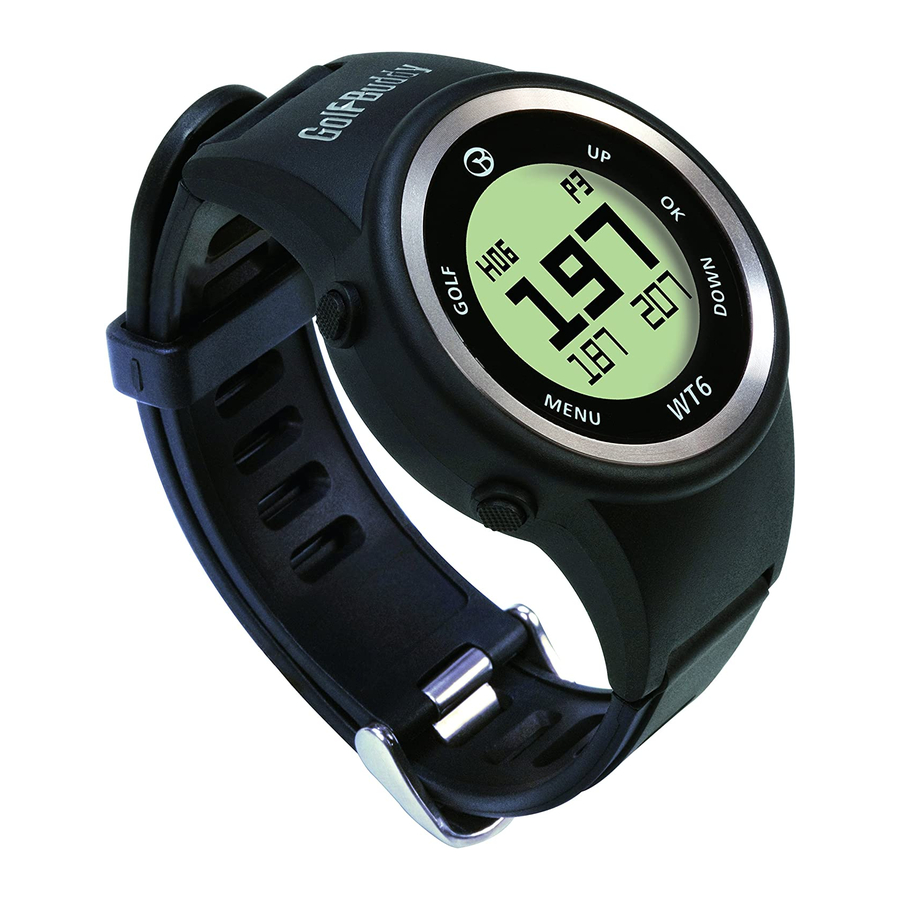
The GolfBuddy WT6 Golf GPS watch's MONO LCD screen
has high visibility and intuitiveness. The WT6 provides a
simple and easy user interface with the push of one direct
golf mode button. The WT6 combines course views for
over 38,000 courses preloaded in 130 countries around
the world, making it a great addition to your game. The
WT6's battery life is over 9 hours. In addition, you are able
to download free course updates via your computer with
no fees ever!
TABLE OF CONTENTS
Thank you for choosing the GolfBuddy WT6
1
Advertisement

Related Manuals for Golf Buddy WT6


Summary of Contents for Golf Buddy WT6
-
Page 1: Table Of Contents
38,000 courses preloaded in 130 countries around the world, making it a great addition to your game. The WT6’s battery life is over 9 hours. In addition, you are able to download free course updates via your computer with... -
Page 2: Device Overview & Charging
1.1 Power On Press and hold MENU button for 2 seconds to POWER ON, then your GolfBuddy WT6 will power on to time mode screen. If the watch is still off, charge the watch first. Note : Date/time will set automatically once the WT6 successfully connects to satellites. - Page 3 Then, remove the Micro USB cable from device. If your WT6 battery display is empty when connected and shows a low-battery icon (image A), it indicates that a full charge has not been achieved. Check your connection to make sure the cable is properly aligned with the connector, and then allow the WT6 to charge until the battery shows 100%.
-
Page 4: Main Menu
2. MAIN MENU From Watch Mode (TIME), press “MENU” button to view the Main Menu. Navigate with “UP” or “DOWN” buttons. Press the “OK” button to activate the selected function from the menu. Functions include “SETTINGS", "SET TIME", "TRACKER", "POWER OFF", and “INFO". 2.1 SETTINGS In Main Menu mode, press “UP”... - Page 5 2.2 SET TIME The WT6 time will set automatically once the watch successfully connects to satellites. First, user needs to set the Time Zone, 12/24 Hours Format, Day Format, and DST. In Main Menu mode, press “UP” and “DOWN” buttons to select "SET TIME"...
- Page 6 Beijing Hong Kong Bangkok Yangon +6.5H Dhaka Delhi +5.5H Karachi Kabul +4.5H Dubai Tehran +3.5H Moscow Athens Cairo Berlin Paris Casablanca London Brasilia Rio de Janeiro Caracas Washington New York Monterrey Chicago El Paso Denver Los Angeles San Francisco Anchorage Honolulu Hawaii -10H Pago Pago...
- Page 7 12/24 Hour Format To change, move to menu using navigate button. Press the “OK” button, use “UP” and “DOWN” buttons to select. The default is "12HOURS" and the other option is "24HOURS". Day Format To change, move to menu using navigate button.
- Page 8 AUTO ON/OFF This feature allows users that prefer to sync their time. In most cases, this is unnecessary. Minutes are set via GPS only. Press the “OK” button, use “UP” and “DOWN” buttons to select. 2.3 TRACKER In Main Menu mode, press UP” and “DOWN” buttons to select "TRACKER" function. Press “OK” button to activate this function.
- Page 9 2.4 INFORMATION Find information on remaining battery, application, firmware version and serial number. In Main Menu mode, press “UP” and “DOWN” buttons to select "INFO" function. Press “OK” button to activate this function. Information of battery level, firmware version, and serial no. will be displayed by using “UP” or “DOWN”...
-
Page 10: Golf Mode
(Image A) The screen shown in Image B will display. After selecting Golf Mode, the WT6 will search for satellite signal as shown in the image to the right (image B). This can be cancelled by pressing the “MENU” button once, and you will return to time mode. - Page 11 ⑥ Distance to the Center of the Green The WT6 watch will automatically advance to the next hole as you play through a course. Please note that in rare instances it may be necessary to manually advance to the next hole (UP button) or return to a previous hole (DOWN button).
- Page 12 3.2 Hazards To view the available hazards for your current hole, press the OK button from the FCB screen. The WT6 watch displays up to 11 hazards per hole. Cycle through hazards using the UP button for next Hazard and the DOWN button for previous hazard. Distance to the...
- Page 13 3.3 Mark Function (Shot Distance) Mark Function is Shot Distance Measurement feature. To measure the distance of any shot, press the GOLF button during Golf play mode. Screen will show image on the right. When standing at the location where the shot is taken, press OK button to activate Mark Function, then screen will change to image on right.
- Page 14 RESET. This procedure will set the WT6 back to factory settings and should solve software related problems. To reset the WT6, press and hold the GOLF, MENU, UP and DOWN buttons for 5 seconds, until the screen goes blank. The WT6 will restart automatically and enter Watch Mode.
-
Page 15: Care & Maintanance
• Store the device in a dry place when not in use. WARNING • DO NOT attempt to open the WT6 watch. Risk of explosion if battery is replaced with incorrect type. • DO NOT attempt to open, disassemble, or service the internal battery. The battery MUST be replaced by a qualified technician. -
Page 16: Updating Your Unit For Free
5. UPDATING YOUR UNIT FOR FREE Your GolfBuddy WT6 unit has been pre-loaded with the latest firmware and world-wide course maps available at the time of manufacture, so it’s ready to play right out of the box. For optimum performance and longer product life, we recommend that you register your unit and keep it updated with the latest course maps and updates for free. - Page 17 5.3 Registering your GolfBuddy WT6: Connect your GolfBuddy unit to a USB port on your computer using the USB cable provided with the unit. • After a short time, your GolfBuddy unit should show an icon on the screen indicating it is connected to the computer.
- Page 18 5.4 Updating your GolfBuddy WT6 in three Steps: Step 1. Once you get the “Connection Established” message, please click “Next” to proceed to Step #2: Firmware Update. Step 2. At step 2, click “Next” to install the latest firmware. If the firmware is already up to...
- Page 19 Step 3. Select the countries that you would like to update and click “Next”. You will see a panel that asks you to “Overwrite” or “Newly Updated Only”. Select your preferred option, then click “OK” to start the course update. Once all the courses have been downloaded you will receive a message “Update Complete”.
- Page 20 Note: Do not disconnect the WT6 from the computer during the update process to prevent software malfunctions 5.5 Updated Course Info You can search courses by country, state, and city. You can also check to see when the course was last updated.
- Page 21 5.6 Profile Info System Information for your WT6 can be found under the profile tab.
Need help?
Do you have a question about the WT6 and is the answer not in the manual?
Questions and answers