Table of Contents
Advertisement
Available languages
Available languages
This guide takes you through your first use of the EziWeigh7i weigh scale indicator.
Contents
Unpacking the box .................................. 1
Charging the battery ................................ 2
Getting around ........................................ 3
Installing ................................................. 4
Setting up the indicator ........................... 5
Recording information ............................. 5
Viewing information ................................ 6
Putting information on ............................. 7
Getting information off ............................ 8
Maintenance and servicing ...................... 9
Compliance ........................................... 11
Unpacking the box
1
Check that you have all of these items. If anything is missing, contact your supplier.
EziWeigh7i weigh scale
indicator (the indicator)
Bracket mounting kit
USB cable
The USB cable is for charging
and also connects the indicator
to a PC.
For further details, view the reference
information on the supplied USB flash drive or
visit www.tru-test.com
Mains power adaptor and
power plug
Power plugs for different countries
are included.
USB flash drive
The flash drive contains Data Link
software and reference information.
1
Advertisement
Chapters
Table of Contents

Related Manuals for Tru-Test EziWeigh7i


Summary of Contents for Tru-Test EziWeigh7i
-
Page 1: Table Of Contents
This guide takes you through your first use of the EziWeigh7i weigh scale indicator. Contents Unpacking the box ........1 For further details, view the reference Charging the battery ........ 2 information on the supplied USB flash drive or Getting around ........3 visit www.tru-test.com... -
Page 2: Charging The Battery
Charging the battery Use the mains power adaptor to charge the indicator’s internal battery from the mains power supply. For best results, do not charge the battery if the temperature is less than 0 °C (32 °F), or greater than 40 °C (104 °F). -
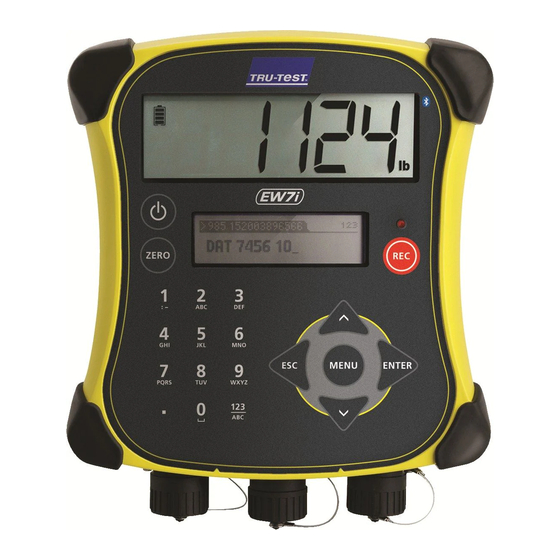
Page 3: Getting Around
Getting around... -
Page 4: Installing
2. Then, switch on the EID reader. For further instructions on pairing the EID reader, see the EID Reader User Manual. Connecting via serial cable Connect the EID reader to the indicator’s power/serial connector using a serial cable, available from Tru-Test as an optional accessory. -
Page 5: Setting Up The Indicator
Setting up the indicator The first time that you turn on the indicator, follow the step by step instructions to set the language. When shipped, the indicator is set up to manually record animal weights and IDs, without drafting. You should change the way the indicator is set up to suit the task that you are about to perform. -
Page 6: Viewing Information
Weighing an animal Ensure that the indicator is displaying 0.0. If not, press 1. Move the animal onto the platform. 2. If recording IDs, enter the animal’s VID or scan the EID tag using an EID reader. 3. If desired, press to enter a comment about the animal, using the alpha numeric keypad. -
Page 7: Putting Information On
Putting information on You can transfer session files or a cross reference file containing EID/VID pairs from a PC to your indicator using the Data Link for PC software application. If you haven't done so already, install Data Link on your PC. To do this, insert the supplied USB flash drive into a USB port on your PC and follow the instructions. -
Page 8: Getting Information Off
2. Launch Data Link on your PC. 3. Click to get information off the indicator. Smartphone app The Tru-Test Data Link app is available to download for free from the Google Play* store (Android* devices) or the Apple App store* (Apple iOS*). -
Page 9: Maintenance And Servicing
Maintenance and servicing Backing up your information We strongly recommend that you regularly back up the data on your indicator by transferring it to a PC using Data Link. Updating your software We recommend that you regularly update the indicator software so that you keep up with the latest features and improvements. - Page 10 Europe – Instructions for disposal of product This symbol on the product or its packaging indicates that this product (and its battery) must not be disposed of with other waste. Instead, it is your responsibility to dispose of your waste equipment by handing it over to a designated collection point for the recycling of waste electrical and electronic equipment.
-
Page 11: Compliance
(2) this device must accept any interference, including interference that may cause undesired operation of the device. EU declaration of conformity Datamars Limited hereby declares that the EziWeigh7i indicator is in compliance with the essential requirements and other relevant provisions of Directive 2014/53/EU. The declaration of conformity may be consulted at http://livestock.tru-test.com/en/compliance... -
Page 12: Instrucciones De Desempacado
Esta guía le mostrará cómo usar el indicador de pesaje EziWeigh7i por primera vez. Índice Para mayor información, vea la información Instrucciones de desempacado ....12 Cómo cargar la batería ......13 de referencia en la unidad flash USB Vistazo general ........14 suministrada o visite www.tru-test.com... -
Page 13: Cómo Cargar La Batería
Cómo cargar la batería Use el adaptador de corriente para cargar la batería interna del indicador desde un tomacorriente. Para mejores resultados, no cargue la batería si la temperatura es menor que 0 °C (32 °F), o mayor que 40 °C (104 °F). -
Page 14: Vistazo General
Vistazo general... -
Page 15: Instalación
Si necesita más información acerca de cómo sincronizar el lector IDE, vea el Manual del usuario del lector IDE. Conexión con un cable serial Conecte el lector IDE al conector serial / de corriente del indicador a través de un cable serial, disponible en Tru-Test como accesorio opcional. -
Page 16: Configuración Del Indicador
Configuración del indicador Al encender el indicador por primera vez, siga las instrucciones paso a paso para configurar el idioma. El indicador se ha configurado en la fábrica para registrar manualmente el peso y los ID, sin clasificación. Le recomendamos que cambie la configuración del indicador según sus necesidades. -
Page 17: Visualización De Información
Pesaje de un animal Asegúrese de que el indicador muestra 0.0. En caso contrario, pulse 1. Suba el animal sobre la plataforma. 2. Si registra los ID, ingrese el IDV del animal o escanee la etiqueta IDE usando un lector IDE. 3. -
Page 18: Carga De Información
Carga de información Puede transferir archivos de sesiones o de referencia con parejas IDE/IDV desde su PC a su indicador usando el software Data Link en su computadora. Si no lo ha hecho aún, instale Data Link en su PC. Para hacerlo, inserte la unidad flash USB suministrada en el puerto USB de su PC y siga las instrucciones. -
Page 19: Transferencia De Datos
3. Haga clic en para transferir datos del dispositivo. Aplicación para teléfonos inteligentes La aplicación Tru-Test Data Link está disponible para descargar gratis en la tienda Google Play* (para dispositivos Android*) o la Apple App Store* (para dispositivos Apple iOS*). -
Page 20: Mantenimiento Y Servicio
Mantenimiento y servicio Backup de su información Le recomendamos que realice backups frecuentes de la información en su indicador mediante transferencias a su PC con Data Link. Actualización del software Le recomendamos que actualice regularmente el software del indicador de manera que esté... -
Page 21: Cumplimiento Normativo
Cumplimiento normativo Declaración UE de conformidad Datamars Limited declara por la presente que el indicador EziWeigh7i cumple con los requisitos esenciales y otras provisiones de la Directiva 2014/53/EU. La declaración de conformidad puede consultarse en http://livestock.tru-test.com/en/compliance ®... -
Page 22: Desembalar A Caixa
GUIA DE INÍCIO RÁPIDO Este guia ajuda na primeira utilização do indicador de pesagem EziWeigh7i. Conteúdo Para mais detalhes veja as informações de Desembalar a caixa ....... 22 Carregar a bateria ......... 23 referência fornecidas na unidade flash USB Conhecer o dispositivo ......24 fornecida ou visite a www.tru-test.com... -
Page 23: Carregar A Bateria
Carregar a bateria Use o adaptador de alimentação de rede para carregar a bateria interna do indicador através da alimentação de rede. Para obter os melhores resultados, não carregue a bateria, quando a temperatura for abaixo de 0 °C ou acima de 40 °C. -
Page 24: Conhecer O Dispositivo
Conhecer o dispositivo... -
Page 25: Instalar
Para instruções mais detalhadas sobre o emparelhamento do leitor IDE, veja o Manual do Usuário do Leitor de IDE. Conexão através do cabo serial Conete o leitor IDE ao conetor de alimentação de rede/serial do indicador, usando um cabo serial, que se vende na Tru-Test como acessório opcional. -
Page 26: Configurar O Indicador
Configurar o indicador Na primeira vez que você ligar o indicador, siga as instruções passo a passo para ajustar o idioma. No estado de fornecimento o indicador está ajustado ao registro manual de pesos e IDs do animal, sem classificação. Altere a configuração do indicador para que cumpra a tarefa que você... -
Page 27: Ver As Informações
Pesar um animal Assegure-se de que o indicador esteja mostrando 0.0. Caso contrário, pressione 1. Coloque o animal na plataforma. 2. Ao registrar IDs, introduza a IDV do animal ou faça um scan do brinco IDE do animal, usando um leitor IDE. 3. -
Page 28: Transferir Informações Ao Indicador
Transferir informações ao indicador Você pode transferir arquivos de sessões ou um arquivo de referência cruzada com pares de IDE/IDV de um PC ao seu indicador, usando a aplicação de software Data Link para PC. Se ainda não tiver feito isto, instale o DataLink no seu PC. Para tal, coloque a unidade flash USB em uma porta USB no seu PC e siga as instruções. -
Page 29: Transferir Informações Do Indicador
2. Inicialize o Data Link no seu PC. 3. Clique em para transferir informações do indicador. Aplicativo Data Link para celular smartphone O aplicativo Tru-Test Data Link pode ser baixado gratuitamente na loja Google Play* (aparelhos Android*) ou na Apple App Store* (Apple iOS*). -
Page 30: Manutenção E Assistência
Manutenção e assistência Fazer backup das suas informações Recomendamos rigorosamente fazer um backup dos seus dados no indicador periodicamente, transferindo-os a um PC, usando o Data Link. Atualizar o seu software Recomendamos atualizar o software do indicador periodicamente para aproveitar as funções novas e os últimos melhoramentos. -
Page 31: Conformidade
Para instruções de desmontagem do produto para a reciclagem, envie um e-mail a contact@trutest.co.nz Conformidade Certificado de conformidade UE Pelo presente, a Datamars Limited declara que o indicador EziWeigh7i está conforme os requerimentos essenciais e outras disposições relevantes da diretiva 2014/53/UE. O certificado de conformidade consta em http://livestock.tru-test.com/en/compliance. ®... -
Page 32: Déballage De La Boîte
Assurez-vous que vous avez l’ensemble des éléments suivants. Si la livraison n’est pas complète, contactez votre distributeur. Indicateur de pesée Câble USB Adaptateur secteur et fiche EziWeigh7i (l’indicateur) d’alimentation Le câble USB permet de charger l’indicateur et Des fiches pour différents pays sont fournies de le connecter à... -
Page 33: Chargement De La Batterie
Chargement de la batterie Utilisez l’adaptateur secteur pour charger la batterie interne de l’indicateur à partir du secteur. Pour obtenir les meilleurs résultats, ne chargez pas la batterie si la température est inférieure à 0 °C ou supérieure à 40 °C. -
Page 34: Prise En Main De L'appareil
Prise en main de l’appareil... -
Page 35: Installation
Pour obtenir des instructions plus détaillées sur le jumelage du lecteur EID, consultez le Manuel d’utilisation du lecteur EID. Connexion via câble série Reliez le lecteur EID au connecteur d’alimentation/série de l’indicateur à l’aide d’un câble série que vous pouvez obtenir de Tru-Test comme accessoire optionnel. -
Page 36: Réglage De L'indicateur
Réglage de l’indicateur Lorsque vous allumez l’indicateur pour la première fois, suivez les instructions étape par étape pour régler la langue. À la livraison, l’indicateur est réglé de manière à enregistrer manuellement les poids et numéros ID des animaux, sans tri. Il est recommandé de modifier les réglages de l’indicateur en fonction de la tâche que vous souhaitez effectuer. -
Page 37: Consultation Des Informations
Pesage d’un animal Assurez-vous que l’indicateur affiche 0.0. Si ce n’est pas le cas, appuyez sur 1. Faites monter l’animal sur la plateforme. 2. Si vous enregistrez les numéros ID, saisissez le VID de l’animal ou scannez la boucle EID à l’aide d’un lecteur EID. 3. -
Page 38: Importation De Données
Importation de données Vous pouvez transférer des fichiers de séance ou un fichier de référence contenant des paires EID-VID depuis un PC vers votre indicateur à l’aide de l’application logicielle Data Link pour PC. Si ce n’est déjà fait, installez Data Link sur votre PC. Pour ce faire, insérez la clé... -
Page 39: Exportation De Données
2. Démarrez Data Link sur votre PC. 3. Cliquez sur pour exporter des données depuis l’indicateur. Application smartphone L’application Data Link de Tru-Test peut être téléchargée gratuitement des boutiques Google Play* store (appareils Android*) ou Apple App store* (Apple iOS*). -
Page 40: Maintenance Et Entretien
Maintenance et entretien Sauvegarde de vos données Nous vous recommandons fortement de sauvegarder régulièrement les données qui se trouvent sur votre indicateur en les transférant sur un PC à l’aide de Data Link. Mise à jour de votre logiciel Nous vous recommandons de mettre à jour régulièrement le logiciel de l’indicateur afin de toujours bénéficier des dernières fonctionnalités et améliorations. -
Page 41: Conformité
Déclaration UE de conformité Par la présente, Datamars Limited déclare que l’indicateur EziWeigh7i est conforme aux exigences essentielles et aux autres dispositions pertinentes de la directive 2014/53/UE. La déclaration de conformité peut être consultée à l’adresse suivante : http://livestock.tru-test.com/en/compliance ®... -
Page 42: Lieferumfang Prüfen
SCHNELLSTARTANLEITUNG Diese Anleitung unterstützt Sie bei der ersten Anwendung Ihres EziWeigh7i Wiegeterminals. Inhalt Weitere Informationen finden Sie auf dem mitgelieferten USB-Stick oder auf der Website Lieferumfang prüfen ......42 unter www.tru-test.com Laden des Akkus ........43 Kennenlernen des Geräts ....... 44 Installation .......... -
Page 43: Laden Des Akkus
Laden des Akkus Verwenden Sie das Netzteil, um den Akku des Terminals über das Stromnetz aufzuladen. Laden Sie den Akku nicht bei Temperaturen unter 0° C oder über 40° C. -
Page 44: Kennenlernen Des Geräts
Kennenlernen des Geräts... -
Page 45: Installation
Installation Bevor Tiere gewogen werden können, muss das Terminal an Wiegebalken oder -zellen angeschlossen werden. Um Tierdaten mithilfe der elektronischen EID-Marken abzurufen, muss das Terminal außerdem an ein EID-Lesegerät angeschlossen werden. Terminal und Wiegebalken installieren Anschließen des Terminals an ein EID-Lesegerät ®... -
Page 46: Einrichten Des Terminals
Einrichten des Terminals Folgen Sie beim ersten Einschalten des Terminals der Schritt-für-Schritt-Anleitung zur Einstellung der Sprache. Bei Lieferung sehen die Einstellungen des Terminals eine manuelle Erfassung von Gewicht und Tiernummer ohne Sortierfunktion vor. Ändern Sie die Einstellungen entsprechend Ihrer Bedürfnisse ab. Ändern der Einstellungen des Terminals So ändern Sie die Einstellungen des Terminals: Drücken Sie auf... -
Page 47: Informationen Abrufen
Ein Tier wiegen Achten Sie darauf, dass das Terminal 0,0 anzeigt. Ist das nicht der Fall, drücken Sie auf 1. Führen Sie das Tier auf die Plattform. 2. Um Tiernummern zu speichern, geben Sie die VID-Nummer ein oder scannen Sie die EID-Marke mit einem EID-Lesegerät. -
Page 48: Daten Einspeisen
Daten einspeisen Sie können Sitzungsdateien oder Referenzdateien, die EID/VID-Paare enthalten, mithilfe der Software „Data Link“ von Ihrem PC auf das Terminal übertragen. Falls noch nicht geschehen, installieren Sie Data Link auf Ihrem PC. Stecken Sie einfach den mitgelieferten USB-Stick in eine USB-Schnittstelle des Computers und folgen Sie den Anweisungen. -
Page 49: Daten Exportieren
2. Starten Sie Data Link auf Ihrem PC. 3. Klicken Sie auf , um Daten aus dem Terminal zu exportieren. Smartphone-App Die App „Tru-Test Data Link“ kann gratis über Google Play* (für Android*-Geräte) oder über den Apple App Store* (Apple iOS*-Geräte) heruntergeladen werden. -
Page 50: Wartung Und Pflege
Wartung und Pflege Daten sichern Eine regelmäßige Sicherung der auf dem Terminal vorhandenen Daten durch Übertragung mittels Data Link auf einen PC wird dringend empfohlen. Aktualisieren der Software Aktualisieren Sie die Software Ihres Terminals regelmäßig, um von den neuesten Funktionen und Verbesserungen zu profitieren. So aktualisieren Sie die Software des Terminals: 1. -
Page 51: Rechtliche Bestimmungen
Wenn Sie eine Anleitung zum recyclinggerechten zerlegen dieses Produkts benötigen, senden Sie bitte eine E-Mail an contact@trutest.co.nz Rechtliche Bestimmungen EU-Konformitätserklärung Datamars Limited erklärt hiermit, dass das Eziweigh7i Wiegeterminal die wesentlichen Anforderungen und sonstigen anwendbaren Bestimmungen der Richtlinie 2014/53/EU erfüllt. Die Konformitätserklärung kann unter http://livestock.tru-test.com/en/compliance eingesehen werden. ®... - Page 52 © Datamars Limited, 2015-2018. All rights reserved. 829551 Issue 3 12/2018...
Need help?
Do you have a question about the EziWeigh7i and is the answer not in the manual?
Questions and answers