Table of Contents
Advertisement
Quick Links
Advertisement
Table of Contents

Related Manuals for Orderman Sol+


Summary of Contents for Orderman Sol+
- Page 1 Operating Instructions for Orderman Sol+ & Sol+ MSR...
- Page 2 Orderman GmbH. P3. - V1.0 • Orderman assumes no liability for injuries or losses resulting from the use of these instructions. • Orderman assumes no liability for losses or claims by third parties resulting from the use of Orderman devices.
-
Page 3: Table Of Contents
Safety information for battery pack ..............5 1.4. Maintenance ..................... 5 DELIVERY VOLUME..................6 ORDERMAN SOL ......................7 OVERVIEW OF ORDERMAN SOL ..............7 CHARGING THE BATTERY PACK ..............7 OPERATION (SETUP) ..................9 The status bar ........................ 9 5.1. -
Page 4: General Information
General Information This description applies to Orderman Sol+ and Sol+ MSR devices. The functions of both products are fundamentally identical and are described below using Orderman Sol as an example. Please note that (as of July 2010) the dual battery charger is not yet available. -
Page 5: General Safety Information
1.2. General safety information Caution: • Orderman Sol does not contain any parts to be serviced by the user and therefore must not be opened. If opened, the warranty is rendered null and void. • Do not expose the unit to extreme weather conditions such as rain, hail, strong sunlight or snow. -
Page 6: Delivery Volume
Delivery volume 1. Orderman Sol and Sol+ 2. Two Orderman touch pens 3. Battery pack 4. Charging station or service station 5. 5 V power supply unit... -
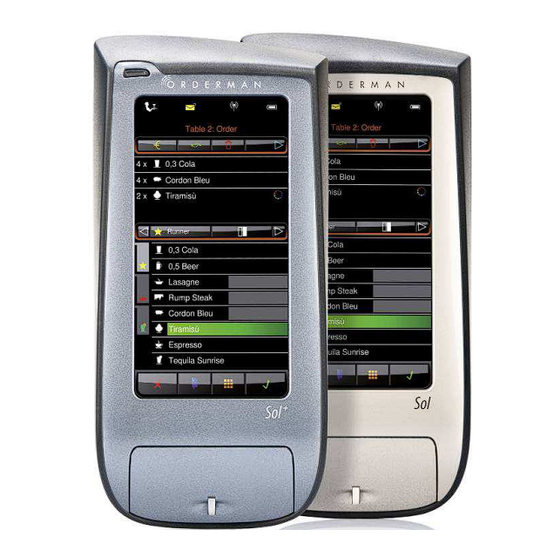
Page 7: Orderman Sol
Orderman Sol Overview of Orderman Sol 1. On/Off button 2. Status bar 3. Display / touch screen 4. Battery compartment with safety cord fastener 5. Battery lock 6. Charging contacts / Ethernet port Charging the battery pack This section describes the steps for charging the battery pack. A fully charged battery pack can be used for up to 18 hours, depending on the setting of the automatic power-off time and display settings. - Page 8 • Insert the battery in the backside of the unit. • Insert the unit in the charging station or service station; the unit will turn on. • The charging icon in the status bar shows the battery level. The following battery states are available: White solid light - Battery OK Green solid light –...
-
Page 9: Operation (Setup)
Status bar Get more Touch the Get more icon to go to the device setup screen. The setup screen contains settings and test options for Orderman Sol. Service personnel can call up the Get more menu at any time. This menu allows you to set the display brightness, backlight timeout, etc. - Page 10 Get More (Setup) White solid light – Setup OK Start screen for setup (Connect Belt Printer displayed only on Sol+) • Configuration (Settings) − Display configuration (Display Settings) To configure the settings, touch the dot on the scale and drag it to the desired position.
-
Page 11: Message Status Bar
The Display Settings menu item enables you to configure the following settings: • Brightness Timeout (seconds): Enables you to set the number of seconds before the display brightness is dimmed. A shorter timeout period saves battery power when the device is in operation. •... -
Page 12: Connection Status Bar
The function is application-specific. Two different states are supported: White solid light – No new messages received Yellow flashing light – Unread messages in mailbox 5.3. Connection status bar The connection icon provides information about the status of the radio connection and the configured channel. - Page 13 Battery LED Information to call up a legend with all the different formats for displaying battery power. The following states are available: White solid light – Battery OK Green solid light – Battery full (in charging station / service station) Green flashing light –...
-
Page 14: Orderman Sol
Orderman Sol+ Connect belt printer To connect the belt printer to Sol+, open the Get more menu and select Connect belt printer Get more menu Connect Belt Printer • Belt printer "On" • Hold the belt printer to the upper left of Sol+ as shown in the figure •... -
Page 15: Belt Printer Test
• Sol+ is now establishing the connection to the belt printer • Once the belt printer is detected, the Get more LED lights up blue for two minutes. In addition, a test page is printed. This test page includes: − Figure 1 (if available) −... -
Page 16: Ordercard Test
Ordercard Test The Ordercard test allows you to check the functionality of the Ordercard. To launch the Ordercard test, open the Get more menu and select Test Ordercard Test. Hold the Ordercard to the upper left corner of the handheld. The connection will be checked. The number of the Ordercard and the number of successful scans will be displayed. -
Page 17: Accessories
5V. • When Orderman Sol is placed in the charging station the unit switches on. The current battery status will be displayed. After some 5 seconds, the display will switch to energy-saving mode. The battery display in the status bar will continue to show the battery level. -
Page 18: Startup
5V. • When Orderman Sol is placed in the service station the unit switches on. The current battery status will be displayed. After some 5 seconds, the display will switch to energy-saving mode. The battery display in the status bar will continue to show the battery level. -
Page 19: System Displays In The Service Station
2.2. System Displays in the Service Station The connection icon in the status bar provides information about the status of the Ethernet connection. See also the illustrations in the following table: Orange flashing light – Unit is contacting the service station properly;... -
Page 20: Technical Data
Technical data Sol+ & Sol+ MSR • Frequency range: 902.450MHz – 905.450MHz • Transmitting power: less than 1 mW • Range: in building up to 50 m, in open areas up to 300 m • Coverage area: up to approx. 7800 m² •... -
Page 21: Service Station
Service station • Supply voltage: 5 V power supply –1A • Power supply unit: − Input voltage 100V to 240V, 50-60Hz − Max. power consumption 150mA • Dimensions: 110 x 169 x 120 mm • Operating time: The service station is designed for continuous operation. •...
Need help?
Do you have a question about the Sol+ and is the answer not in the manual?
Questions and answers