
Related Manuals for GE 29878


Summary of Contents for GE 29878
- Page 1 All manuals and user guides at all-guides.com 29878 Digital Answerer User's Guide We bring good things to life.
-
Page 2: Nterference Information
All manuals and user guides at all-guides.com FCC R EGISTRATION NFORMATION Your telephone equipment is registered with the Federal Communications Commission and is in compliance with parts 15 and 68, FCC Rules and Regulations. 1 Notification to the Local Telephone Company On the bottom of this equipment is a label indicating, among other information, the FCC Registration number and Ringer Equivalence Number (REN) for the equipment. -
Page 3: Table Of Contents
All manuals and user guides at all-guides.com ABLE OF ONTENTS ........15 FCC R ....2 LAYING ESSAGES EGISTRATION NFORMATION ....16 ......2 RASING ESSAGES NTERFERENCE NFORMATION ......16 ..........4 EAVING A NTRODUCTION ........4 CREENING ALLS ISCONNECT EFORE EGIN ) ........ -
Page 4: Introduction
All manuals and user guides at all-guides.com NTRODUCTION Your Digital Answerer is designed to give you flexibility in use and high quality performance. To get the most from your new answerer, we suggest that you take a few minutes right now to read through this instruction manual. -
Page 5: Installing The Battery
All manuals and user guides at all-guides.com NSTALLING THE ATTERY In the event of a power loss, a 9-volt alkaline battery (not included) enables the answerer to retain messages stored in memory. To install the battery: 1. Remove the battery compartment door on the bottom of the unit by loosening the screw with a Phillips screwdriver. -
Page 6: Installation
All manuals and user guides at all-guides.com NSTALLATION CAUTION: • Unplug phone cord from wall before installing or charging batteries. • Never install telephone wiring during a lightning storm. • Never touch uninsulated telephone wires or terminals, unless the telephone line has been disconnected at the network interface. -
Page 7: Important Instructions For Answerer
All manuals and user guides at all-guides.com 3. Connect the small end of the power supply into the POWER 9V AC jack on the back of the answerer. Plug the other end into an AC power outlet. The unit announces “please wait for the beep. ” The unit pauses while the MESSAGE indicator flashes and then beeps again when it is ready for setup or to answer calls with the default greeting and settings. -
Page 8: Set Up
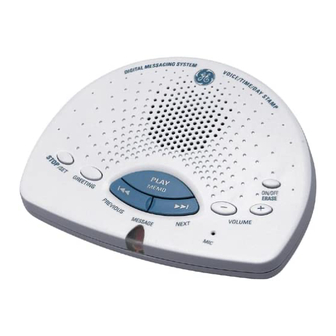
All manuals and user guides at all-guides.com ON/OFF/ PLAY/MEMO ERASE button button STOP/SET button VOLUME buttons GREETING button PREVIOUS NEXT button button MESSAGE indicator ECORDING THE REETING Before using your new answerer, you should record a greeting (the announcement callers hear when your answering system answers a call). If you don't record a greeting, callers hear a default greeting which says, "We are unavailable to take your call. -
Page 9: Hanging The
All manuals and user guides at all-guides.com 1. Prepare your greeting. Sample Greeting: Hi, this is (use your name here). I can’t answer the phone right now, so please leave your name, number, and a brief message after the tone, and I’ll get back to you. Thanks. 2. -
Page 10: Etting The
All manuals and user guides at all-guides.com ETTING THE This setting allows you to set the current time and day for the Time/Day stamp attached to each message. Range of Settings Default Settings Time Time 12 a.m. Sunday Hour 12 a.m. - 11 p.m. Rings to Answer 4 Minute 0 - 59... -
Page 11: Etting The
All manuals and user guides at all-guides.com 2. To change the minutes, press and release the NEXT or PREVIOUS button and the unit announces a minute such as “01, 02, 03” or “59, 58, 57. ” 3. After choosing the minute, press and release the STOP/SET button to store the minute. -
Page 12: Nformation
All manuals and user guides at all-guides.com 3. After choosing a number, press and release the STOP/SET button to store the rings to answer. The unit confirms the setting and enters Message Length menu. NFORMATION BOUT AVER Toll Saver can save you the cost of making a call when you access your messages from another phone: •... - Page 13 All manuals and user guides at all-guides.com ETTING THE ECURITY This setting allows to change the factory default security code used to access your answerer from a remote location. The default code is 123. 1. The unit announces, “Security code (the current 3 number Security Code setting).
-
Page 14: Olume
All manuals and user guides at all-guides.com EVIEWING THE ETTINGS This function allows you to review the current time, rings to answer, message time and security code. • Press and release the STOP/SET button to start the review. The unit announces the current settings. -
Page 15: Playing Messages
All manuals and user guides at all-guides.com LAYING ESSAGES When the message indicator flashes slowly you have received new messages. Messages play back in first received-first played order. If there are new messages, the unit plays new messages first, followed by old messages. -
Page 16: Erasing
All manuals and user guides at all-guides.com NOTE: • An ‘old’ message is a message that has been listened to (including the time and day) and not erased. • A ‘new’ message is a message that has not been listened to completely. •... -
Page 17: Remote Access
All manuals and user guides at all-guides.com Auto Disconnect tells the unit to stop playing the greeting or recording a message when an extension phone is picked up. Sometimes you may pick up the phone and the machine keeps playing the greeting. This is normal. If you want to pick up the phone while the greeting is playing, wait about two seconds after the system answers before picking up the phone. -
Page 18: General Product Care
All manuals and user guides at all-guides.com 4. Select the function you want to use and press that number on the phone’s keypad you are using. 5. To end the call, hang up or press the “6” button while the menu is playing. -
Page 19: Troubleshooting Tips
All manuals and user guides at all-guides.com ROUBLESHOOTING ’ OESN T ANSWER OR ANSWERS ON TH RING • Make sure answerer is turned on. • Memory is full, erase some messages. • Check AC power and phone line connections. NCOMING MESSAGES ARE INCOMPLETE •... - Page 20 All manuals and user guides at all-guides.com “L ” NIT ANNOUNCES ATTERY • Install a new 9-volt alkaline battery. T RESTART THE MESSAGE • You must play messages for at least 5 seconds before pressing and holding the PREVIOUS button. ESSAGES INDICATOR FLASHES RAPIDLY •...
-
Page 21: Service
All manuals and user guides at all-guides.com ERVICE FCC requires this product be serviced only by the manufacturer or its authorized service agents. In accordance with FCC requirements, changes or modifications not expressly approved by ATLINKS USA, Inc. could void the user’s authority to operate this product. -
Page 22: Index
All manuals and user guides at all-guides.com NDEX Interference Information 2 Introduction 4 Adjusting the Volume 14 Leaving a Memo 16 Limited Warranty 24 Before You Begin 4 Messages Indicator 14 Changing the Settings 9 Minutes 10 Modular Jack Requirements 4 Day 11 Parts Checklist 4 Playing Messages 15... -
Page 23: Remote Access Card
All manuals and user guides at all-guides.com EMOTE CCESS Cut out this remote access card so that you can take it with you to help you use the remote features. FOLD Press: Play messages ......1 Play previous ......7 (during message playback) Skip to next message ... -
Page 24: Limited Warranty
All manuals and user guides at all-guides.com IMITED ARRANTY What your warranty covers: • Defects in materials or workmanship. For how long after your purchase: • One year, from date of purchase. (The warranty period for rental units begins with the first rental or 45 days from date of shipment to the rental firm, whichever comes first.) What we will do: •... - Page 25 All manuals and user guides at all-guides.com 29878 Contestador Digital Guía del Usuario Creamos cosas buenas para la vida...
- Page 26 All manuals and user guides at all-guides.com NFORMACIÓN EGISTRO A LA Su equipo telefónico de la ha sido registrado con la Comisión Federal de Comunicaciones (FCC) y está en acuerdo con las Partes 15 y 68 de las Regulaciones y Reglas de la FCC. Notificación a la Compañía Telefónica Local Al fondo de este equipo Ud.
- Page 27 All manuals and user guides at all-guides.com ABLA DE ONTENIDO .... 14 FCC ..2 EVISAR LAS ROGRAMACIONES NFORMACIÓN EGISTRO A LA ... 2 ....14 NFORMACIÓN DE NTERFERENCIAS JUSTAR EL OLUMEN ......14 ..........4 NDICADORES DE ENSAJES NTRODUCCIÓN ........
-
Page 28: Introducción
All manuals and user guides at all-guides.com NTRODUCCIÓN Su Contestador Digital está diseñado para darle flexibilidad de uso y la más alta calidad de funcionamiento. Para aprovechar al máximo su nuevo contestador, le sugerimos que se tome unos minutos ahora mismo para leer este manual de instrucciones. - Page 29 All manuals and user guides at all-guides.com NSTALACIÓN DE LA ATERÍA En caso de un corte de corriente, una batería alcalina de 9 voltios (no incluida) le permite al contestador retener mensajes almacenados en la memoria. Para instalar la batería: 1.
-
Page 30: Instalación
All manuals and user guides at all-guides.com NSTALACIÓN CUIDADO: • Desconecte el cable de línea telefónico de la pared antes de instalar o re-cargar las baterías. • Nunca instale el cableado del teléfono durante una tormenta de relámpagos. • Nunca toque alambres telefónicos o terminales que no estén aislados, a menos de que la línea telefónica haya sido desconectada en la interfaz de la red. -
Page 31: Instrucciones
All manuals and user guides at all-guides.com 3. Conecte el extremo corto del cable de corriente dentro del enchufe marcado “POWER 9V AC” en la parte posterior del contestador. Conecte el otro extremo en un enchufe de corriente AC. El aparato anuncia “por favor espere al tono. -
Page 32: Programación
All manuals and user guides at all-guides.com ROGRAMACIÓN Botón para borrar y activar (“ON/OFF/ Botón para ERASE”) reproducir (“PLAY/ MEMO”) Botón para programar (“STOP/SET”) Botones para volumen Botón para el saludo (“VOLUME”) (“GREETING”) Botón para Micrófono Botón para previo siguiente (MIC) (“PREVIOUS”) Indicador de... -
Page 33: Información Sobre El
All manuals and user guides at all-guides.com 1. Prepare su saludo. Ejemplo de un saludo: Hola, habla (use su nombre aquí). No puedo contestar el teléfono en este momento, pero por favor deje su nombre, número de teléfono y un mensaje breve después del tono, y yo le llamaré... -
Page 34: Hora
All manuals and user guides at all-guides.com ROGRAMAR LA ÍA Esta programación le permite programar la información de Fecha/Hora que acompaña a cada Mensaje. Rango de Programaciones Programaciones de Fábrica Hora Hora 12 a.m. Domingo Horas 12 a.m. - 11 p.m. Timbres para Contestar Minutos... -
Page 35: Imbres Para
All manuals and user guides at all-guides.com 2. Para cambiar los minutos, oprima y suelte el botón “NEXT” (siguiente) o “PREVIOUS” (previo) y el aparato anuncia un minuto, como “01, 02, 03” o “59, 58, 57. ” 3. Después de seleccionar el minuto, oprima y suelte el botón “STOP/SET” para almacenar el minuto. -
Page 36: Cargos
All manuals and user guides at all-guides.com 3. Después de seleccionar un número, oprima y suelte el botón “STOP/ SET” para almacenar el número de timbres para contestar. El aparato confirma la programación y entra en el menú de Longitud del Mensaje. NFORMACION CERA DEL HORRADOR DE... - Page 37 All manuals and user guides at all-guides.com ROGRAMACION DEL ODIGO DE EGURIDAD Esta programación le permite cambiar el código de seguridad programado de fábrica que se usa para tener acceso a su contestador desde una localización remota. El código programado de fábrica es 123. 1.
-
Page 38: Para Revisar Lasp
All manuals and user guides at all-guides.com EVISAR LAS ROGRAMACIONES Esta función le permite revisar la hora actual, los timbres para contestar, longitud del mensaje y código de seguridad. • Oprima y suelte el botón “STOP/SET” para empezar a revisar. El aparato anuncia las programaciones actuales. -
Page 39: Para
All manuals and user guides at all-guides.com EPRODUCIR ENSAJES Cuando el indicador de mensaje parpadea lentamente significa que usted ha recibido mensajes nuevos. Los mensajes se reproducen en el orden en que fueron recibidos. Si hay mensajes nuevos, el aparato reproduce los mensajes nuevos primero, y después los mensajes viejos. -
Page 40: Para
All manuals and user guides at all-guides.com NOTA: • Un mensaje “viejo” es aquel que ha sido escuchado (incluyendo la hora y la fecha del mensaje) y no ha sido borrado. • Un “nuevo” es aquel que no ha sido escuchado completamente. •... -
Page 41: Acceso Remoto
All manuals and user guides at all-guides.com La función de Auto Desconectar le dice al aparato que deje de reproducir el saludo o de grabar el mensaje cuando una extensión del teléfono es levantada. Algunas veces usted levanta la extensión y la máquina sigue reproduciendo el saludo. -
Page 42: Cuidado General Del Producto
All manuals and user guides at all-guides.com 4. Seleccione la función que usted quiera utilizar y oprima ese número en el teclado del teléfono que usted está utilizando para llamar. 5. Para terminar una llamada, cuelgue u oprima el botón “6” mientras el menú... - Page 43 All manuals and user guides at all-guides.com OLUCIÓN DE ROBLEMAS (10) T ONTESTA ONTESTA EN EL ÉCIMO IMBRE • Asegúrese de que el contestador esté activado. • La memoria está llena, borre algunos mensajes. • Verifique que haya corriente AC y verifique las conexiones de los cables telefónicos.
- Page 44 All manuals and user guides at all-guides.com “L ” (B L APARATO ANUNCIA ATTERY AJA BATERÍA • Instale una batería nueva de 9 voltios. UEDE OLVER A OMENZAR EL ENSAJE • Usted debe reproducir mensajes por lo menos durante 5 segundos antes de oprimir y sostener el botón “PREVIOUS.
- Page 45 All manuals and user guides at all-guides.com ÓMO BTENER ERVICIOS DE ANTENIMIENTO La FCC requiere que este producto sea sometido a servicios de mantenimiento solamente por el fabricante o por sus agentes de servicio autorizados. De acuerdo con los requerimientos de la FCC, los cambios o las modificaciones que no hayan sido expresamente aprobadas por ATLINKS USA, Inc.
-
Page 46: Solución De Problemas 19
All manuals and user guides at all-guides.com Í NDICE Lista de Partes 4 Acceso Remoto 17 Acceso Remoto Tarjeta 23 Antes de Comenzar 4 Minutos 10 Cómo Obtener Servicios de Mantenimiento 21 Para Ajustar el Volumen 14 Cómo Tener Acceso a su Contestador 17 Para Borrar todos los Mensajes 16 Cuidado General del Producto 18 Para Cambiar las Programaciones 9... -
Page 47: Acceso
All manuals and user guides at all-guides.com CCESO EMOTO ARJETA Recorte esta tarjeta con las funciones del control remoto para que usted pueda llevarla consigo. FOLD Para: Oprima: Reproducir los mensajes ....1 Reproducir previo ......7 (durante la reproducción) Saltar al siguiente mensaje .. - Page 48 All manuals and user guides at all-guides.com ARANTÍA IMITADA Lo que cubre su garantía: • Defectos de materiales o de trabajo. Por cuánto tiempo después de la compra: • Un año, a partir de la fecha de compra. (El periodo de garantía para unidades arrendadas se inicia con la primera renta o 45 días de la fecha del embarque a la firma de arrendamiento, lo que ocurra primero).
Need help?
Do you have a question about the 29878 and is the answer not in the manual?
Questions and answers