
Related Manuals for Emotiv EPOC


Summary of Contents for Emotiv EPOC
- Page 1 Emotiv EPOC User Manual Includes headset and software setup information for your Emotiv EPOC neuroheadset.
-
Page 2: Table Of Contents
2.2 Use of Saline Hydration Sensor Pack and Felt Inserts ..........18 2.3 USB Transceiver Installation ..................20 2.4 EPOC Control Panel™ ..................... 20 2.5 Placement of Emotiv EPOC Neuroheadset on the Head ........... 21 2.6 EmoEngine Status Panel ..................21 2.7 User Status ....................... 22 2.8 Sensor Contact Quality Display ................. - Page 3 EY FOR OGNITIV CTIONS 3.4 Mouse Emulator ......................41 3.4.1 U ................ 41 NDERSTANDING THE OUSE MULATOR 3.4.2 M ....................42 OUSE MULATOR ONTROLS 4.0 Trouble Shooting and Help ..................43 EMOTIV EPOC USER MANUAL | BRAIN COMPUTER INTERFACE TECHNOLOGY...
-
Page 4: Quick Start Guide
Saline solution 50/60Hz 100-250 VAC Battery Charger (US customers) or USB charger (non-US customers) CD Installation Disk for Windows XP or Vista (for EPOC consumer headset. SDKs are delivered electronically) EMOTIV EPOC USER MANUAL | BRAIN COMPUTER INTERFACE TECHNOLOGY... - Page 5 Charging for 30 minutes usually yields about a 10% increase in charge. The EPOC Headset contains two status LEDs located at the rear and next to the power switch at the back of the headband. When the power switch is set to the “on” position, the rear LED will illuminate and appear blue if there is sufficient charge for correct operation, unless charging is in progress.
- Page 6 However, the bottle supplied with the kit should be sufficient initially. See the User Manual on the EPOC CD setup disk for recommendations. Add a few drops of saline to saturate the large white hydrator pad attached to the top cover of the hydrator, then close the cover and gently shake the hydrator pack.
- Page 7 NOTE: When not in use, the sensor units should be removed from the headset arms and stored in the hydrator pack for subsequent use. EMOTIV EPOC USER MANUAL | BRAIN COMPUTER INTERFACE TECHNOLOGY...
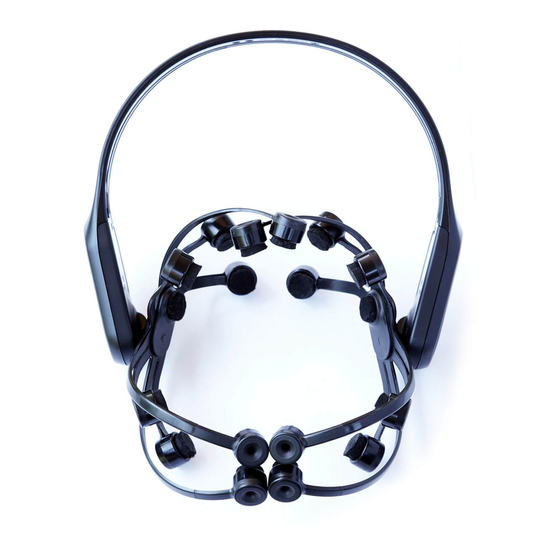
- Page 8 Transceiver. Headset Placement You are now ready to put the EPOC headset on your head. Using both hands, slide the headset down from the top of your head. Place the arms approximately as depicted, being careful to place the sensors with the black rubber insert on the bone just behind each ear lobe. Correct placement of the rubber sensor is critical for correct operation.
- Page 9 EPOC Control Panel Headset Setup screen. Gently press and hold each remaining sensor against your scalp until all the lights corresponding to those sensors turn to green in the EPOC Control Panel. EMOTIV EPOC USER MANUAL | BRAIN COMPUTER INTERFACE TECHNOLOGY...
- Page 10 Signal Quality Screen Your objective is to achieve as many green lights as possible using the EPOC Control Panel and adjusting the position of the various arms accordingly. (See full User Manual Document contained...
- Page 11 You are now ready to begin using the EPOC headset. If you experience difficulties with initial headset start-up, fine tuning or operation, you may contact Emotiv EPOC Customer Support by live chat or support tickets at www.emotiv.com EMOTIV EPOC USER MANUAL | BRAIN COMPUTER INTERFACE TECHNOLOGY...
-
Page 12: Introduction To Emotiv Epoc Neuro-Technology Neuroheadset
Based on the latest developments in neuro-technology, Emotiv has developed a revolutionary new personal interface for human computer interaction. The Emotiv EPOC uses a set of sensors to tune into electric signals produced by the brain to detect player thoughts, feelings and expressions and connects wirelessly to most PCs. -
Page 13: Safety
Use with caution. WARNING: Discontinue use if the system becomes uncomfortable to wear or if skin irritation occurs. Users are advised not to share sets of sensors to avoid cross-infection risks. EMOTIV EPOC USER MANUAL | BRAIN COMPUTER INTERFACE TECHNOLOGY... -
Page 14: Regulatory Requirements
2. Increase the separation between the equipment and receiver. 3. Connect the equipment into an outlet on another circuit. 4. Consult the dealer or an experienced radio/TV technician for help. NOTE: Modifications not expressly approved by Emotiv could void the user’s authority to operate the equipment Canada This device complies with RSS-210 of Industry Canada (IC). - Page 15 Europe, Australia, New Zealand Product Name and Model: Emotiv EPOC Model 1.0 Product description: EPOC Neuroheadset, USB-01 Transceiver, Hydrator Pack + charger or charge cable conforms to the following Product Specifications and Regulations: EMC and Telecom: Class B ETSI EN 300 440-2 V1.4.1...
-
Page 16: Getting Started
Inside the box you will find all of the components neatly stored for shipping and storage. Note: Never put the Emotiv EPOC, or any of its components, back into the packaging until they have dried completely. Make sure the Hydrator sensor pack is sealed and is not leaking. If wet, wipe the seal clean before closing. -
Page 17: Minimum Hardware And Software Requirements
10% increase in charge. The EPOC Neuroheadset contains a status LED located next to the power switch at the back of the headband. When the power switch is set to the “on” position, the LED will illuminate and appear blue if there is sufficient charge for correct operation. -
Page 18: Use Of Saline Hydration Sensor Pack And Felt Inserts
Following the initial hydration step, each of the inserts must be removed from the pack and securely mounted in the EPOC neuroheadset arms by turning the inserts one quarter turn to the right and listen/feel for the click. If you do not hear or feel the click, try again until you do. A very firm force may be needed the first couple of times but be careful not to exert excessive force or you may damage the headset arms. - Page 19 After first use, the pads should be rewet the next time EPOC is used by using a dropper to wet the sensors and hydrator pad again. The sensors should be removed from arms after use and stored in the hydrator unit to keep the sensors moist for subsequent use.
-
Page 20: Usb Transceiver Installation
USB Human Interface Device. Please wait for a moment until Windows indicates that the new hardware is installed and ready to use. Hold the Emotiv EPOC close to the USB receiver, and turn it on using the switch at the rear of the headband. -
Page 21: Placement Of Emotiv Epoc Neuroheadset On The Head
NOTE: Caution should be exercised never to bend the arms of the neuroheadset backwards out of their natural curvature. Damage may occur. A view of a properly located Emotiv EPOC. Note that the front sensors are 2 – 2.5 inches (50- 60mm or about three finger widths) above the eyebrows. -
Page 22: User Status
EPOC Neuroheadset at a time. The Headset combo box allows you to specify the EPOC Neuroheadset that has the current “focus.” In Figure 3 the User Status controls tell us that the Control Panel is currently displaying information for the user with profile “Emotiv User”, wearing EPOC Neuroheadset “0.”... -
Page 23: Sensor Contact Quality Display
EPOC Neuroheadset sensors. The display is a smaller copy of the contact quality visualization found on the Control Panel’s Neuroheadset Setup tab. Please see Section 3.0 for more information about fitting the EPOC Neuroheadset and achieving good signal quality. -
Page 24: Neuroheadset Set-Up
EPOC Neuroheadset’s sensors and provide guidance to the user in fitting the EPOC Neuroheadset correctly. It is important for the user to achieve the best possible contact quality before proceeding to the other EPOC Control Panel tabs. -
Page 25: Achieving Good Signal Quality
Section 2.2, above. STEP 2: Switch on the EPOC Neuroheadset, and verify that the built-in battery is charged and is providing power by looking for the blue LED located near the power switch at the back of the neuroheadset. - Page 26 (i.e. they show RED, and most or all of the other sensors turn BLACK), immediately restore these sensors to green before proceeding further. Try the alternative reference locations behind the ears if you continue to have difficulty with the primary locations (Section 2.5). EMOTIV EPOC USER MANUAL | BRAIN COMPUTER INTERFACE TECHNOLOGY...
-
Page 27: Expressiv™ Suite
The Expressive Suite details the facial expressions and non-verbal communication capabilities of the EPOC Neuroheadset. No longer do you need to push a button or type in emoticons into a chat dialog box during game-play. Now, if you want to show facial expressions on your avatar, you need only perform them while wearing the EPOC neuroheadset and you can display these expressions on the face of your avatar. -
Page 28: Sensitivity Adjustment Panel
Sensitivity can be increased or decreased by moving the sensitivity slider to the right or left, respectively. Figure 6 Expressiv Suite Sensitivity Adjustment Panel EMOTIV EPOC USER MANUAL | BRAIN COMPUTER INTERFACE TECHNOLOGY... -
Page 29: Emokey
3.1.3 EmoKey EmoKey links the Emotiv technology to your applications by easily converting detected events into any combination of keystrokes. EmoKey is a nonintrusive, lightweight, background process that runs behind your existing games or applications. EmoKey lets you create mappings that define how detections are converted to keystroke combinations. - Page 30 You can manage and save Emokey mappings using the EmoKey menu at the top of the Control Panel Window. Mappings can be loaded or saved and you can also temporarily suspend EmoKey activity using the Activate tick selector in the EmoKey menu. EMOTIV EPOC USER MANUAL | BRAIN COMPUTER INTERFACE TECHNOLOGY...
-
Page 31: Affectiv™ Suite
3.2.1 Affectiv Suite Introduction The Affectiv Suite reports real time changes in the subjective emotions experienced by the user. EPOC Control Panel currently displays three short-term and three long-term Affectiv detections: Meditation, Engagement and Excitement. Emotions related to Engagement are alertness, vigilance, concentration, stimulation, interest. -
Page 32: Understanding The Affectiv Panel Display
EEG waveform) along with attenuated alpha waves (another type of EEG waveform). The opposite pole of this detection is referred to as “Boredom” in EPOC Control Panel and the Emotiv API; however, please note that this does not always correspond to a subjective emotional experience that all users describe as boredom. -
Page 33: Cognitiv™ Suite
Learning to control multiple actions typically requires practice and becomes progressively harder as additional actions are added. Although EPOC Control Panel allows a user to select up to 4 actions at a time, it is important that each user masters the use of the Cognitiv detection one action at a time, only increasing the number of concurrent actions after he or she has first gained confidence and accuracy with a lower number of actions. -
Page 34: Understanding The Cognitiv Panel Display
Remember, in order for the Cognitiv detection to be activated, all actions, plus Neutral (the user’s background mental state) must be trained. Use the drop down selection menu to modify the number and type of enabled actions. EMOTIV EPOC USER MANUAL | BRAIN COMPUTER INTERFACE TECHNOLOGY... -
Page 35: Cognitiv Training
A progress bar will appear as your brainwaves are observed. Once training is complete, you will be asked to accept or reject the training session by pressing YES or NO. Once you accept, you will be automatically returned to the Cognitiv Panel Display. EMOTIV EPOC USER MANUAL | BRAIN COMPUTER INTERFACE TECHNOLOGY... - Page 36 Otherwise, the cube will remain stationary or, if you have already supplied training data and the detection is active, will be animated by the current detection results for the action being trained, while you supply new training data. EMOTIV EPOC USER MANUAL | BRAIN COMPUTER INTERFACE TECHNOLOGY...
-
Page 37: Training Neutral
Abort Training button to abort the training recording if you are interrupted, become distracted, or notice problems with the EPOC Neuroheadset contact quality indicators during the recording. A training session is automatically discarded if the wireless signal strength or EEG signal quality is poor for a significant portion of the training period. -
Page 38: Clear Training Button
A short latency, of up to two seconds, in the initiation and cessation of the cube’s animated action on screen is typical. EMOTIV EPOC USER MANUAL | BRAIN COMPUTER INTERFACE TECHNOLOGY... -
Page 39: Emokey For Cognitiv Actions
3.3.7 EmoKey for Cognitiv Actions EmoKey links the Emotiv technology to your applications by easily converting detected events into any combination of keystrokes. EmoKey is a nonintrusive, lightweight, background process that runs behind your existing games or applications. EmoKey lets you create mappings that define how detections are converted to keystroke combinations. - Page 40 Figure 15 EmoKey in Action Linking Pull to keying in “Z” 3.3.8 Cognitiv Challenge The Challenge tab allows you to play with cube model and submit your score to emotiv’s website EMOTIV EPOC USER MANUAL | BRAIN COMPUTER INTERFACE TECHNOLOGY...
-
Page 41: Mouse Emulator
3.4.1 Understanding the Mouse Emulator Tab The Mouse Emulator Tab in the EPOC Control Panel allows you to activate the neuroheadset’s gyroscope and link it to the control of your computer’s mouse cursor. EMOTIV EPOC USER MANUAL | BRAIN COMPUTER INTERFACE TECHNOLOGY... -
Page 42: Mouse Emulator Controls
The Reset button allows you to re-centre your position. To deactivate this feature, use your head movement to move your cursor to the Deactivate button and left mouse click, or Press CTRL+SHIFT+M. EMOTIV EPOC USER MANUAL | BRAIN COMPUTER INTERFACE TECHNOLOGY... -
Page 43: Trouble Shooting And Help
Transceiver Dongle to the extension cable and position in a prominent location away from your PC, monitor, wireless router and other sources of radio-frequency interference. Turn off or disconnect other wireless and Bluetooth devices in the area to isolate possible causes EMOTIV EPOC USER MANUAL | BRAIN COMPUTER INTERFACE TECHNOLOGY... - Page 44 Ensure reference sensors and at least one forehead sensor are sufficiently wet Ensure all sensors are properly located in the neuroheadset receptacles. They should not spin or fall out when gently moved. EMOTIV EPOC USER MANUAL | BRAIN COMPUTER INTERFACE TECHNOLOGY...
- Page 45 In the unlikely event that contact is still impossible to obtain, you can use a longer felt pad or use a cotton ball soaked in saline to fill the gap or replace the felt piece. EMOTIV EPOC USER MANUAL | BRAIN COMPUTER INTERFACE TECHNOLOGY...
- Page 46 If you have other problems or your problem is not rectified by the above procedures, please check the updated Troubleshooting information, visit our Live Chat Support, initiate a support ticket at www.emotiv.com or email support@emotiv.com for further assistance. EMOTIV EPOC USER MANUAL | BRAIN COMPUTER INTERFACE TECHNOLOGY...
Need help?
Do you have a question about the EPOC and is the answer not in the manual?
Questions and answers