Table of Contents
Advertisement
Solar Powered Wireless Wi-Fi Weather Station
Contents
Glossary of Common Terms ...................................................................... 2
OVERVIEW ............................................................................................... 4
Display console .................................................................................. 4
Features ............................................................................................. 4
ProWeatherStation™ Setup ...................................................................... 5
1. Sensor Array Components ............................................................. 6
1.2. Install wind vane (If required) ............................................... 8
1.4. Install Batteries .................................................................... 9
1.5. Mount outdoor sensor ........................................................ 10
1.5 Reset Button and Transmitter LED ..................................... 10
2. Best Practices for Wireless Communication ................................ 11
3. Display Unit Set up ....................................................................... 13
3.1. Display Console Layout ..................................................... 13
3.2. Initial Display Console Set Up ........................................... 14
Console Operation ................................................................................... 16
Program mode .................................................................................. 16
1. Quick Display Mode (Update every 5 Seconds) .......................... 16
2. Setting Mode ................................................................................ 21
3. ALARM MODE ............................................................................. 24
4. Max/Min Mode .............................................................................. 26
5. History mode ................................................................................ 26
Other Console Functions ......................................................................... 27
Weather Tendency indicators ........................................................... 27
Moon Phases ................................................................................... 27
Beaufort Scales (Wind Speed) ......................................................... 28
Specification............................................................................................. 29
8000060 Rev 3 19-Feb-19
TP3000WC Operation Manual
1
TyconSystems.com
Advertisement
Table of Contents

Subscribe to Our Youtube Channel
Related Manuals for Tycon Power Systems TP3000WC

Summary of Contents for Tycon Power Systems TP3000WC
-
Page 1: Table Of Contents
Solar Powered Wireless Wi-Fi Weather Station TP3000WC Operation Manual Contents Glossary of Common Terms ..............2 OVERVIEW ....................4 Display console .................. 4 Features ..................... 4 ProWeatherStation™ Setup ..............5 1. Sensor Array Components ............. 6 1.2. Install wind vane (If required) ..........8 1.3. -
Page 2: Glossary Of Common Terms
Android Software Operation ..............31 iOS Software Operation……………………...….………….……………….42 PC Software Operation ................57 Maintenance .................... 64 Troubleshooting Guide ................65 FCC Statement ..................71 Warranty Information ................73 About this manual Thank you for purchasing the ProWeatherStation™! This device provides accurate weather readings and is Wi-Fi capable to stream live data from your weather station to the internet so that users can enjoy remote monitoring of weather conditions. - Page 3 International System (SI) of measurement. The hectopascal holds the same value Important Note: The ProWeatherStation TP3000WC comes fully assembled for ease of use. The Outdoor Sensor array runs mainly on solar power which charges a supercapacitor located inside the unit but has 2 AA batteries for backup power when needed (i.e.;...
-
Page 4: Overview
Package Contents: Below please find the package content: Item Display Console Outdoor Sensor (Temp/Humidity / Rain Gauge / Wind Speed Sensor/ Wind Direction / Light-UV Sensor) U-bolt with mounting plate 120/220VAC 500mA Adapter (Required Wi-Fi communications and always on display) User Manual Note: An AC adaptor is included. -
Page 5: Proweatherstation™ Setup
one month, one-year, total rain and rainfall event. ⚫ Wind speed in mph, km/h, m/s, knots or Beaufort ⚫ Wind direction with 360 degrees ⚫ Wind chill, dew point, and heat index temperature display. ⚫ Barometric, weather forecast. ⚫ MAX, MIN value with time stamp. High/ low alarm. ⚫... -
Page 6: Sensor Array Components
⚫ Ensure batteries are installed with correct polarity (+/-) 1. Sensor Array Components Figure 1 1. Wind Speed Sensor 2. Wind Vane 3. Temp/Humidity sensor 4. Rain collector 5. Bubble level 6. Solar panel 7. Light sensor and UV sensor 8. - Page 7 Once the metal plate is inserted, insert both U-bolts through the respective holes of the metal plate as shown in Figure 3. Figure 3 U-Bolt installation Loosely screw on the nuts on the ends of the U-bolts. You will tighten these later during final mounting.
-
Page 8: Install Wind Vane (If Required)
1.2. Install wind vane (If required) Push the wind vane into the shaft. as shown in figure 5. Tighten the set screw with as shown in figure 6. Wind vane doesn’t move as freely as the wind speed sensor. This damping effect is helpful in keeping wind direction measurement steady. -
Page 9: Install Wind Speed Sensor (Anemometer) (If Required)
1.3. Install wind speed sensor (Anemometer) (if required) Push the wind cup into the shaft. as shown in figure 7. Tighten the set screw with as shown in figure 8. Make sure the wind speed cups spin freely. Figure 7 Figure 8 1.4. -
Page 10: Mount Outdoor Sensor
Note: If no LED lights up or is lit full time, make sure the battery is inserted with correct polarity. Caution! Do not install the batteries backwards as you can permanently damage the outdoor sensor. If the LED function is not as expected, remove the batteries, wait 30 seconds and then re-install. -
Page 11: Best Practices For Wireless Communication
pressed, and resumes normal operation after the Reset button is released: LED will flash every 16s during normal operation. RESET button LED light Figure 13 2. Best Practices for Wireless Communication Note: The open field distance between the display console and the outdoor sensor array can reach up to 300 feet providing that there are no interfering obstacles such as buildings, trees, vehicles, high voltage lines, etc. - Page 12 Wireless communication is susceptible to interference, distance, walls, and metal barriers. We recommend the following best practices for trouble-free wireless communications. 1. Electro-Magnetic Interference (EMI). Keep the console several feet away from computer monitors and TVs. 2. Radio Frequency Interference (RFI). If you have other 433 MHz devices and communication is intermittent, try turning off these other devices for troubleshooting purposes.
-
Page 13: Display Unit Set Up
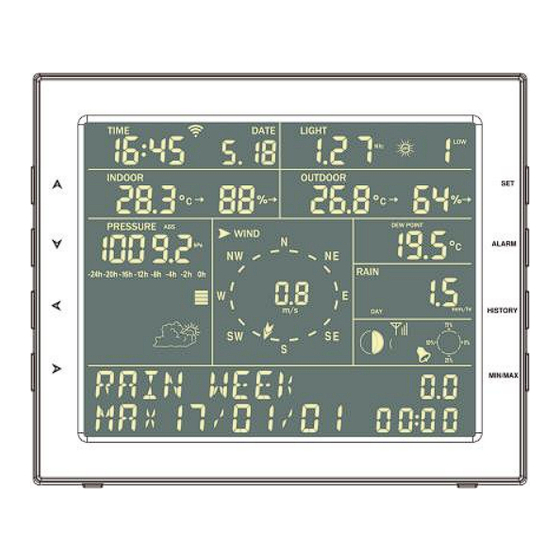
3. Display Unit Set up 3.1. Display Console Layout 1.Time 2.Indoor Temperature 3.Indoor Humidity 4.Barometric Pressure 5. Barometric Pressure graph 6.Weather Forecast icon 7. Dynamic information display area 8.RF signal 9. Alarm icon 10. Memory status 11.Wind direction 12.Rainfall 13.Wind speed/Gust speed 14. -
Page 14: Initial Display Console Set Up
3.2. Initial Display Console Set Up 3.2.1 The unit will turn on all segments of the LCD for 3 seconds after power. Then the unit will start to register the outdoor sensor array which takes ~3 minutes. 3.2.2 Full display 8000060 Rev 3 19-Feb-19 TyconSystems.com... - Page 15 3.2.3 Key function SET: Enter the setting mode ALARM: Display high or low alarm function / turn on/off the alarm HISTORY: Display history records / return to normal mode MAX/MIN: Display the MAX, MIN value Move to the previous information (normal mode) or + (programming mode) Move to next information (normal mode) or–...
-
Page 16: Console Operation
Console Operation Note: Multiple display console settings can be easily set up using the WeatherSmartIP PC software. To do this, the software needs to be installed on a PC and the display console needs to be connected to your Wi-Fi network. Instructions on connecting your display console are located later in this user guide (Page 31 for Android, 42 for iOS). - Page 17 The 11 digits on left are used to display text, the right side displays figures. The display will automatically switch after a few seconds. Or use the “ ” or “ ” keys to manually switch the display. If there are alarms triggered, the alarm information will be displayed in real time as well.
- Page 18 ⚫ Indoor temperature If the arrow symbol “ ” is in this segment, following information with time stamp will appear on the message board: Max indoor temperature value of the current day. Min indoor temperature value of the current day. Max indoor temperature value since the last reset Min indoor temperature value since the last reset Max indoor humidity value of the current day.
- Page 19 ⚫ Barometric If the arrow symbol “ ” is in this segment, following information with time stamp will appear on the message board: Max relatively barometric pressure of the current day Min relatively barometric pressure of the current day Max relatively barometric pressure since the last reset Min relatively barometric pressure since the last reset Max absolute barometric pressure of the current day Min absolute barometric pressure of the current day...
- Page 20 If the arrow symbol “ ” is in this segment, following information with time stamp will appear on the message board: The max wind speed of the current day The max wind speed since the last reset. The max wind gust speed of the current day The max wind gust speed since the last reset.
-
Page 21: Setting Mode
Max rain rate since the last reset Max Rainfall data of current day Max Rainfall data of last week Max Rainfall data of last month Max Rainfall data of last year 2. Setting Mode 2.1 In normal mode, press SET key for 2 seconds to enter the setting mode. - Page 22 TIME: Manual setting of time and date TIME ZONE DAYLIGHT SAVING TIME: switch on/off the reception of DST. NORTH/SOUTH: Set northern/southern hemisphere for moon phase ⚫ UNIT SETTING After entering setting mode, the first setting function” TIME ”key to SETTING” will appear on the message board. Press” switch to “UNIT SETTING”...
- Page 23 annual rainfall occurs. Rain season influences the annual rainfall maximum, minimum and total value. The annual rainfall and annual max/min rainfall resets at 12:00 AM of the first day of the selected month. ⚫ PRESSURE SETTING Under setting mode, the first setting function appearing on the message board is”...
-
Page 24: Alarm Mode
WIND DIR OFFSET Wind direction can be adjusted by 0-359°. WIND SPEED Wind speed calibration coefficient: default 1 (range is Range is 0.1-2.5) RAINFALL FACTOR Rain factor calibration coefficient: default 1 (range is Range is 0.1-2.5) RAIN DAY CALIBRATION Calibration for total rainfall of 1 day. (Range is 0-9999mm) RAIN WEEK CALIBRATION Calibration for total rainfall of 1 week (Range is 0-9999mm) RAIN MONTH CALIBRATION... - Page 25 alarm REL BARO HIGH ALARM --Set relatively barometric pressure high alarm WIND HIGH ALARM --Set wind speed high alarm GUST HIGH ALARM --Set gust speed high alarm DEW POINT HIGH ALARM --Set dew point high alarm HEAT INDEX HIGH ALARM --Set heat index high alarm RAIN RATE HIGH ALARM --Set rainfall rate high alarm m) RAIN DAY HIGH ALARM --Set rainfall day high alarm ⚫...
-
Page 26: Max/Min Mode
parameters. Press MIN/MAX to switch among below records: TODAY MAX—The maximum values during the current day HISTORY MAX –The maximum values since the last reset TODAY MIN --The minimum values during the current day HISTORY MIN --The minimum values since the last reset Press button to switch among max/min records of different parameters, together with the time and date stamp. -
Page 27: Other Console Functions
Under history mode, push the “SET” button for 2 seconds to clear all the memory. Other Console Functions Weather Tendency indicators There are arrow symbols besides the indoor/outdoor temperature and humidity segments to indicate weather trend: Tendency Humidity Temperature indicators Rising rate >= 10% Rising >= 1℃... -
Page 28: Beaufort Scales (Wind Speed)
WAXING GIBBOUS MOON FULL MOON WANING GIBBOUS MOON LAST QUARTER MOON WANING CRESCENT MOON Beaufort Scales (Wind Speed) Wind speed Beaufort number Description 0-1mph(0-1.6kph) Calm 1-3mph(1.6-4.8kph) Light air 3-7mph(4.8-11.3kph) Light breeze 7-12mph(11.3-19.3kph) Gentle breeze 12-18mph(19.3-29.0kph) Moderate breeze 18-24mph(29.0-38.6kph) Fresh breeze 24-31mph(38.6-49.9kph)... -
Page 29: Specification
Specification Outdoor data Transmission distance in open field : 100m(330 feet) Frequency 433MHZ Temperature range -40˚C--60˚C (-40℉ to +140℉) Accuracy + / - 1 °C Resolution 0.1˚C Measuring range rel. humidity 10%~99% Accuracy +/- 5% 0 – 9999mm (show --- if outside range) Rain volume display Accuracy + / - 10%... - Page 30 Measuring range air pressure : 300-1100hPa (8.85-32.5inHg) Accuracy : +/-3hpa under 700-1100hPa Resolution : 0.1hPa (0.01inHg) Alarm duration : 120 sec Power consumption Base station : 5V DC adaptor (included) Base station : 3X AA 1.5V LR6 Alkaline batteries (not included) Remote sensor : 2X AA batteries (not included), The primary power source is the solar panel.
-
Page 31: Android Software Operation
Weather WeatherCloud.net Weathercloud is a real-time Cloud weather social network formed by observers from around the world. The weather station can also operate alone - showing weather data on the display console and computer (only if the weather station console and computer are connected to the same Wi-Fi). - Page 32 Connect the console to Wi-Fi (Android) 1.1 Android user: Now activate the application you have downloaded on your mobile device. The following instructions will generally show screenshots for the Android application side by side. Configure Device Note: If you own a dual band router (2.4 GHz and 5.0 GHz), make sure you connect to the 2.4 GHz band, otherwise the Weather Station will fail connecting to Wi-Fi.
- Page 33 Press Scan and select the The app will then connect Wi-Fi network you would like your ProWeatherStation to the console to connect to, you your Wi-Fi. If configured may also type in the SSID successfully it will jump to “Upload Setting” screen and password, and press Next automatically.
- Page 34 Note:Users can register to Wunderground.com directly through the WS View App, Weathercloud and WOW through a web browser Upload your weather data to Wunderground.com Register at If registered Upload your weather data Wunderground.com successfully, you’ll to Wunderground.com receive a Station ID Enter your valid e-mail and Station password / Input Station ID &...
- Page 35 Select OK to fill in the Station ID and Station password / key automatically. Press Save Your station ID will be added on the WU StationID. Upload to Wunderground.com Setting finish. Press Next. Jump to the screen about Upload your weather data to Weathercloud.net Press Back if you don’t want...
- Page 36 Upload your weather data to Weathercloud.net Upload your weather data to will then Register at Weathercloud.net prompted Weathercloud.net device/ Select “Create Visit Input Weathercloud ID & device” and enter your weathercloud.net and Weathercloud Key, press station’s information. enter a Username, Save then press Next.
- Page 37 Upload your weather data to WeatherObservationsWebsite (WOW) Upload your weather data to Register at The actual form is WeatherObservationsW longer, but all questions ebsite should be Input Weathercloud ID & self-explanatory. Choose “New Account” Weathercloud Key, press Complete and submit you will be presented with Save.
- Page 38 Follow instructions on the screen and log in to the site Once you are logged in you will need to create a new WOW site. “Sites” are the means by which WOW organizes weather data you contribute. Basically, WOW builds a personal web site for your weather station. Associated with the web site are two items you will need to allow uploading of data: Site ID: This is an arbitrary number that is used to distinguish your site...
- Page 39 You will also need to establish a unique 6 digits PIN code that you should keep secret. It is the “Authentication Key.” Set up this number by clicking on “Edit Site”) ( Error! Reference source not found. ) and filling out the with a 6-digit number of your choice: You will need both “Site ID”...
- Page 40 Mobile application – Check WU weather data and graph In the mobile application tap Menu choose WU Dashboard and you will be presented with a page listing current conditions for that station. If you have added multiple WU IDs, tap on the WU Station ID to switch to view data from other IDs.
- Page 41 Mobile application – Remove or Add WU ID If you have previously registered your console for use with wunderground.com and wish to remove this device data display from App, use the “Manage WU Station” menu option after tapping on the settings icon, select “Delete”...
-
Page 42: Ios Software Operation
iOS Software Operation Connecting the Weather Station Console to Wi-Fi (iOS) To send weather data to these services you must connect your console to the internet via Wi-Fi. The console can only operate using Wi-Fi when the external power adapter is connected and plugged in! Note: If you are testing the setup with the outdoor sensor package nearby and indoor, you may want to consider connecting to Wi-Fi, but not yet configuring any of the weather services. - Page 43 Download mobile application Wi-Fi configuration is done using your mobile device. Start by downloading the “WS View” application from the Apple App Store. Activate the application you have downloaded on your mobile device. The main screen will indicate your station is off-line (because it is not yet connected to Wi-Fi).
- Page 44 Tap on the settings Operate Select the device you icon select information, tick the box have from the device “Configure to confirm “completed list, then press Next operation”, press Next. Device”. You may also go to your Wi-Fi settings Enter your Wi-Fi SSID and password and connect to your Wi-Fi network then and press Next.
- Page 45 If the console Select device Wi-Fi. Follow the instructions successfully The device named as stated on the screen. “EasyWeather-WIFxx connects, the page will jump to “Upload xxI”” and return to Setting” screen WS View App automatically. If you see the mesage “Please connect your mobile Wi-Fi to (Wi-Fi Network name) and return to WS View App”.
- Page 46 to register to each site to get the ProWeatherStation to work. If you choose not to upload data right now, press the Back button. Note:Users can register to Wunderground.com directly through the WS View App, Weathercloud and WOW through a web browser Upload your weather data to Wunderground.com Register at If registered successfully,...
- Page 47 Upload your weather data to Weathercloud.net Input Weathercloud ID & Weathercloud Key, press Save. Then press Next. If you don’t have a Weathercloud ID and Key, press “Register at Weathercloud.net” to open a web browser, then sign up. You will then be prompted to add a device/ Select “Create device” and enter your station’s information.
- Page 48 If you don’t have a WOW ID and Key, press “Register at WeatherObservationsWebsite” to open a web browser, then sign up. Follow instructions on the screen and log in to the site Once you are logged in you will need to create a new WOW site. “Sites” are the means by which WOW organizes weather data you contribute.
- Page 49 Make sure you are (still) logged in to the WOW site. Log in as necessary. Now click on “My Sites” in the navigation bar at the top. If you have only 1 site, you will now be shown its page. If you have multiple, you will have to choose the correct one first.
- Page 50 the “Weathercloud” configuration. Please press “Next” one more time and you will now be on the screen where you will configure WOW. On this screen, you will fill out “Station ID” with the WOW “Site ID” value, and “Station Key” with the WOW “Authentication Key” you created. Press “Save”...
- Page 51 Mobile application – Remove or Add WU ID If you have previously registered your console for use with wunderground.com and wish to remove this device data display from App, use the “Manage WU Station” menu option after tapping on the settings icon, select “Delete”...
- Page 52 Mobile application – Set Units You may want to change the units in which sensor values are reported. To do so, click on the “Configure Units” menu after tapping on the settings icon. Next, tap on the sensor type you wish to change the reporting units for and set the units as desired.
- Page 53 Registering with WeatherUnderground.com through a PC or Mac. 1. Visit Wunderground.com and select the Join link at the top of the page. Select the Free sign up option. 2. Select More | Register Your PWS. 3. Click Send Validation Email. Respond to the validation email from Wunderground (it may take a few minutes).
- Page 54 5. After registering your station, make a note of the following: • Station ID • Station Key / Password Enter the Station ID (ID) and Station Key (Password) into the WS View. Next image is an example (Your station ID and password will be different) Note: Your station ID will have the form: KSSCCCC###, where K is for USA station (I for international), SS is your state, CCCC is your city and ### is the station number in that city.
- Page 55 There are several ways to view your data on Wunderground: Web Browser Visit:http://www.wunderground.com/personal-weather-station/dashboard ?ID=STATIONID where STATIONID is your personal station ID (example, KAZSEDON12). Mobile Apps Download the mobile app and sign in. Visit: https://www.wunderground.com/download for a complete list of Mobile apps for iOS and Android.
- Page 56 Registering and Viewing your Data on WeatherCloud.net through a PC or Mac 1. Visit WeatherCloud.net and enter a Username, Email, and Password. 2. Verify your account by clicking on the link contained in the email from WeatherCloud (it may take a few minutes). 3.
-
Page 57: Pc Software Operation
4. Select Create Device and enter your weather station information. Select Fine Offset as the manufacturer and WH Series as the Model. Select WS Tool as the Link Type. Fill in other information as needed. After registering your station, take note of the Weathercloud ID and Key Enter the Weathercloud ID (ID), Key (password) into the WS View app. - Page 58 properties of the Wi-Fi network on your computer to find the IP address) and click OK. 4. Under System column, click Select Device and choose weather station device IP address (weather station display IP address can be found on Device List from your WS View app). Click OK. 8000060 Rev 3 19-Feb-19 TyconSystems.com...
- Page 59 5. PC will try to connect to weather station now. 6. When connected successfully the weather data from the console will show. Basic Functions of the "WeatherSmartIP" Software 8000060 Rev 3 19-Feb-19 TyconSystems.com...
- Page 60 System Setting Alarm 8000060 Rev 3 19-Feb-19 TyconSystems.com...
- Page 61 Max/Min Day Max/Min History 8000060 Rev 3 19-Feb-19 TyconSystems.com...
- Page 62 Calibration 8000060 Rev 3 19-Feb-19 TyconSystems.com...
- Page 63 Record History 8000060 Rev 3 19-Feb-19 TyconSystems.com...
-
Page 64: Maintenance
Graph Maintenance 1. Clean the rain gauge once every 3 months. Rotate the funnel counter-clockwise and lift to expose the rain gauge mechanism, and clean with a damp cloth. Remove any dirt, debris, and insects. If bug infestation is an issue, spray the array lightly with insecticide. 8000060 Rev 3 19-Feb-19 TyconSystems.com... - Page 65 Clean the solar radiation sensor and solar panel every 3 months with a damp cloth. Replace batteries every 1-2 years. If left in too long, the batteries may leak due to environmental challenges. In harsh environments, inspect the batteries every 3 months (when cleaning the solar panel). When replacing the batteries, apply a corrosion preventive compound on the battery terminals, available at Amazon and most hardware stores.
-
Page 66: Troubleshooting Guide
Troubleshooting Guide Problem Solution Wireless remote Check the outdoor sensor array LED for (outdoor unit) not flashing. It should flash every 16secs reporting in to console. The outside sensor has an LED under the plastic, just above the battery compartment. There are dashes (--) The LED will flash every 16 seconds. - Page 67 Problem Solution 3. Do not touch any buttons for several minutes. 4. The remote sensor search icon will splash on the display. Wait several minutes for this icon to turn off. 5. If the search icon turns off and the outdoor temperature and humidity are still showing dashes (--), the remote sensor is defective.
- Page 68 Problem Solution not transmitting through solid metal like aluminum siding (acts as an RF shield), or earth barrier (down a hill). 5. Move the display console around electrical noise generating devices, such as computers, TVs and other wireless transmitters or receivers. 6.
- Page 69 Problem Solution 3. The barometer is only accurate to ± 0.08 inHg within the following relative pressure range: 27.13 to 32.50 inHg, which corresponds to an altitude of -2,200 to 2,700 feet. At higher altitudes, expect some non-linearity or error. Time is incorrect Make sure your time zone and daylight savings settings are correct.
- Page 70 Problem Solution 2. Confirm your station ID is correct. The station ID is all caps, and the most common issue is substituting an O for a 0 (or vice versa). Example, KAZPHOEN11, not KAZPH0EN11 3. Make sure the date and time are correct on the console.
-
Page 71: Fcc Statement
Problem Solution 4. The console only supports and connects to 2.4 GHz routers. If you own a dual-band router, make sure you connect to the 2.4GHz band. 5. The console does not support guest networks. FCC Statement Statement according to FCC part 15.19: This device complies with part 15 of the FCC rules. - Page 72 harmful interference to radio communications. However, there is no guarantee that interference will not occur in an installation. If this equipment does cause harmful interference to radio or television reception, which can be determined by turning the equipment off and on, the user is encouraged to try to correct the interference by one or more of the following measures: •...
-
Page 73: Warranty Information
Warranty Information We disclaim any responsibility for any technical error, printing error, or their consequences. All trademarks and patents are recognized. We provide a 1-year limited warranty on this product against manufacturing defects in materials and workmanship. This limited warranty begins on the original date of purchase, is valid only on products purchased and only to the original purchaser of this product.
Need help?
Do you have a question about the TP3000WC and is the answer not in the manual?
Questions and answers