
Subscribe to Our Youtube Channel
Related Manuals for Gigabyte Aivia Uranium


Summary of Contents for Gigabyte Aivia Uranium
-
Page 1: Table Of Contents
Contents Introduction Package Content & Support Installation Mouse Instructions GHOST Macro Station GHOST Macro Engine Battery & Charging Safety Maintenance Users’ manual in other languages can be downloaded from GIGABYTE’s official website. Please visit www.gigabyte.com for more product information. -
Page 2: Introduction
With 6500dpi, 1000Hz polling rate, and amazing 50hrs continuous gaming capability, Aivia Uranium performs as well cordless as it does corded, giving you an unparalleled freedom of frenzy motion on the battlefield. Support Register your Aivia Uranium on the Aivia Forum www.aivia.gigabyte.com... -
Page 3: Installation
Installation Connect the GHOST Macro Station OS support: Windows® 98/ 2000/ XP/ 7/ 8 Insert AA Rechargeable Batteries We’ve included 2 rechargeable NiMH batteries, but it will also run on normal AA alkaline batteries. Aivia Uranium... - Page 4 Install Aivia GHOST Engine Download the Aivia GHOST software from GIGABYTE's offi cial website for further macro recording. Instant Power Charging Pull out the charging cable for instant power supply. You can use the mouse while charging. Aivia Uranium...
- Page 5 Synchronize Mouse and Receiver The re-pairing process is needed only when the mouse loses connection with the receiver. Aivia Uranium...
-
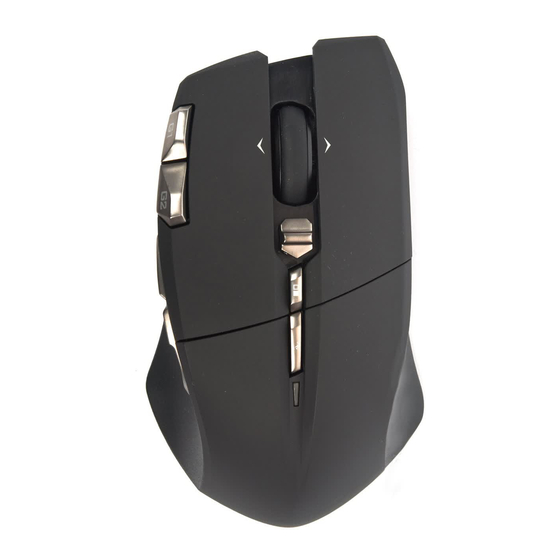
Page 6: Mouse Instructions
– Scroll Click and 4-direction Wheel – On-the-fl y DPI Adjustment – Wheel Controller Lock – Profi le Switch – Gaming Button (unassigned) – Gaming Button (unassigned) – Gaming Button (forward) – Gaming Button (backward) – Power & Wheel Indicator Aivia Uranium... - Page 7 – Twin-eye Laser Sensor – Pairing Button (Connect) – Power ON/OFF – AA Battery Slot – Screen Brightness Adjustment – OLED Display – 5-color Profi le Indicator – Retractable Micro USB Charging Cable – Built-in GHOST Macro Engine Aivia Uranium...
-
Page 8: Ghost Macro Station
Dynamic Display Mode Dynamic update and display DPI value, report rate, gaming profiles, and remaining battery life of your Aivia Uranium. Live Editing Mode Prompt re-assign macro hotkeys and set-up DPI value directly through GHOST station. - Page 9 Profi le Select the function category: Basic/Key Mapping/Macro (refer to page13) Select one of the profi les you wish to program Choose the function and press scroll click to confirm setting Select a mouse button you wish to program Aivia Uranium...
- Page 10 (125/142/166/200/250/333/ 500/1000Hz selectable) Press scroll click to save the change Scroll backward and for ward the wheel to adjust DPI value for both X and Y axle. Press scroll click to save the change Aivia Uranium...
-
Page 11: Ghost Macro Engine
3. Click “SETTINGS” to set up performance, lighting, and manage profi les. You may also link to You may also link to You may also link to for more product information. for more product information. for more product information. Aivia Uranium... - Page 12 5 profi les back to factory default.) is to reset all 5 profi les back to factory default.) Aivia Uranium...
- Page 13 3. or click 3. or click to return the default setting. to return the default setting. KEY MAPPING KEY MAPPING You may simply maps a mouse button to a specific key on the keyboard, includes A~Z, num1~0, F1~F12 Aivia Uranium...
- Page 14 Pre-defi ne the macro scripts and then assign to any mouse buttons. Select any empty macro and click Select any empty macro and click , and you will then enter into , and you will then enter into the macro depot. Aivia Uranium...
- Page 15 Record keystrokes, mouse button press and also cursor’s coordinates. Record both keystrokes and mouse button press. Record mouse button press and also cursor’s coordinates. Only record mouse button press but ignore keystrokes. Only record keystrokes but ignore mouse button press. Aivia Uranium...
- Page 16 Key-in the time interval as a fi xed time delay. Action mode Execute a macro once as press the mouse button once. Execute a macro continuously, and press again to stop the running macro. Execute a macro continuously until you release the assigned button. Aivia Uranium...
- Page 17 3. More: You may You may the macros you’d edited to the PC, and also the macros you’d edited to the PC, and also a macro back to GHOST macro engine. a macro back to GHOST macro engine. Aivia Uranium...
- Page 18 REPORT RATE The report rate determines the time intervals that your PC retrieves data from your mouse. You can switch between to 125Hz, 142Hz, 166Hz, 200Hz, 250Hz, 333Hz, 500Hz, or 1000Hz on the slider. Default setting: 500Hz Aivia Uranium...
- Page 19 10mins. Except the default logo, you can customize the other display logo as a screen saver for your GHOST Macro Station. You may directly import a photo (bmp format only) from PC or manually draw on the bitmap. Aivia Uranium...
- Page 20 Type on the reminder script for this timer to remind yourself Select the show-up effect: Highlight/ Blinking Click Enable/ Disable to activate the timer Note! The cooling timer is effective only when running Aivia GHOST. Exiting the Aivia GHOST software will automatically close the timer function. Aivia Uranium...
- Page 21 Click Pairing and then press the rubber button on the bottom of mouse. Note! You may need another mouse to control the cursor during pairing process. The mouse will be reinstated once the pairing process is complete. Aivia Uranium...
-
Page 22: Battery & Charging
Battery and Charging • For best condition, please fully charge the battery the first time you use Aivia Uranium. It takes about 4 hours to fully charge 2*AA NiMH 2100mAh rechargeable batteries as you plug the single main USB connector. You may speed up the charging time by plugging both the USB connectors of the charging dock. -
Page 23: Safety
• This device complies with part 15 of the FCC Rules. Operation is subject to the following two conditions: (1) This device may not cause harmful interference, and (2) this device must accept any interference received, including interference that may cause undesired operation. Aivia Uranium... -
Page 24: Maintenance
Maintenance 1. Should you have trouble operating the mouse properly, please contact GIGABYTE customer service center on www.gigabyte.com for support. Do not attempt to service or fix the device yourself at any time. 2. Do not take the mouse apart (doing so will also void your warranty).
Need help?
Do you have a question about the Aivia Uranium and is the answer not in the manual?
Questions and answers