
Subscribe to Our Youtube Channel
Related Manuals for Microsemi Adaptec ASR-8405


Summary of Contents for Microsemi Adaptec ASR-8405
- Page 1 Installation and User's Guide Serial Attached SCSI RAID Controllers Released January 2019...
- Page 2 2016 September Update supported OSes, Installing driver on Solaris, and Technical Specification. 2016 April 2016 Update supported OSes; add backup unit status, SGPIO/IPBI LED blink pattern, DKMS drivers, misc corrections. Microsemi Proprietary and Confidential. Installation and User's Guide Revision 5...
- Page 3 Limited 3-Year Hardware Warranty 1. Microsemi Corporation (“Microsemi”) warrants to the purchaser of this product that it will be free from defects in material and workmanship for a period of three (3) years from the date of purchase. If the...
- Page 4 UL Compliance Statement Microsemi Adaptec products are tested and listed by Underwriters Laboratories, Inc. to UL 60950-1 Second Edition and IEC-60950-1 Second Edition standards, file numbers E175975. Microsemi Adaptec products are for use only with UL listed ITE.
- Page 5 Microsemi Adaptec products are tested and certified by KCC: KCC-REM-KHK-ASR-6xx5 KCC-REM-KHK-ASR-7xxx5 KCC-REM-KHK-ASR-6xx5 KCC-REM-KHK-ASR-7xxx5 MSIP-REM-KHK-ASR-8xxx5 The above certification covers the following series: ASR-8405, ASR-8405E, ASR-8805, ASR-8805E, ASR-8885 ASR-8885Q, ASR-81605Z, ASR-81605ZQ AFM-700 Microsemi Proprietary and Confidential. Installation and User's Guide Revision 5...
- Page 6 Regulatory Compliance Statements This equipment is home use (Class B) electromagnetic wave suitability equipment and to be used mainly at home and it can be used in all areas. Microsemi Proprietary and Confidential. Installation and User's Guide Revision 5...
-
Page 7: Table Of Contents
6 Creating a Bootable Array .......................24 6.1 Setting the Boot Controller..........................24 6.2 Creating an Array..............................24 6.2.1 Creating an Array with the ARC Utility....................24 6.2.2 Creating an Array with maxView Storage Manager................26 Microsemi Proprietary and Confidential. Installation and User's Guide Revision 5... - Page 8 A.5 What’s a SAS Port?............................45 A.6 What’s a SAS Address?.............................45 A.7 What’s a SAS Connector?..........................46 A.8 What do SAS Cables Look Like?........................46 A.9 How are Disk Drives Identified in SAS? ......................46 Microsemi Proprietary and Confidential. Installation and User's Guide Revision 5...
- Page 9 D.2.2 Creating the Firmware Update Disk ....................70 D.3 Running the Menu-based AFU.........................71 D.4 Running the AFU from the Command Line......................71 D.4.1 AFU Commands..........................72 D.5 Updating the Flash Using the AFU Command Line...................74 Microsemi Proprietary and Confidential. Installation and User's Guide Revision 5...
- Page 10 Contents Appendix E Safety Information......................75 E.1 Electrostatic Discharge (ESD)..........................75 Appendix F Technical Specifications....................76 F.1 Environmental Specifications..........................76 F.2 DC Power Requirements...........................76 F.3 Current Requirements ............................76 F.4 Supercapacitor Ratings .............................76 Microsemi Proprietary and Confidential. Installation and User's Guide Revision 5...
-
Page 11: About This Guide
About This Guide About This Guide This Installation and User's Guide explains how to install your Microsemi ® Adaptec ® RAID controller. It also describes the utilities included in your controller kit, and provides a basic overview of Serial Attached SCSI (SAS) and Redundant Array of Independent Disk (RAID) technology. - Page 12 Utilityconcept) to perform basic array and configuration management functions. • Microsemi Adaptec Event Monitor User's Guide—Describes how to use the Event Monitor utility to monitor the Microsemi Adaptec storage controllers installed on your system Microsemi Proprietary and Confidential. Installation and User's Guide Revision 5...
-
Page 13: Kit Contents And System Requirements
Kit Contents • Microsemi Adaptec RAID controller • Cables (Not included in Microsemi Adaptec 'Single' product. If your kit includes cables, the type and quantity vary—for more information, see Cablescontrollers SAS cablesSAS cables on page 13.) -
Page 14: About Your Raid Controller
This chapter provides an overview of the features of your Microsemi Adaptec RAID controller. Standard RAID Controller Features • Support for SAS and SATA Hard Disk Drives (HDD) and Solid State Drives (SSD) • Flash ROM for updates to controller firmware, BIOS, and the Microsemi Adaptec RAID Configuration utility • Disk drive hot-swapping •... -
Page 15: Adding A Flash Backup Module
Flash Backup Module AFM-700 with Superca- pacitor module (integrated) Upgrading the Controller Firmware You can upgrade the firmware on your Microsemi Adaptec RAID controller using the Adaptec Flash Utility or from the computer's uEFI BIOS. Follow the instructions in Using the Adaptec Flash Utility... -
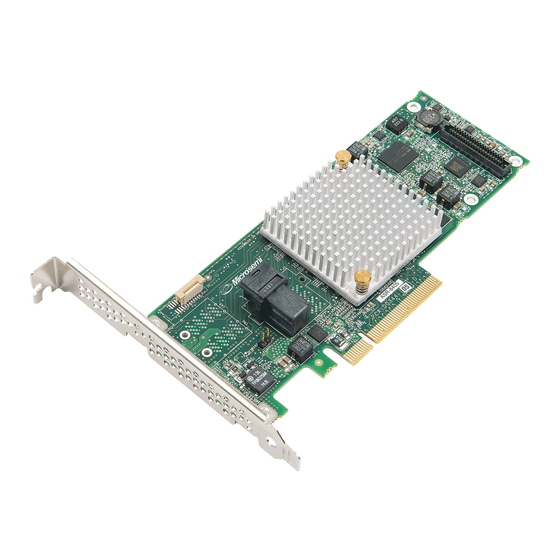
Page 16: About The Microsemi Adaptec Raid 8405
About Your RAID Controller About the Microsemi Adaptec RAID 8405 The Microsemi Adaptec RAID 8405 is a SAS RAID controller with these features: 1 internal mini-SAS HD connector Daughterboard PCIe x8 connector connector HDA mode connector Mounting bracket Form Factor... -
Page 17: About The Microsemi Adaptec Raid 8405E
About Your RAID Controller About the Microsemi Adaptec RAID 8405E The Microsemi Adaptec RAID 8405E is a SAS RAID controller with these features: 1 internal mini-SAS HD connector PCIe x8 connector HDA mode connector Mounting bracket Form Factor Low-profile MD2 Bus compatibility PCIe 3.0... -
Page 18: About The Microsemi Adaptec Raid 8805
About Your RAID Controller About the Microsemi Adaptec RAID 8805 The Microsemi Adaptec RAID 8805 is a SAS RAID controller with these features: 2 internal mini-SAS HD connectors Daughterboard PCIe x8 connector connector HDA mode connector Mounting bracket Form Factor... -
Page 19: About The Microsemi Adaptec Raid 8805E
About Your RAID Controller About the Microsemi Adaptec RAID 8805E The Microsemi Adaptec RAID 8805E is a SAS RAID controller with these features: 2 internal mini-SAS HD connectors PCIe x8 connector HDA mode connector Mounting bracket Form Factor Low-profile MD2 Bus compatibility PCIe 3.0... -
Page 20: About The Microsemi Adaptec Raid 8885/8885Q
About Your RAID Controller About the Microsemi Adaptec RAID 8885/8885Q The Microsemi Adaptec RAID 8885/8885Q is a SAS RAID controller with these features: 2 internal mini-SAS HD connectors 2 external mini-SAS HD connectors Daughterboard connector PCIe x8 connector HDA mode connector... -
Page 21: About The Microsemi Adaptec Raid 81605Z/81605Zq
About Your RAID Controller About the Microsemi Adaptec RAID 81605Z/81605ZQ The Microsemi Adaptec RAID 81605Z/81605ZQ is a SAS RAID controller with these features: 2 internal mini-SAS HD connectors Stiffener (back of board) 2 internal mini-SAS HD connectors Reserved HDA mode... -
Page 22: Getting Started
This chapter provides the basic information you need to set up your disk drives and arrays the way you want them. It describes the options you have for installing your Microsemi Adaptec RAID controller and disk drives and creating arrays for storage. It also describes how to prepare your controller for installation into a low-profile computer cabinet. -
Page 23: Cables
Replacing the Full-Height Bracket with a Low-Profile Bracket If you are installing your Microsemi Adaptec RAID controller into a low-profile computer cabinet, replace the original full-height bracket with the low-profile bracket included in your distribution kit. The full-height bracket is mounted on the front of the controller, the low-profile bracket is mounted on the back of the controller, as shown in the figure below. -
Page 24: Installation Options
Installation Options When you install your Microsemi Adaptec RAID controller, you can choose to create a bootable array and then install your operating system and the controller driver on that array. Alternatively, you can complete a standard installation, where the controller driver is installed on an existing operating system. -
Page 25: Basic Installation Steps
2. Install the controller driver (see Installing the Driver on an Existing Operating System installation driverdriver installation). 3. Install maxView Storage Manager and begin to manage your data storage (see Managing Your Storage Spacetopic). Microsemi Proprietary and Confidential. Installation and User's Guide Revision 5... -
Page 26: Installing The Controller And Disk Drives
Installing the Controller and Disk Drives Installing the Controller and Disk Drives This chapter explains how to install your Microsemi Adaptec RAID controller, and how to install and connect internal and external disk drives. Before You Begin • Read Safety Informationsafety information. -
Page 27: Installing A Raid Controller With Zero Maintenance Cache Protection
5.2.2 Installing a RAID Controller with Zero Maintenance Cache Protection Microsemi Adaptec RAID controllers with zero maintenance cache protection include a flash module daughterboard and a supercapacitor module. On Microsemi Adaptec Series Q controllers, the daughterboard is pre-installed. On Microsemi Adaptec RAID controllers with optional zero maintenance cache protection... - Page 28 Installing the Controller and Disk Drives The following instructions describe how to install the RAID controller and supercapacitor module on a Microsemi Adaptec Series 8/8ZQ controller using the mounting plate method. It assumes that the daughterboard is already installed. Warning: Do NOT remove or insert a fully charged supercapacitor module. Always discharge the unit first to avoid damage to the controller or flash backup module.
- Page 29 6. Install the mounting plate in the empty slot next to the controller, as shown in the next figure. After securing the mounting plate to the card cage, verify that the supercapacitor module and mounting plate sit above (and do not touch) the PCIe slot. Microsemi Proprietary and Confidential. Installation and User's Guide Revision 5...
-
Page 30: Connecting Disk Drives To Your Controllers
1. Install your internal SAS or SATA disk drives, following the instructions in your system's documentation. 2. Use internal SAS, mini-SAS, or mini-SAS HD cables to attach the disk drives to the controller, as required. Microsemi Proprietary and Confidential. Installation and User's Guide Revision 5... -
Page 31: Connecting Drives To A System Backplane
For maxCache caching applications, you can connect a maximum of 8 maxCache-compatible SSDs to a controller. For RAID arrays, Microsemi Adaptec controllers support a maximum of 256 drives, including SSDs (for details, see About Your RAID Controllercontrollers figurescontrollers descriptions). -
Page 32: Connecting External Devices
Note: If you are not connecting any external devices, see the following section, Next Steps. Use high-quality cables to connect your controller to your external device(s), such as disk drives or disk drive enclosures. Microsemi Proprietary and Confidential. Installation and User's Guide Revision 5... -
Page 33: Next Steps
Installing the Controller and Disk Drives We recommend using only Microsemi Adaptec cables. For more information about cabling options for your controller, see Cablescontrollers SAS cablesSAS cables on page 13. Next Steps If you are installing the controller driver and an operating system onto a bootable array, continue with Creating a Bootable Array. -
Page 34: Creating A Bootable Array
Creating a Bootable Array Creating a Bootable Array This chapter explains how to set your Microsemi Adaptec controller to be the boot controller, and how to create a bootable array. Note: If you are completing a standard installation onto an existing operating system, you don't have to complete this task. - Page 35 You can start using the array immediately. However, performance is reduced until the build process is complete. 12. Press until the Exit utility window appears. 13. Select , then press Enter The computer restarts. Microsemi Proprietary and Confidential. Installation and User's Guide Revision 5...
-
Page 36: Creating An Array With Maxview Storage Manager
This section describes how to use the maxView Storage Manager configuration wizard to build an array. Note: Before you begin, download the maxView Storage Manager bootable USB image at start.microsemi.com, then copy the bootable image to a USB flash drive. For details, refer to the maxView Storage Manager User's Guide. -
Page 37: Making Your Array Bootable
Creating Bootable ArraysARC creating bootable arraysarrays creating bootable arraysbootable arrays creating). Then continue with Installing the Driver and an Operating System installation driver and operating systemdriver and operating system installationoperating system installation. Microsemi Proprietary and Confidential. Installation and User's Guide Revision 5... -
Page 38: Installing The Driver And An Operating System
Installing the Driver and an Operating System Installing the Driver and an Operating System This chapter explains how to install your Microsemi Adaptec RAID controller driver and an operating system on a bootable array (see Creating a Bootable Array bootable arrays creatingarrays (bootable)). -
Page 39: Installing With Windows
You must have root privilege to install the driver image. To install the Microsemi Adaptec RAID controller driver while installing Red Hat Linux or CentOS: 1. Insert your installation DVD. 2. Restart your computer. -
Page 40: Installing With Ubuntu Linux
Note: You need the Ubuntu installation DVD (or equivalent virtual media/iso image) to complete this task. You must have root privilege to install the driver image. To install the Microsemi Adaptec RAID controller driver while installing Ubuntu Linux: 1. Insert the Ubuntu Installation DVD, then restart your computer. -
Page 41: Installing With Vmware
(listed below, where xxxxxxx is the driver version number) should be in the driver download directory on your Windows system (see Creating a Driver Disk). Option Description ESXi 6.5/6.0 VMware-VMvisor-Installer-6.0.0-2494585.x86_64.iso Microsemi Proprietary and Confidential. Installation and User's Guide Revision 5... -
Page 42: Installing With Citrix Xenserver
6. When prompted to add a driver (at the end of the OS installation),remove the XenServer installation DVD and insert the driver CD. 7. Complete the XenServer installation, following the on-screen instructions. 8. Remove the driver CD, then reboot your computer. Microsemi Proprietary and Confidential. Installation and User's Guide Revision 5... -
Page 43: Installing The Driver On An Existing Operating System
Installing the Driver on an Existing Operating System Installing the Driver on an Existing Operating System This chapter explains how to install your Microsemi Adaptec RAID controller driver on an existing operating system. Note: 1. To install the driver while you're installing an operating system, see... -
Page 44: Installing On Red Hat, Centos, Suse, Or Fedora Linux
Enter these commands: sudo bash; sudo passwd root. You must have root privilege to install the driver image. Note: Microsemi's pre-built driver supports the kernel that is delivered as part of the ISO. For other kernels, use DKMS process. -
Page 45: Installing On Vmware
Note: To copy the driver RPM file to XenServer (in [ 1 ] below), you must have access to a remote copy utility, such as WinSCP, putty, or Linux scp. You must have root privilege to install the driver. Microsemi Proprietary and Confidential. Installation and User's Guide Revision 5... - Page 46 1. Using a remote copy utility, copy the driver RPM file to a local directory on XenServer. This example uses Linux scp to copy the driver to /tmp/aacraid: scp /mnt/sda1/linux/driver/citrix-aacraid-1.2.1-xxxxx.xen-6.x.rpm root@<xen-server-ip>:/tmp/aacraid 2. Install the driver module rpm: rpm -ivh /tmp/aacraid/citrix-aacraid-1.2.1-xxxxx.xen-6.x.rpm 3. Reboot your computer. Microsemi Proprietary and Confidential. Installation and User's Guide Revision 5...
-
Page 47: Installing Dynamic Kernel Module Support
1. Retrieve the EPEL repository file (the "X" denotes the major version). $ wget https://dl.fedoraproject.org/pub/epel/epel-release-latest-X.noarch.rpm 2. Install the EPEL repository. $ sudo rpm -Uvh epel-release-latest-X.noarch.rpm 3. Install DKMS. $ sudo yum install dkms Microsemi Proprietary and Confidential. Installation and User's Guide Revision 5... -
Page 48: Dkms Reference
# dkms mkdriverdisk -k 2.4.21-4.ELBOOT,2.4.21-4.ELsmp,2.4.21-4.EL \ -d redhat -m aacraid -v 1.2.1.52009 # dkms mkdriverdisk -k 2.6.11.4-20a-default,2.6.11.4-20a-smp \ -d suse -m aacraid -v 1.2.1.52009 4. Check current status of DKMS. # dkms status Microsemi Proprietary and Confidential. Installation and User's Guide Revision 5... -
Page 49: Managing Your Storage Space
About the Microsemi Adaptec RAID Configuration Utility The Microsemi Adaptec RAID Configuration (ARC) utility is a BIOS-based utility that you can use to create and manage controllers, disk drives and other devices, and arrays. The ARC utility comprises these tools: •... -
Page 50: About The Adaptec Flash Utility
For operating systems that do not support the maxView Storage Manager GUI, such as FreeBSD, use the ARCCONF command line utility to configure and manage arrays. Microsemi Proprietary and Confidential. Installation and User's Guide Revision 5... -
Page 51: Solving Problems
Storage Manager User's Guide or the online Help. 11.3 Silencing the Alarm If your Microsemi Adaptec RAID controller includes an alarm, the alarm will sound when an error occurs. To silence the alarm, use maxView Storage Manager (see Managing Your Storage Spacetopic.) OR the ARC... -
Page 52: Recovering From A Disk Drive Failure
If copyback is enabled, data is moved back to its original location once the controller detects that the failed drive has been replaced. Microsemi Proprietary and Confidential. Installation and User's Guide Revision 5... -
Page 53: Disk Drive Failure In A Raid 0 Array
11.5 Resetting the Controller You may need to reset, or flash, your Microsemi Adaptec RAID controller if it becomes inoperable or if a firmware upgrade is unsuccessful. Microsemi Adaptec RAID controllers support a reset protocol called HDA mode flash. For information about HDA mode, see the Readme or contact your support representative. To... -
Page 54: Appendix A Introduction To Sas
As shown in the following figure, SAS devices contain ports (see What’s a SAS Port?SAS ports), ports contain phys, and each phy contains one transmitter and one receiver—one transceiver. A phy can belong to one port only. Microsemi Proprietary and Confidential. Installation and User's Guide Revision 5... -
Page 55: What's A Phy
SAS address. In another example, a SAS device might have one 4-wide port. That port has one SAS address, which is shared by all four phys in the port. Microsemi Proprietary and Confidential. Installation and User's Guide Revision 5... -
Page 56: What's A Sas Connector
You can connect end devices to each other through direct cable connections and through backplane connections. When you use one or more expander devices (see SAS Expander ConnectionsSAS expander connectionsexpander connections), you can create large configurations. Microsemi Proprietary and Confidential. Installation and User's Guide Revision 5... -
Page 57: Direct-Attach Connections
The next figure illustrates (in very basic terms) a SAS domain and shows how SAS cards, SAS and SATA disk drives, and expander devices can fit together in a large data storage topology. Microsemi Proprietary and Confidential. Installation and User's Guide Revision 5... -
Page 58: How Is Sas Different From Parallel Scsi
User intervention required to set SCSI IDs SAS addresses self-configured by SAS devices Requires bus termination Requires no bus termination Standard SCSI connectors SAS connectors (see Cablescontrollers SAS cablesSAS cables) Microsemi Proprietary and Confidential. Installation and User's Guide Revision 5... -
Page 59: Appendix B Understanding Raid
Each RAID level offers a unique combination of performance and redundancy. RAID levels also vary by the number of disk drives they support. This appendix describes the RAID levels supported by your Microsemi Adaptec RAID controller, and provides a basic overview of each to help you select the best level of protection for your data storage. -
Page 60: Raid 1 Arrays
Disk Drive 1 Disk Drive 2 400 GB Disk Drive 2 Disk Drive 3 400 GB Disk Drive 3 Disk Drives in Logical Drive RAID 1E Logical Drive = 600 GB Microsemi Proprietary and Confidential. Installation and User's Guide Revision 5... -
Page 61: Raid 10 Arrays
Unused Space = 150 GB Disk Drive 4 . . . Disk Drive 4 400 GB Unused Space = 150 GB Disk Drives in Logical Drive RAID 10 Logical Drive = 500 GB Microsemi Proprietary and Confidential. Installation and User's Guide Revision 5... -
Page 62: Raid 5 Arrays
. . . Disk Drive 4 Disk Drive 4 400 GB Unused Space = 150 GB RAID 5 Logical Drive = 750 GB plus Parity Disk Drives in Logical Drive Microsemi Proprietary and Confidential. Installation and User's Guide Revision 5... -
Page 63: Raid 5Ee Arrays
400 GB Unused Space = 150 GB Based on the drive segment sizes used: Disk Drives in Logical Drive RAID 5EE Logical Drive = 500 GB plus parity and hot spare Microsemi Proprietary and Confidential. Installation and User's Guide Revision 5... -
Page 64: Raid 50 Arrays
Total Unused Space = 150 GB Drive 1 Drive 2 Drive 3 250 GB 250 GB 250 GB Drive 4 Drive 5 Drive 6 400 GB 400 GB 400 GB Microsemi Proprietary and Confidential. Installation and User's Guide Revision 5... -
Page 65: Raid 6 Arrays
RAID 6 arrays. Two sets of parity data provide enhanced data protection, and striping improves performance. RAID 60 arrays also provide high data transfer speeds. Microsemi Proprietary and Confidential. Installation and User's Guide Revision 5... -
Page 66: Comparing Raid Levels
50 – 88% Disk drive usage, read performance, and write performance depend on the number of drives in the logical drive. In general, the more drives, the better the performance. Microsemi Proprietary and Confidential. Installation and User's Guide Revision 5... -
Page 67: Appendix C Using The Microsemi Adaptec Raid Configuration Utility
Using the Microsemi Adaptec RAID Configuration Utility Using the Microsemi Adaptec RAID Configuration Utility The Microsemi Adaptec RAID Configuration (ARC) utility is a BIOS-based utility that you can use to create arrays and manage controllers, disk drives and other devices. -
Page 68: Using The Arc Utility To Create And Manage Arrays
• Modify power management settings. • Change the cache settings for an array. • Delete an array. Caution: Before deleting an array, back up the data to avoid permanently losing it. Microsemi Proprietary and Confidential. Installation and User's Guide Revision 5... - Page 69 Solid State Drives (SSDs) in your system as fast cache memory to improve performance for both read and write operations in I/O-intensive applications with mixed workloads. Note: maxCache SSD Caching is supported on Microsemi Adaptec Series Q controllers only.
-
Page 70: Initializing Disk Drives
Secure ATA Erase dialog. You Ctrl-S will see this dialog only if the drive supports Secure ATA Erase. The selected disk drive(s) cannot be used until the erase is complete. Microsemi Proprietary and Confidential. Installation and User's Guide Revision 5... -
Page 71: Uninitializing Disk Drives
C.2.6 Uninitializing Disk Drives Uninitializes one or more physical drives. This option clears Microsemi Adaptec metadata and reserved space and any OS partitions from a drive; any existing data on the drive is destroyed. Drives can uninitialized only if they are not part of any array. -
Page 72: Modifying Your Controller's Configuration
RAID controller models.) Alarm Control When enabled, the alarm sounds. Default is enabled. Note: When the alarm is turned off (disabled), it will remain off after a reboot. Microsemi Proprietary and Confidential. Installation and User's Guide Revision 5... - Page 73 DRAM write cache is bypassed based on IO write size; performance criteria is optimized for serving Web pages, file serving, and data retrieval. When set to User Defined, you are prompted to use the OS tools to set individual parameters (contact Microsemi Adaptec support for more information). Default is Dynamic.
- Page 74 RAID controller to act and be used as an HBA. Changing into HBA mode is allowed only if there are no drives with Microsemi Adaptec metadata attached to the controller, including hot spare drives (see...
- Page 75 1. Start the ARC utility in uEFI mode (see Ctrl-A or uEFI/HII? Unified Extensible Firmware Interface (uEFI)Human Interaction Infrastructure Interface (HII)HII interfaceuEFI). 2. Scan for controllers, then select the controller you want. Microsemi Proprietary and Confidential. Installation and User's Guide Revision 5...
-
Page 76: Checking Backup Unit Status
You can use the Identify Drive feature to physically locate a disk drive by blinking the LED. Note: This feature is only available with disk drives that have an activity LED. Microsemi Proprietary and Confidential. Installation and User's Guide Revision 5... -
Page 77: Identifying Disk Drives
(If the global write-cache policy is set to Enable All or Disable All, this option is grayed out.) To set the drive-specific write-cache policy: 1. Start the ARC utility (see Running the ARC Utility). 2. Select the controller you want, then press Enter 3. Select Disk Utilities. Microsemi Proprietary and Confidential. Installation and User's Guide Revision 5... -
Page 78: Updating The Controller Firmware
Use this option to save configuration and status information to help Customer Support diagnose a problem with your system. Saved information includes (but is not limited to) device logs, drive logs, event logs, error logs, controller logs, and statistics. To create a support archive: Microsemi Proprietary and Confidential. Installation and User's Guide Revision 5... -
Page 79: Viewing The Event Log
2. Select the controller you want, then press Enter 3. When the ARC utility menu appears, press Ctrl+P 4. Select Controller Log Information, then press Enter The current event log opens. Microsemi Proprietary and Confidential. Installation and User's Guide Revision 5... -
Page 80: Appendix D Using The Adaptec Flash Utility
To create the firmware update disks: 1. Copy these files to a USB flash drive or writable CD: • AFU.exe • Axxxx01.ufi where xxx is the model number of your controller. Microsemi Proprietary and Confidential. Installation and User's Guide Revision 5... -
Page 81: Running The Menu-Based Afu
Commands) and any switches you want. Note: To find a controller number, type , then press AFU LIST Enter The AFU processes the command and reports either success or an error message code. Microsemi Proprietary and Confidential. Installation and User's Guide Revision 5... -
Page 82: Afu Commands
A:\> AFU SAVE /C 0 In this example, the AFU saves flash contents from Controller 1 to a UFI file in C:\UFI_FILES: A:\> AFU SAVE /C 1 /D C:\UFI_FILES Microsemi Proprietary and Confidential. Installation and User's Guide Revision 5... - Page 83 Adaptec Flash Utility V4.0-0 B5749 (c)Adaptec Inc. 1999–2005. All Rights Reserved. Version Information for Controller #0 (Adaptec RAID 51645) ROM: Build 5748 [VALID] Fri Sep 27 13:28:40 EDT 2005 A:\> AFU VERSION /C ALL Microsemi Proprietary and Confidential. Installation and User's Guide Revision 5...
-
Page 84: Updating The Flash Using The Afu Command Line
Note: The UFI file identifies the RAID controllers, so you don't have to worry about flashing the wrong controller. 7. When prompted, insert the firmware disk. The AFU processes the command and reports either success or an error message code. Microsemi Proprietary and Confidential. Installation and User's Guide Revision 5... -
Page 85: E.1 Electrostatic Discharge (Esd)
• Put the controller down only on an antistatic surface such as the bag supplied in your kit. • If you are returning the controller to Microsemi Adaptec Product Support, put it back in its anti-static bag immediately. If a wrist strap is not available, ground yourself by touching the metal chassis before handling the controller or any other part of the computer. -
Page 86: F.1 Environmental Specifications
Technical Specifications Technical Specifications Environmental Specifications Note: Microsemi Adaptec RAID controllers require adequate airflow to operate reliably. The recommended airflow is 200 LFM (linear feet per minute), minimum. Forced airflow is required. Ambient temperature with forced airflow 0 °C to 55 °C Ambient temperature with Flash Backup Unit 0 °C to 55 °C... - Page 87 Technical Specifications Specification Microsemi Adaptec Flash Backup Module AFM-700 Charge rate Discharge rate Operating temperature 0 °C to 55 °C Storage temperature –20 °C to 70 °C Microsemi Proprietary and Confidential. Installation and User's Guide Revision 5...
- Page 88 20, boot controller iv, disk drives iv–vi, 4, 12, 20, 22, 42–43, 46, 60–61, 66–67 bootable arrays iv–v, 24, 27, connecting to controllers iv, creating iv, 24, 27, connections Microsemi Proprietary and Confidential. Installation and User's Guide Revision 5...
- Page 89 See disk drive Microsemi Proprietary and Confidential. Installation and User's Guide Revision 5...
- Page 90 Adaptec RAID Controller utility end devices expander connections vi, ARCCONF expander devices fanout expanders link speed links v, narrow connectors verifying disk drives vi, narrow ports VMware v, phys v, OS installation v, Microsemi Proprietary and Confidential. Installation and User's Guide Revision 5...
- Page 91 Index Windows v, 29, XenServer v, driver installation v, OS installation v, OS installation v, zero maintenance cache protection iv, 4, 16–17 Microsemi Proprietary and Confidential. Installation and User's Guide Revision 5...
- Page 92 Microsemi makes no warranty, representation, or guarantee regarding the information contained herein or the suitability of its products and services for any particular purpose, nor does Microsemi assume any liability whatsoever arising out of the application or use of any product or circuit. The products sold hereunder and any other products sold by Microsemi have been subject to limited testing and should not be used in conjunction with mission-critical equipment or applications.
Need help?
Do you have a question about the Adaptec ASR-8405 and is the answer not in the manual?
Questions and answers