Advertisement
Available languages
Available languages
1 Description
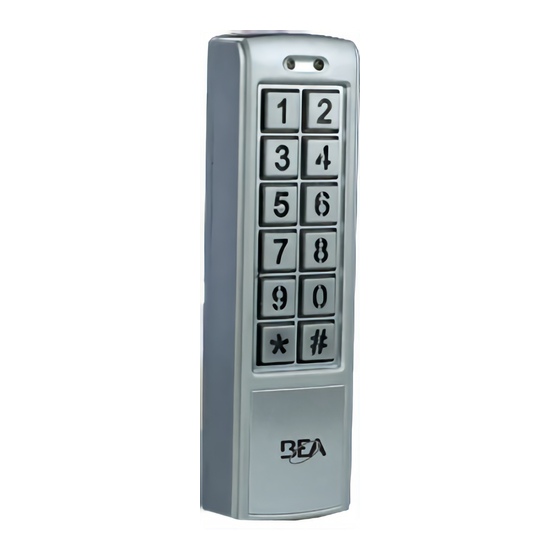
BEA keypads 10KEYPADU and 10KEYPADUSL (slimline) offer
field-proven reliability and cost-effective solutions anywhere
access control is desired.
BEA keypads are waterproof and dustproof with IP66
protection rating. Keypads allow for up to 1010 users (zone 1:
1000 users, zone 2: 10 users), and incorporate a tamper alarm
and a doorbell feature as standard options.
These are ideal for integration into security systems with
electromagnetic locks, electric strikes, restricted access
elevators, or gates and other types of equipment requiring on/
off or momentary control inputs.
All programming is completed entirely from the keypad.
2 Specifications
DESCRIPTION
Supply voltage:
Standby current:
Working current:
Max user codes:
Relock time:
Output:
Cable length:
Operating temperature:
Operating humidity:
IP rating:
Dimension:
Certification:
Backlight:
Product will be damaged and warranty will be voided if supply voltage exceeds 30VDC or 24VAC. This product shall not be
used with a BEA part number 1024VAC transformer or any standard, non-regulated 24VAC transformer as the measured
3 Precautions
Shut off all power before attempting any wiring procedures.
Maintain a clean & safe environment when.
Constantly be aware of pedestrian traffic around the door area.
Always check placement of all wiring before powering up to insure moving door parts will not catch any wires and cause
damage to equipment.
Ensure compliance with all applicable safety standards and building codes upon completion of installation.
75.5892.03 KEYPADS 20171013
75.5892.03 KEYPADS 20171013
10KEYPADU & 10KEYPADUSL
2
12 – 24 VAC/VDC
(DO NOT EXCEED 30VDC or
≤ 30 mA
≤ 160 mA
1010 ( zone 1: 1000 users, zone 2: 10 users)
0 – 99 seconds
2 relays (free of potential change-over contact)
Max. contact voltage: 42 VAC/VDC
Max. contact current: 1 A (resistive)
Max. switching power: 30 W (VDC) / 48 VA (VAC)
3 ft
-22 – 158 °F
0 – 95% (non-condensing)
IP66 (waterproof and dustproof)
10KEYPADU: 3.0" (W) x 4.7" (H) x 0.9" (D) – (76 mm x 120 mm x 22 mm)
10KEYPADUSL: 1.7" (W) x 5.9" (H) x 0.95" (D) – (44 mm x 150 mm x 24 mm)
CE, RoHS
Blue keypad illumination
WARNING:
voltage exceeds 24 VAC.
STANDALONE ACCESS CONTROL KEYPAD
1
3
1. Mode LED
2. Door LED
3. Matrix keypad
4. Case screw
(bottom of case)
4
SPECIFICATION
24VAC)
USER'S GUIDE
2
1
3
4
Page 1 of 5
Page 1 of 5
Advertisement
Table of Contents

Related Manuals for BEA 10KEYPADU


Summary of Contents for BEA 10KEYPADU
-
Page 1: Specifications
IP66 (waterproof and dustproof) Dimension: 10KEYPADU: 3.0” (W) x 4.7” (H) x 0.9” (D) – (76 mm x 120 mm x 22 mm) 10KEYPADUSL: 1.7” (W) x 5.9” (H) x 0.95” (D) – (44 mm x 150 mm x 24 mm) -
Page 2: Installation Notes
4. Connect the wires based on the following wiring diagram. 5. Mount keypad to the back cover by using the provided screws. Installation 10KEYPADU Wiring 10KEYPADU / 10KEYPADUSL CAUTION: Do not damage the tamper sensor. 1 Red (power +) Input DC: 12V to 24V... -
Page 3: Keypad Programming
6 Keypad Programming PROGRAMMING NOTES: If you forget the administration code, turn off the power, press and hold “#” key, and then turn the power back on. A short beep will be heard and the administration code has been restored back to 1234. If no buttons are pressed within 30 seconds while in “setup”... - Page 4 6 Keypad Programming (cont.) 2a) Add user code to zone 1: This code must be different from the admin code. DOOR MODE a. Enter “setup” mode. red flashing b. Press the star (*) key and then “9”. Mode LED will flash red. c.
-
Page 5: Additional Procedures
7 Additional Procedures OPTIONAL: Door bell and tamper alarm DOOR MODE 4a) Door bell: a. Connect an external speaker (8Ω, 0.5w) to brown/white and black/white wires of this device. b. Press the star (*) key and the external speaker rings as a door bell. 4b) External tamper alarm: This feature allows a built-in buzzer to activate if the keypad is removed from the wall. -
Page 6: Spécifications
Dimension : 10KEYPADU : 3,0 po (l) x 4,7 po (h) x 0,9 po (p) – (76 mm x 120 mm x 22 mm) 10KEYPADUSL : 1,7 po (l) x 5,9 po (h) x 0,95 po (p) – (44 mm x 150 mm x 24 mm) -
Page 7: Remarques Sur L'installation
4. Raccordez les fils selon le schéma de câblage suivant. 5. Installez le clavier sur la plaque de support en utilisant les vis fournies. 10KEYPADU Câblage 10KEYPADU / 10KEYPADUSL ATTENTION : Ne pas endommager le capteur anti-sabotage. 1 Rouge (énergie +) Entrée DC: 12V - 24V... -
Page 8: Programmation Du Clavier
6 Programmation du clavier REMARQUES SUR LA PROGRAMMATION : Si vous oubliez le code d’administration, coupez l’alimentation, maintenez enfoncée la touche « # », puis rétablissez l’alimentation. Un court bip retentit et le code d’administration 1234 est alors restauré. Si aucun bouton n’est enfoncé... - Page 9 6 Programmation du clavier (suite) 2a) Ajoutez un code d’utilisateur à la zone 1 : Ce code doit être différent du code d’administration. PORTE MODE a. Saisissez le mode « configuration ». voyant rouge b. Appuyez sur la touche étoile (*), puis sur « 9 ». La DEL de mode clignote rouge. clignote c.
- Page 10 7 Méthodes supplémentaires EN OPTION : sonnette de porte et alarme anti-sabotage PORTE MODE 4a) Sonnette de porte : a. Raccordez un haut-parleur externe (8 Ω, 0,5 W) aux fils brun/blanc et noir/blanc de ce dispositif. b. Appuyez sur la touche étoile (*) et le haut-parleur externe retentit comme une sonnette de porte. 4b) Alarme anti-sabotage externe : Cette caractéristique permet l’activation de l’avertisseur intégré...
Need help?
Do you have a question about the 10KEYPADU and is the answer not in the manual?
Questions and answers