
Summary of Contents for PRESONUS ATOM
- Page 1 ATOM ™ Production and Performance Pad Controller Owner’s Manual ® English www.presonus.com...
-
Page 2: Table Of Contents
Studio One Artist Quick Start — 23 What’s in the Box — 2 Installation and Authorization — 23 What’s in your My PreSonus Account — 2 Setting Up Studio One — 25 Companion PreSonus Products — 3 Configuring Audio Devices — 25 4.2.1... -
Page 3: Overview
This will help you to get better performances and faster results. Throughout this manual, you will find Power User Tips that can quickly make you an ATOM expert and help you get the most out of your investment. Product Registration PreSonus is committed to delivering the best experience for our customers. -
Page 4: What's In The Box
Louisiana 70809 USA• 1-225-216-7887 www.presonus.com Part# 70-52000098-A 6’ (1.8m) USB cable What’s in your My PreSonus Account Once you register your ATOM, you will be able to download the following: Studio One Artist recording software and content Universal Control (necessary for firmware updates) -
Page 5: Companion Presonus Products
Owner’s Manual Companion PreSonus Products Thanks for choosing PreSonus! As a solutions company, we believe the best way to take care of our customers (that’s you) is to ensure that you have the best possible experience from the beginning of your signal chain to the end. To achieve this goal, we’ve prioritized seamless integration throughout every design phase of these... -
Page 6: Firmware Updates
Control from your My PreSonus account after registering your ATOM. Note: At the time of this manual’s publication, a firmware update is required for full functionality of your ATOM. You must download and install Universal Control and run the firmware update on your unit. -
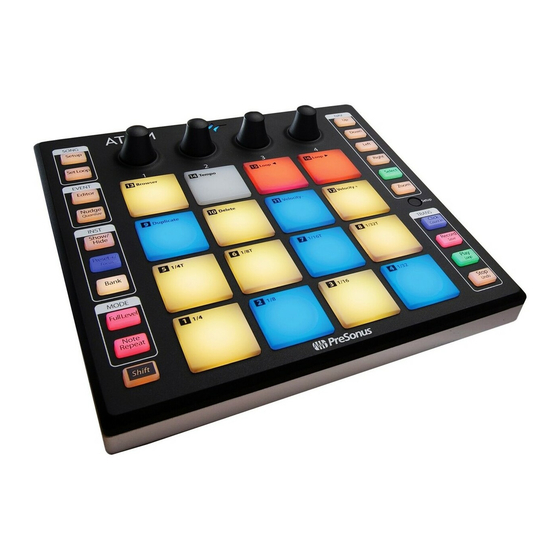
Page 7: Controls
Controls ATOM™ Top Panel Overview Owner’s Manual Controls Top Panel Overview 1. Status Indicator. This LED will change color to indicate whether Studio One Native control is active or not. When Studio One is connected, the LED will illuminate blue. For other applications, it will illuminate green. -
Page 8: Note Repeat
Controls ATOM™ Note Repeat Owner’s Manual Note Repeat As previously mentioned, Note Repeat allows you to repeatedly trigger a sound at a specified rate for as long as you hold down the assigned pad. In this way, you can, for example, trigger a series of ¼ notes simply by pressing and holding a pad. -
Page 9: Quick Setup Mode
To launch Quick Setup Mode, press and hold the Setup button on the right side of your ATOM controller. While Quick Setup Mode is active, the 16 pads on your ATOM controller will not send MIDI messages, rather they will act as toggle buttons for Quick Setup functions. -
Page 10: Pressure Type
MIDI Keyboard Mode. CC22 is sent on all octaves. • Aftertouch. Post-strike pressure sends Aftertouch (also known as polyphonic aftertouch). • Channel Pressure. This is the default setting for your ATOM. Post-strike pressure sends Channel Pressure messages (also known as monophonic aftertouch). -
Page 11: Pressure Threshold
• High. This is the default setting for the ATOM and requires the greatest amount of pressure after the strike for the MIDI pressure message to send. Power User Tip: Regardless of the Pressure Threshold setting, the pressure value always starts from 0 or 127 (depending on the Global Pressure setting). -
Page 12: Internal Midi Clock Tempo
Controls ATOM™ Quick Setup Mode Owner’s Manual 2.2.5 Internal MIDI Clock Tempo MIDI Clock Tempo While in Quick Setup Mode, Pad 16 will flash in sync with the Internal MIDI Clock tempo. By default, this is set to 120 BPM. To adjust the Tempo, use this pad to tap the desired BPM. -
Page 13: Advanced Studio One
Studio One, select your Instrument plug-in, choose your desired preset, and create a track, all from your ATOM controller as well as provide quick navigation functions. While in Song Setup mode, the 16 pads on your ATOM will not function as controllers for instruments. -
Page 14: Navigating Tracks
Advanced Studio One Integration ATOM™ Song Setup Mode Owner’s Manual Duplicate Event Press Pad 9 to duplicate the currently selected event. Delete Event Press Pad 10 to delete the currently selected event. 3.1.3 Navigating Tracks Press the Up and Down buttons to navigate through the track list. -
Page 15: Adding An Instrument
Advanced Studio One Integration ATOM™ Song Setup Mode Owner’s Manual Adding an Instrument 3.1.4 Opening the Instrument Browser Press Pad 13 to open and close your Instrument browser. While the Browser is active, you can use the Up and Down buttons to navigate... -
Page 16: Set Loop
Advanced Studio One Integration ATOM™ Set Loop Owner’s Manual Selecting a Preset Pressing the Right button will expand the preset list. Pressing the Left button will collapse the preset list. Power User Tip: Press the Left button while navigating through the preset list to quickly return to the top of the folder. -
Page 17: Zooming
Pads 15 and 16. Backward Forward 3.2.1 Zooming ATOM lets you quickly focus on your loop to make fast, detailed edits. While Set Loop is active, press the Zoom button to focus your session on the loop area. -
Page 18: Insert Pattern
To delete a pattern, press Pad 10. Event Editor Pressing the Editor button will open the Music Editor view in Studio One. For the best experience, PreSonus recommends closing the Instrument Browser first. While Editor control is active, Pads 9-12 will control the following functions: •... -
Page 19: Adjusting Pitch
Advanced Studio One Integration ATOM™ Event Editor Owner’s Manual Use the Left and Right buttons to select the previous or next note in the timeline. Power User Tip: To select multiple notes, press and hold the Shift button with the Left or Right buttons to navigate through the timeline. -
Page 20: Nudging
Advanced Studio One Integration ATOM™ Event Editor Owner’s Manual Nudging 3.3.2 Holding the Nudge button while pressing the Right button, moves the selected event or note forward in the timeline according to the current grid settings. Holding the Nudge button will pressing the Left button, moves the selected event or note backward in the timeline according to the current grid settings. -
Page 21: Instrument Quick Controls
3.4.1 Impact XT Pad Focus To change the currently focused pad in Impact, press the Shift and Preset +/- button. Pressing any pad on the ATOM will bring the corresponding pad in Impact XT into focus to edit the sample. -
Page 22: Pattern Editor
Pattern in Studio One, select an Instrument Track, and navigate to Event>Insert Pattern, press [Ctrl]+[Shift]+P on your QWERTY keyboard, or press Duplicate on your ATOM while Set Loop is active. An empty Pattern will be created on the selected track. -
Page 23: Transport Controls
Advanced Studio One Integration ATOM™ Transport Controls Owner’s Manual Press Nudge to use the Left and Right buttons to shift all the notes in the active lane by one step. Power User Tip: To Duplicate, Create, or Delete a new variation, open the Inspector by click on the “i”... -
Page 24: Zooming
Advanced Studio One Integration ATOM™ Zooming Owner’s Manual Zooming While holding the Zoom button, the Navigation buttons allow you to adjust the current view. Horizontal Zoom Pressing Zoom with either the Left or Right buttons simultaneously will zoom in or out respectively. -
Page 25: Studio One Artist Quick Start
Studio One Artist provides you with all of the tools necessary to capture and mix a great performance. Power User Tip: As a valued PreSonus customer, you are eligible for a discount upgrade to Studio One Professional. For more details on the Studio One upgrade program for PreSonus customers, please visit https://shop.presonus.com/products/software/studio-... - Page 26 “Install. ” The content will automatically begin to download and install from your My PreSonus user account. Power User Tip: You may be prompted to enter your My PreSonus user account information. Clicking “Remember Credentials” will allow you to have immediate access...
-
Page 27: Setting Up Studio One
In the middle of the Start page, you will see the Setup area. Studio One Artist automatically scans your system for all available drivers and selects a driver. By default, it will choose a PreSonus driver if one is available. 1. Click on the Configure Audio Interface link to select your audio interface driver. -
Page 28: Configuring Midi Devices
Please consult the documentation that came with your MIDI hardware for complete installation instructions. Note: Studio One will automatically configure your ATOM for control. No setup is required. Setting up a MIDI Keyboard controller A MIDI keyboard controller is a hardware device that is generally used for playing and controlling other MIDI devices, virtual instruments, and software parameters. - Page 29 Studio One Artist Quick Start ATOM™ Setting Up Studio One Owner’s Manual 3. From the menu on the left, select your MIDI controller from the list of manufacturers and models. If you do not see your MIDI controller listed, select New Keyboard. At this point, you can customize the name of your keyboard by entering the manufacturer and device names.
- Page 30 Studio One Artist Quick Start ATOM™ Setting Up Studio One Owner’s Manual Setting up an External MIDI Sound Module MIDI instrument controllers (keyboards, MIDI guitars, etc.) send musical information, in the form of MIDI data, to tone modules and virtual instruments, which respond by generating sound as instructed.
-
Page 31: Creating A New Song
Studio One Artist Quick Start ATOM™ Creating a New Song Owner’s Manual Creating a New Song Now that you’ve configured your audio and MIDI devices, let’s create a new Song. We’ll start by setting up your default audio I/O. 1. From the Start page, select “Create a New Song. ”... - Page 32 Studio One Artist Quick Start ATOM™ Creating a New Song Owner’s Manual 2. Click on the Audio I/O Setup tab. 3. From the Inputs tab, you can enable any or all of the inputs on your audio interface that you’d like to have available. We recommend that you create a mono input for each of the inputs on your interface.
-
Page 33: Creating Audio And Instrument Tracks
Studio One Artist Quick Start ATOM™ Creating a New Song Owner’s Manual Creating Audio and Instrument Tracks 4.3.2 1. In the upper left corner of the Arrange window, you will notice several buttons. The button furthest to the right is the Add Tracks button. -
Page 34: Recording An Audio Track
Studio One Artist Quick Start ATOM™ Creating a New Song Owner’s Manual Recording an Audio Track 4.3.3 1. To begin recording, create an audio track from the Add Tracks window, set its input to Input 1 on your audio interface, and connect a microphone to the same input. - Page 35 Studio One Artist Quick Start ATOM™ Creating a New Song Owner’s Manual Drag-and-Drop Virtual Instruments To add a virtual instrument to your session, open the browser and click on the Instrument button. Select the instrument or one of its patches from the Instrument browser and drag it into the Arrange view.
- Page 36 MIDI Mapping ATOM™ Pads and Banks Owner’s Manual MIDI Mapping Pads and Banks Bank 1 MIDI Bank 2 MIDI Bank 3 MIDI Bank 4 MIDI Bank 5 MIDI Bank 6 MIDI Bank 7 MIDI Bank 8 MIDI Pad Number Note Value...
-
Page 37: Midi Mapping
MIDI Mapping ATOM™ Knobs Owner’s Manual Pad Numbers Bank 1 MIDI Bank 2 MIDI Bank 3 MIDI Bank 4 MIDI Bank 5 MIDI Bank 6 MIDI Bank 7 MIDI Bank 8 MIDI Continued Note Value Note Value Note Value Note Value... -
Page 38: Buttons
MIDI Mapping ATOM™ Buttons Owner’s Manual Knob MIDI CC HEX Value Range B0 12h 0-127 B0 13h 0-127 B0 14h 0-127 B0 15h 0-127 Buttons Button MIDI CC HEX Value Button MIDI CC HEX Value B0 1Bh B0 66h B0 1Ch... -
Page 39: Advanced Setup Mode
MIDI messages, rather they will act as channel select buttons. Note: Changes made in Advanced Setup Mode will not be reflected while Studio One Native control is active. This mode is designed to customize ATOM for use with 3rd party applications. -
Page 40: Select Button Midi Channel
MIDI Channel 1. Pressing the Editor button while Advanced Setup Mode is active will allow you to change the MIDI channel for the buttons on your ATOM. Press the number of the pad for the desired MIDI channel. For example, to changed the MIDI channel to Channel 3, press Pad 3. -
Page 41: Turn Pad Note On/Off
Turn Pad Note On/Off 5.4.5 By default, the 16 pads on your ATOM send Note On/Off messages on every bank. Using Advanced Setup mode, you can configure any of the pads on Bank 1 to only send CC messages. To disable Note On/Off for any pad, press the Show/Hide button while Advanced Setup Mode is active. - Page 42 Integration, and XMAX are trademarks or registered trademarks of PreSonus Audio Electronics, Inc. Capture, Impact, Mixverb Presence, RedLightDist, SampleOne, Studio One, and Tricomp are trademarks or registered trademarks of PreSonus Software Ltd. Mac and Mac OS are registered trademarks of Apple, Inc., in the U.S. and other countries. Windows is a registered trademark of Microsoft, Inc., in the U.S.
- Page 43 ATOM ™ Production and Performance Pad Controller Owner’s Manual 18011 Grand Bay Ct. • Baton Rouge, ® Louisiana 70809 USA• 1-225-216-7887 Part# 70-52000107-A www.presonus.com...
Need help?
Do you have a question about the ATOM and is the answer not in the manual?
Questions and answers