Table of Contents
Advertisement
Quick Links
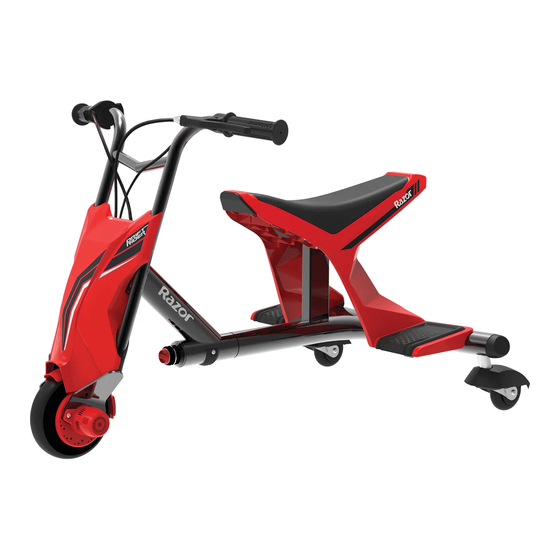
DRIFT RIDER™ ELECTRIC DRIFT CYCLE
OWNER'S MANUAL
Read and understand this entire manual before allowing
child to use this product! For assistance contact Razor.
DO NOT RETURN TO STORE.
NOTE: Manual illustrations are for demonstration purposes only.
Illustrations may not reflect exact appearance of actual product.
Specifications subject to change without notice.
Please have your product along with the 19 character product I.D. code with you
before contacting Razor for warranty assistance and/or replacement parts.
Product I.D. Code: _____________ - ____________ - ____________
Advertisement
Table of Contents

Related Manuals for Razor DRIFT RIDER


Summary of Contents for Razor DRIFT RIDER
- Page 1 DRIFT RIDER™ ELECTRIC DRIFT CYCLE OWNER’S MANUAL Read and understand this entire manual before allowing child to use this product! For assistance contact Razor. DO NOT RETURN TO STORE. NOTE: Manual illustrations are for demonstration purposes only. Illustrations may not reflect exact appearance of actual product.
-
Page 3: Table Of Contents
COMMON SENSE. Do not activate the throttle on the hand grip unless you are on the Drift Rider This manual contains important safety information. It is your responsibility to and in a safe, outdoor environment, suitable for seated riding. -
Page 4: Safety Warnings
Need Help? Visit our website for replacement parts, product support, a list of authorized service centers in the US and customer service contact information at www.razor.com. Please have the product I.D. code (located on the white label of your product) available for better assistance. Additional Customer Service... -
Page 5: Before You Begin
Need Help? Visit our website for replacement parts, product support, a list of authorized service centers in the US and customer service contact information at www.razor.com. Please have the product I.D. code (located on the white label of your product) available for better assistance. Additional Customer Service... -
Page 6: Assembly And Set-Up
Need Help? Visit our website for replacement parts, product support, a list of authorized service centers in the US and customer service contact information at www.razor.com. Please have the product I.D. code (located on the white label of your product) available for better assistance. Additional Customer Service... - Page 7 ASSEMBLY AND SET -UP Attaching the Handlebar Unit Cont. Required Tool: 5 mm Allen wrench WARNING: Failing to properly tighten the steering bolt that attaches the front fork assembly to the down tube assembly can cause you to lose control and fall. Reinsert the steering bolt and secure using the 5 mm Allen wrench.
- Page 8 ASSEMBLY AND SET -UP Attaching the Seat Cont. Required Tools: 5 mm Allen wrench, Phillips screwdriver, 13 mm wrench. Press firmly until click is heard. Install the four (4) screws (included in bag with the manual) using the Phillips screwdriver. Install seat/foot rest assembly.
-
Page 9: Assembly And Set-Up
Need Help? Visit our website for replacement parts, product support, a list of authorized service centers in the US and customer service contact information at www.razor.com. Please have the product I.D. code (located on the white label of your product) available for better assistance. Additional Customer Service... -
Page 10: Charging The Battery
CHARGING THE BATTERY Your Drift Rider may not have a fully charged battery; therefore it is a good idea to charge the battery prior to use. Be WARNING: Use ONLY with sure to charge the battery in a clean, dry location away from direct sunlight, flames or sparks. -
Page 11: Usage
Need Help? Visit our website for replacement parts, product support, a list of authorized service centers in the US and customer service contact information at www.razor.com. Please have the product I.D. code (located on the white label of your product) available for better assistance. Additional Customer Service... -
Page 12: Repair And Maintenance
REPAIR AND MAINTENANCE Turn power switch “OFF” before beginning repair or maintenance: • Read the instructions • Secure the unit under repair • Contact Razor customer service if unsure about any • Remove charger plug • Exercise caution around repair or maintenance exposed parts •... - Page 13 Need Help? Visit our website for replacement parts, product support, a list of authorized service centers in the US and customer service contact information at www.razor.com. Please have the product I.D. code (located on the white label of your product) available for better assistance. Additional Customer Service...
- Page 14 REPAIR AND MAINTENANCE Hub Motor Replacement Cont. Required Tools: 13 mm wrench, awl for opening out wire prongs. Insert motor cable through hole Tighten axle nut using the 13 mm wrench. ≤30° Open out wire prongs using an awl. Insert motor cable wires into connector (Red &...
- Page 15 Need Help? Visit our website for replacement parts, product support, a list of authorized service centers in the US and customer service contact information at www.razor.com. Please have the product I.D. code (located on the white label of your product) available for better assistance. Additional Customer Service...
- Page 16 REPAIR AND MAINTENANCE Battery Replacement Cont’d Required Tool: Phillips screwdriver Disconnect battery cables. Remove battery bracket screw using the Phillips screwdriver. Loosen battery bracket. Remove battery. Install new battery. (Note orientation Secure battery between vertical pegs. of cable) Replace battery bracket screw using the Rotate battery bracket up.
- Page 17 Need Help? Visit our website for replacement parts, product support, a list of authorized service centers in the US and customer service contact information at www.razor.com. Please have the product I.D. code (located on the white label of your product) available for better assistance. Additional Customer Service...
- Page 18 REPAIR AND MAINTENANCE Replace Rear Casters Required Tool: 5 mm Allen wrench Loosen caster bolt using the 5 mm Remove caster and lock washer. Allen wrench. Install caster and lock washer. Tighten caster bolt using the 5 mm Allen wrench.
- Page 19 Need Help? Visit our website for replacement parts, product support, a list of authorized service centers in the US and customer service contact information at www.razor.com. Please have the product I.D. code (located on the white label of your product) available for better assistance. Additional Customer Service...
-
Page 20: Troubleshooting Guide
Need Help? Visit our website for replacement parts, product support, a list of authorized service centers in the US and customer service contact information at www.razor.com. Please have the product I.D. code (located on the white label of your product) available for better assistance. Additional Customer Service... -
Page 21: Drift Rider Parts
DRIFT RIDER PARTS Keep your Drift Rider running for years with genuine Razor parts. Visit our website or e-mail us for more information on spare part availability. (Specifications subject to change without notice.) Handlebar Grip (Right and Left) Battery (21.9V) 15. -
Page 22: Warranty
Need Help? Visit our website for replacement parts, product support, a list of authorized service centers in the US and customer service contact information at www.razor.com. Please have the product I.D. code (located on the white label of your product) available for better assistance. Additional Customer Service... - Page 23 NOTICE: INSURANCE YOUR INSURANCE POLICIES MAY NOT PROVIDE COVERAGE FOR ACCIDENTS INVOLVING THE USE OF THIS SCOOTER/ELECTRIC RIDE-ON PRODUCT. TO DETERMINE IF COVERAGE IS PROVIDED, YOU SHOULD CONTACT YOUR INSURANCE COMPANY OR AGENT.
-
Page 24: Contact Information
Need Help? Visit our website for replacement parts, product support, a list of authorized service centers in the US and customer service contact information at www.razor.com. Please have the product I.D. code (located on the white label of your product) available for better assistance. Additional Customer Service...
Need help?
Do you have a question about the DRIFT RIDER and is the answer not in the manual?
Questions and answers