
Related Manuals for Motorola MBP87SN


Summary of Contents for Motorola MBP87SN
- Page 1 USER’S GUIDE Smart Air Purifier Model: MBP87SN The features described in this guide are subject to modifications without prior notice.
- Page 2 The Smart Air Purifier freshens your baby’s room. Please keep your original dated sales receipt for your records. For warranty service of your Motorola product, you will need to provide a copy of your dated sales receipt to confirm warranty status.
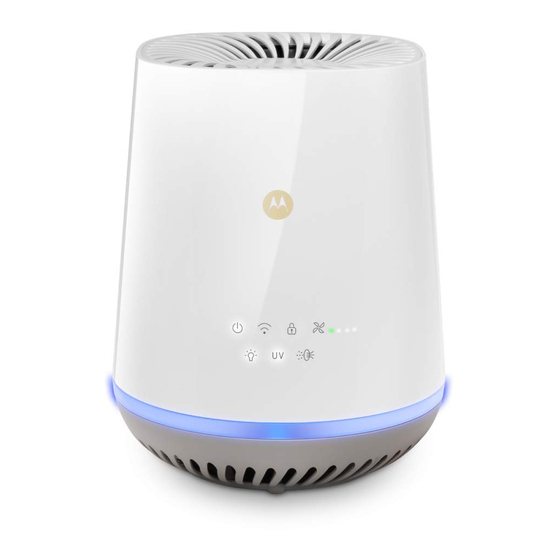
- Page 3 Overview of the Air Purifier Air Inlet Air Outlet Control Panel (with LED Air Quality Sensor Door Backlight) Air Quality Indicator Understand the Air Quality Indicator Color of the air quality light Air quality level Blue Good Yellow Fair Note: The built-in air quality sensor measures the air quality and automatically selects the appropriate color of the air quality light.
- Page 4 Operation of the Touch Control Buttons On/Off Toggle the button to turn the unit On or Off. Button Pair Button When the unit is on, press and hold the button for 5s to enter Pairing Mode to pair the unit with your Wi-Fi router.
-
Page 5: Table Of Contents
Table of contents Safety Instructions....................6 System Requirements...................9 Getting Started..................... 10 Connect Air Purifier to Power Supply............10 Connecting Devices ..................... 11 User Account and Air Purifier Setup on Android™ Devices....11 4.1.1 Download Hubble for Smart Nursery App ......11 4.1.2 Run Hubble for Smart Nursery App on Android™ device 12 4.1.3 Add Air Purifier to your Smart Nursery account ....13 User Account and Purifier Setup on iOS®... -
Page 6: Safety Instructions
1. Safety Instructions READ AND SAVE THESE INSTRUCTIONS. WARNING This product is compliant with all relevant electromagnetic field standards and is, when handled as described in the User’s Guide, safe to use. Therefore, always read the instructions in this User’s Guide carefully before using the device, and save it for later use. - Page 7 • If the supply cord is damaged, it must be replaced by the manufacturer, its service agent or similarly qualified persons in order to avoid hazard. • DO NOT attempt to repair or adjust any electrical or mechanical functions on this unit. Doing so will void your warranty. The inside of the unit contains no user serviceable parts.
- Page 8 Important guidelines for installing Air Purifier • Use of other 2.4 GHz products, such as other wireless networks, ® Bluetooth systems or microwave ovens may cause interference with this product. Keep the Air Purifier away from these types of products, or turn them off if they appear to be causing interference.
-
Page 9: System Requirements
2. System Requirements ® Smartphones/Tablets: Android™ and iOS only. System Requirement: iOS 8.0, Android™ 4.4.2 or higher For more information please visit: https://hubbleconnected.com/requirements System Requirements... -
Page 10: Getting Started
3. Getting Started Connect Air Purifier to Power Supply Connect the Smart Air Purifier to the electrical outlet. The Power ON/OFF button will light up momentarily and the backlight will stay on for 5s then goes off. It will light up again when you tap to turn on the Air Purifier. -
Page 11: Connecting Devices
Access your Air Purifier from any Access your Air compatible device remotely Purifier locally Wi-Fi Router MBP87SN Smart Nursery Server When a user tries to access the Air Purifier, our Smart Nursery server authenticates the user’s identity and permits access. -
Page 12: Run Hubble For Smart Nursery App On Android™ Device
4.1.2 Run Hubble for Smart Nursery App on Android™ device ® • Ensure that your Android™ Device is connected to the Wi-Fi router or mobile network. • Run Hubble for Smart Nursery App, tap SIGNUP and follow the in-app instructions to create your Smart Nursery Account. By signing up, you agree to our Terms &... -
Page 13: Add Air Purifier To Your Smart Nursery Account
4.1.3 Add Air Purifier to your Smart Nursery account • Switch on your Air Purifier, then press and hold the Pair Button to enter Wi-Fi pairing/ setting mode. • Tap on Smart Ai Purifier or press Add Device then tap on Smart Air Purifier to enter Purifier setup mode. - Page 14 • The device SSID can be found on your Android™ Device. Tap the SSID to confirm. (Picture A6) • Air Purifier is detected. Tap Next to proceed to the next step. (Picture A7) ® • You need a Wi-Fi network to connect to your Air Purifer. Tap Search to start network searching.
- Page 15 ® ® • Select a Wi-Fi network from the network list, enter Wi-Fi password and then tap Submit. (Picture A9) ® • It will take a few minutes for Air Purifier to connect to the Wi-Fi network. Tap Get Started when Air Purifier is successfully connected to Hubble for Smart Nursery App.
-
Page 16: User Account And Purifier Setup On Ios® Devices
® User Account and Purifier Setup on iOS Devices What you need • Smart Air Purifier ® • Device with iOS 8.0 or higher 4.2.1 Download Hubble for Smart Nursery App • Go to App Store to search for Hubble for Smart Nursery. •... -
Page 17: Add Air Purifier To Your Smart Nursery Account
4.2.3 Add Air Purifier to your Smart Nursery account • Switch on your Purifier, then press and hold the Pair Button to enter Wi-Fi pairing/ setting mode. • Tap on Smart Air Purifier to enter Purifier setup mode. (Picture • Skim over the main features of your Purifier, then tap Skip To Setup. - Page 18 • Go to Settings > Wi-Fi menu on your iOS ® device. (Pictures i6) • Select the SSID of your Air Purifier from the list of networks. (Pictures i8) • Return to the Smart Nursery App to resume setup. ® •...
- Page 19 ® • It will take a few minutes for Air Purifier to connect to the Wi-Fi network before showing the connection status. (Pictures i12) Note If you fail to complete the setup process, press and hold the Pair Button until the backlight blinks to enter registration mode and repeat the above steps again.
-
Page 20: Overview Of Hubble App
5. Overview of Hubble App Fan Speed Tap to select the speed level (1 - 3 Button or Auto) (AUTO, 1, 2, 3) Child Lock Tap to activate and deactivate the child lock feature. Night Light Toggle the button to turn On night light, select "Fully Bright Light", "Half Bright Light"... - Page 21 Motorola By tapping on the button, you will Shopping Cart be directed to Motorola website where you can shop for replacement HEPA filter, UV-C lamp and other products. Overview of Hubble App...
-
Page 22: Recommendations For Use And Care
6. Recommendations for Use and Care • The appliance is only intended for household use as described in this manual. Any other use not recommended by the manufacturer may cause fire, electric shock or injury to persons. • During operation, NEVER block the air openings, grills/ outlets of the unit or place the unit on a soft surface such as a bed or sofa, as this could cause the unit to tip over, blocking the air inlet or outlet openings. -
Page 23: Replace Hepa Filter And Uv-C Lamp
7. Replace HEPA Filter and UV-C Lamp You will be notified by the control panel backlight and the Smart Nursery App when it’s time to change the activated carbon filter and HEPA Filter. Replace the HEPA Filter Turn anticlockwise Step 3 Step 2 Step 1 Step 1... -
Page 24: Checking And Maintaining The Filter
Step 5 Install a new HEPA filter in the correct position. Turn clockwise Step 6 Step 6 Put the bottom cover back to the unit and turn in a clockwise direction to the position marked with a LOCK icon as shown. The white LED Filter Change Reminder will blink indicating that it’s time to replace the filter. -
Page 25: Replace The Uv Lamp
Replace the UV Lamp Step 3 Turn anticlockwise Step 2 Step 1 Step 1 Turn off and unplug the unit. Turn the bottom cover in an anticlockwise direction to the position marked with an UNLOCK icon as shown. Step 2 / Step 3 Remove the bottom cover. - Page 26 Step 6 Step 7 Turn clockwise Step 6 Hold the end of the lamp*, then unscrew it until it completely detaches from the holder. * HANDLE THE GLASS LAMP WITH CARE. Replace a new UV lamp by screwing it back to the holder until it is fastened.
-
Page 27: Clean The Air Quality Dust Sensor
Clean the Air Quality Dust Sensor Step 1 Step 2 Dust outlet Lens Dust inlet Cleaning Method: Step 1 Open the air quality sensor door. Step 2 Clean the lens and dust inlet/outlet with a lightly moistened cotton swab. Afterwards, dry the lens and dust inlet/outlet with a dry cotton swab. -
Page 28: Troubleshooting
8. Troubleshooting Problem Problem Solution Category Description / Error Account I am unable to login Please check your user name even after and password. registration. Account What do I do if I Click on the "Forgot Password" forget my link on https:// password? app.hubbleconnected.com/ #lostpassword OR on your... - Page 29 Connectivity I am not able to Please check if the Device is Issues access my device. within Wi-Fi range. If the LED on your Device is flashing slowly, please try to move the Device closer to the router for better Wi-Fi connectivity and try again.
- Page 30 Functions The air purifier still Perhaps you did not press the indicates that I need HEPA Filter Change Reminder / to replace the filter; Reset Button but I already did. Plug in the air purifier, press the ON/OFF button and press and hold (control panel) for 5 seconds.
- Page 31 General How do I download Android™: the App for - Open the Google Play on your Android™ and iOS Android™ device. devices? - Select Search - Type in "Hubble for Smart Nursery" - The results will show the Hubble App - Select to install it iOS Device: - Open the App Store...
-
Page 32: Disposal Of The Device (Environment)
9. Disposal of the Device (Environment) At the end of the product life cycle, you should not dispose of this product with normal household waste. Take this product to a collection point for the recycling of electrical and electronic equipment. The symbol on the product, user's guide and/or box indicates this. -
Page 33: General Information
US and Canada 1-888-331-3383 E-mail: support@motorolastore.com Consumer Products and Accessories Limited Warranty ("Warranty") Thank you for purchasing this Motorola branded product manufactured under license by Binatone Electronics International Ltd ("BINATONE"). What Does this Warranty Cover? Subject to the exclusions contained below, BINATONE warrants that this Motorola branded product ("Product") or certified accessory... - Page 34 WARRANTY IS THE EXCLUSIVE REMEDY OF THE CONSUMER, AND IS PROVIDED IN LIEU OF ALL OTHER WARRANTIES, EXPRESS OR IMPLIED. IN NO EVENT SHALL MOTOROLA OR BINATONE BE LIABLE, WHETHER IN CONTRACT OR TORT (INCLUDING NEGLIGENCE) FOR DAMAGES IN EXCESS OF THE PURCHASE...
- Page 35 (c) use of the Products or Accessories for commercial purposes or subjecting the Product or Accessory to abnormal usage or conditions; or (d) other acts which are not the fault of MOTOROLA or BINATONE, are excluded from coverage.
- Page 36 How to Obtain Warranty Service or Other Information? To obtain service or information, please call: US and Canada 1-888-331-3383 E-mail: support@motorolastore.com You will receive instructions on how to ship the Products or Accessories at your expense and risk, to a BINATONE Authorized Repair Center.
- Page 37 FCC and IC regulations FCC Part l5 NOTE: This equipment has been tested and found to comply with the limits for a Class B digital device, pursuant to Part 15 of the Federal Communications Commission (FCC) rules. These limits are designed to provide reasonable protection against harmful interference in a residential installation.
- Page 38 WARNING Changes or modifications, to this equipment not expressively approved by the party responsible for compliance could void the user’s authority to operate the equipment. The socket-outlet shall be installed near the equipment and shall be easily accessible. Industry Canada This device complies with Industry Canada licence-exempt RSS standard(s): Operation is subject to the following Two conditions:(1) this device may not cause interference, and (2) this device must...
-
Page 39: Technical Specifications
11. Technical Specifications Connectivity 2.4GHz Wi-Fi® 802.11 b/g/n Standby power less than 2 W consumption Operating Temperature F - 104 F (5 °C - 40°C) Rated Voltage/Frequency AC120V / 60Hz Power Hi-speed 45W±20% Me-speed 37W±20% Lo-speed 25W±20% UVC (Ultraviolet C) 3W –... - Page 40 App Store is a service mark of Apple Inc. Google Play and Android are trademarks of Google Inc. Wi-Fi is a trademark of the Wi-Fi Alliance. All other trademarks are the property of their respective owners. © 2017 Motorola Mobility LLC. All rights reserved. 3131342 US_EN Version 1.0...
Need help?
Do you have a question about the MBP87SN and is the answer not in the manual?
Questions and answers