
Related Manuals for Ruhle SR1


Summary of Contents for Ruhle SR1
- Page 1 Operating Manual the semi automatic High-Tech-Cutter SR1 and SR1 turbo Rühle GmbH Lebensmitteltechnik Beim Signauer Schachen 10 79865 Grafenhausen Tel: ++49 7748 - 523-0 Fax: ++49 7748 - 52385-00 10/2001 CR www. Ruhle.biz...
-
Page 2: Table Of Contents
Contents Page 1. Safety instructions ............................3 1.1 Safety hints................................3 1.2 Safety data sheet.............................4 Installation instructions ..........................6 2.1 Machine installation........................... .7 2.2 Connection of the Machine........................7 2.3 Commissioning of the machine........................8 Operating instructions ..........................9 3.1 Switching on the machine..........................9 3.2 Cutting preparation............................10 3.3 Cut adjustments. -
Page 3: Safety Instructions
1. Safety Instructions !!! The safety instructions have to be observed during the installation, operation, cleaning and servicing of the Rühle High Tech Cutter type SR 1 and SR1 turbo. 1.1 Safety hints !!! The operating manual has to be read by the supervising personal before installation, operation, cleaning or servicing. -
Page 4: Safety Data Sheet
CE – Conformity declaration The fully automatic High-Tech-Cutter of the Type SR1 and SR 1 turbo corresponds to the following safety and health requirements: a. EU – Machine guideline 89 / 392 / EWG and 91 / 368 / EWG b. -
Page 6: Installation Instructions
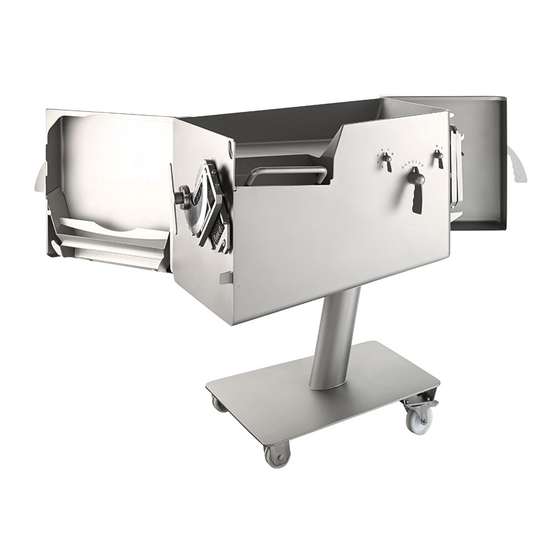
2. Installation instruction Installation and commissioning of the machine should only be carried out in presence of a Rühle service technician. The Rühle limited liability company is not liable for damages caused by violation of these instructions. The transport of the machine has to be carried out according to the operating manual. Pre-compacting adjustment lever Cutting length... -
Page 7: Machine Installation
Before connecting the machine to the mains, make sure that the power outlet is dimensioned according to the machine datas. The High-Tech-Cutter SR1 and SR1 turbo is standard equipped with a connected load of 400 V / 50 Hz / 16 A / 1,5 kW. -
Page 8: Commissioning Of The Machine
These values can vary, so take the values from the data plate, positioned at the back of the machine, before finally connecting the machine. After an electrician has fitted a suitable power plug to the power lead, the machine can be supplied with power by connecting the lead to the power point. -
Page 9: Operating Instructions
Operating instructions 3.1 Switching on the machine To start the machine....the main switch has to be turned to position ”1” ..a trolley with a box has to be pushed under the cutting area door..the discharge funnel has to be installed inside the cutting area door..with a Multi-cutter installed, the shaft slider and the cutting area door have to be closed. -
Page 10: Cut Adjustments
Pre-compacting: A simple rotary motion brings the pre-compacting adjusting lever to the desired position from 0 ( no compacting Presure ) to 10 ( highest compacting pressure ) Cut adjustments To vary pre-set cutting parameters it requires a great deal of cutting experience as well as a sound knowledge of the machine in order to achieve the best cutting result without the machine suffering any damage. - Page 11 Adjustment: Streaky bacon Material State Multi-cutter Multi-cutter Length Pre-Comp Bottom/mm Top/mm Pork cold 0°C Pork cold 0°C Pork froz.-2°C Pork cold 2°C Pork warm 30°C Adjustment : Bacon Material State Multi-cutter Multi-cutter Length Pre-Comp Bottom/mm Top/mm Pork cool 4°C Pork cool 4°C Pork cool 4°C...
- Page 12 Pork cold 0°C 30,0 Adjustment: Inlay meat Material State Multi-cutter Multi-cutter Length Pre-Comp Bottom/mm Top/mm Pork cool 4°C Pork cool 4°C 12,0 Adjustment: Goulash Material State Multi-cutter Multi-cutter Length Pre-Comp Bottom/mm Top/mm Pork cool 4°C 24,0 Beef cool 4°C 24,0 Pork cool 4°C 12,0...
- Page 13 Pork cool 4°C Adjustment: Liver/Heart/Kidney Material State Multi-cutter Multi-cutter Length Pre-Comp Bottom/mm Top/mm Pork cool 4°C Pork cool 4°C Pork cool 4°C Adjustment: Tribe/Lung Material State Multi-cutter Multi-cutter Length Pre-Comp Bottom/mm Top/mm Beef cool 4°C 10,0 Beef cool 4°C Pork cool 4°C Adjustment: Pork head Material...
- Page 14 Adjustment: Schnitzel (without sectioning blade, install bottom Multi-cutter.) Material State Multi-cutter Multi-cutter Length Pre-Comp Bottom/mm Top/mm Pork cool 4°C 10,0 Pork froz. -3°C 10,0 Adjustment : Roulades (without sectioning blade, install bottom Multi-cutter.) Material State Multi-cutter Multi-cutter Length Pre-Comp Bottom/mm Top/mm Pork cool 4°C...
- Page 15 Pork cool 4°C Pork froz. -3°C Adjustment: Cheese Material State Multi-cutter Multi-cutter Length Pre-Comp Bottom/mm Top/mm hard soft hard soft soft hard soft hard hard soft Adjustment: Potatoes Material State Multi-cutter Multi-cutter Length Pre-Comp Bottom/mm Top/mm Carrots cool 4°C Adjustment: Fondue Chinoise Material State Multi-cutter...
-
Page 16: The Hightech-Cutter
The Multi-cutter The Multi-cutter determines two out of the three dimensions of the cube or stripe. The size of the cutting dimension is in mm, which means that the distance between two adjacent knives is x mm. The following cut-sizes are available for the High-Tech-Cutter: 5 mm x 5 mm, 6 mm x 6 mm, 8 mm x 8mm, 10 mm x 10 mm, 12 mm x 12 mm, 16 mm x 16 mm 20 mm x 20 mm, 24 mm x 24 mm, 30 mm x 30 mm, 32 mm x 32 mm, 40 mm x 40 mm, 60 mm x 60 mm. -
Page 17: Hightech-Cutter Selection
3.4.1 HighTech-cutter selection This operating manual contains the correct grid selection for SR 1 and SR 1 turbo. For the selection of the HighTech-cutter frame the following applies: Always select the frame with the smallest number of slits. This results in the best cut. Of course it is possible to take a HighTech-cutter frame with lots of slits. - Page 18 C. Now the product stabilizer(s) have to be inserted into the Multi-cutter frame from the side, on top of the knives of the bottom Multiplex-cutter-half. The stabilizers are inserted so far, that they are not protruding on either side of the Multi-cutter frame.
-
Page 19: Hightech-Cutter Installation
3.4.3 HighTech-cutter installation Only install the Multi-cutter, which is nominated in the desired cutting program. The operator has to wear protective gloves against cuts and stabs while working in the cutting area. A. Open the processing shaft and remove the shaft slider by sliding it diagonally out of the guides on the side. -
Page 20: Hightech-Cutter Maintenance
3.4.4 HighTech-cutter maintenance In the end a cutting machine always depends on sharp knives, because they keep the wear and tear to a minimum and create a beautiful cut. For this reason, the Multiplex cutter halves and the knives should be sharpened with a suitible tool every 50 operating hours. -
Page 21: The Tool Box
The wing nut is fastened counterclockwise and loosened clockwise so that the sectioning blade doesn’t turn loose during the cutting Open process. Now loosen the wing nut by a full turn and fasten the nut again Closed by swinging it round with lots of speed. This is sufficient to hold the blade in position. -
Page 22: Feeding The Machine
3.7 Feeding the machine The feed hight is 1.100 mm above floor level. During manual feed no more than 50 kg of produkt should be put on to the machine. for a comfortable operation a maximum of 25 kg is recommended. 3.7 .1The work bench When the machine is positioned correctly the work bench has a slope of 3°... -
Page 23: Product Discharge
To open the shaft push the handle about 1 cm away from you to release the locking mechanism. then pull the handle towards you until the limit stop is reached. Now let go off the handle so that the slider can lock itself in this position through its own weight. After filling, ideally with 110% of the shaft volume, locking and pre-compacting is started. -
Page 24: Cleaning Instructions
4. Cleaning instruction The High-Tech-Cutter SR1 and SR1 turbo is constructed in such a way, that all parts getting into contact with the product can be reached from the operating side and from the front of the machine. Correct cleaning of the machine is a condition for good food and prolongs the life of the machine. -
Page 25: Cleaning Procedure
4.3 Cleaning procedure Before cleaning the machine, the operator has to prepare the machine for the cleaning process and follow the sequence below exactly. a. Start machine and stop after 2 seconds. b. Remove all objects lying on top of the machine. Open tool box. c. -
Page 26: Technical Service
Apart from the machine system which is covered by the Rühle guarantee, there are parts which are not wear resistant and are parts which are not wear resistant and are there fore not covered by guarantee. With the High-Tech-Cutters SR1 and SR1 turbo grid knives, cutting blade and grid drive bolts are such parts. -
Page 27: Regular Servicing
e. Check Multi-cutter – drive bolt for ease of operation and the end clearance and make sure, that the running surfaces of the bearings show no sign of having plane surfaces. Check the cam rollers of all Multi-cutter frames for ease of operation and make sure, that the running surfaces of the bearings show no sign of having plane surfaces. -
Page 28: Errors
5.3 Errors Error Solutions Bad cross section of cut Check product for required temperature Correct process machine adjustment? Correct grid mounted? Sectioning blade blunt or damaged? Grid knives blunt or damaged? No stabilisers mounted on grid? Product falling past the collecting Machine is not level (spirit level)? vessel. -
Page 29: Technical Documentation
Working place noise level under 65 dBa 6.1 Circuit diagrams The circuit diagrams of your High-Tech-Cutter SR 1 and SR1 turbo are supplied together with the machine. These diagrams are kept inside the switch box, in order to have them handy for the service technician. -
Page 30: Index
Index Adjustments p. 12 Faults p. 33 Phone-service p. 1, 34, 35 Assembly p. 30 General view of machine p. 6 Safety hints p. 3, 28 CE-conformity decl. p. 4 Knife sharpening p. 22 Service interval p. 32 Compressed air p. 34 Machine feet p.
Need help?
Do you have a question about the SR1 and is the answer not in the manual?
Questions and answers