Table of Contents
Advertisement
Advertisement
Table of Contents

Subscribe to Our Youtube Channel
Related Manuals for LEGRAND Digital Audio System


Summary of Contents for LEGRAND Digital Audio System
- Page 1 Legrand Digital Audio System User Guide...
-
Page 2: Table Of Contents
Contents Legrand Digital Audio System User Guide System Overview Controllers What’s in the Enclosure? Modules What’s in the Wall? Keypads & Inputs The Control App - Getting Around Zones Pane (Rooms) Sources Pane Whole House Control Volume Control Digital Source Selection... -
Page 3: System Overview
The keypad will then allow users to press the favorite button and return to that source/volume quickly. Easy to use, the Digital Audio System is a flexible, feature- rich, and accessible structured wiring audio solution. -
Page 4: Controllers
Controllers The Digital Audio System can be controlled by smartphones, tablets and by the AU7010-XX Keypad. For controlling the system via smartphone or tablet, free applications are available for both Android and iOS devices through the Google Play and App Stores. Please search for ‘On-Q Digital Audio’ to down- load the app. -
Page 5: What's In The Enclosure
What’s in the Enclosure? Modules The Digital Audio System is comprised of enclosure-based modules, as well as keypad and input devices located throughout the home. The heart of the system, the Digital Audio Distribution Module (AU7000), as well as the Digital Audio Power Distribution Module (PW1020), are required for every system. -
Page 6: What's In The Wall
Favorite feature, offering quick access to a preferred source/ volume setting. Also installed in a specific zone, a Digital Audio System might include the use of a Digital Audio Global Source Input (AU7007-XX) or a Digital Audio Lo- cal Source Input (AU7008-XX). -
Page 7: The Control App - Getting Around
The Control App - Getting Around Zones Pane (Rooms) Offering complete control of a Digital Audio System, the free applications (apps) available for Android and iOS devices provide both simple navigation and a complete view of a system’s current status. -
Page 8: Sources Pane
Sources Pane Also on the left hand side of the app screen, the Digital Audio System’s avail- able sources will be displayed. The example below shows a system with two Digital Audio Input Modules and one Digital Audio Global Source. -
Page 9: Whole House Control
Whole House Control This area of the application provides global commands that affect all zones simultaneously. This command turns all zones off This command mutes and un-mutes all zones This command selects a single source for all on zones... -
Page 10: Volume Control
Volume Control Volume can be controlled by sliding the fader, or incrementally increased by tapping the plus (+) or minus (-) buttons. If a single zone is playing, adjusting the volume will affect that single zone. If multiple zones are playing within a group, multiple volume control faders will open to adjust each zone... -
Page 11: Digital Source Selection
Digital Source Selection This panel allows users to select their digital audio sources, such as stream- ing services or digital content stored in a networked music library or even on a mobile device. (For how to set up streaming services, see page 20.) -
Page 12: Currently Playing
Currently Playing When a source is selected in the sources pane (located on the left), its meta- data is displayed at the top of the app. -
Page 13: Transport Controls
Transport Controls Various digital audio services provide transport controls, which display in the designated pane below, for added interaction with the audio content (such as the ‘thumbs up’ and ‘thumbs down’ functions for Pandora). Please note no transport controls will display when an analog source is se- lected. -
Page 14: Playing Queue
Playing Queue The Playing Queue displays additional content details, such as the next track, for the currently selected source. Please note the available information in this pane will vary by source. -
Page 15: Settings
Settings The gear icon in the top right corner of the app screen accesses the system’s settings. Within Settings, you can add zones, setup additional streaming ser- vices, or manually access software updates. -
Page 16: Wall Devices
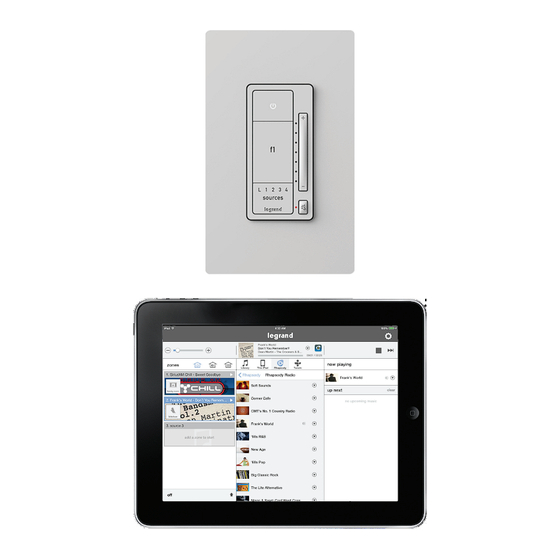
Wall Devices The AU7010 Digital Audio Amplified Keypad The Digital Audio Keypad provides the amplification that powers the speakers in the zone and provides access to core control functions such as volume up/ down, mute, power on/off, source selection and access to preset favorites. To set a favorite, select the desired source and adjust volume to a preferred level, then press and hold the ‘F1’... -
Page 17: The Au7007 Global Source Input
The AU7007 Global Source Input The Digital Audio Global Source Input (AU7007-XX) introduces analog sourc- es into the Digital Audio System for global access through all zones. Sourc- es connect to the Digital Audio Global Source Input either through a stereo 3.5mm line cable, in the case of a MP3 player, or through an adapter cable for... -
Page 18: The Au7008 Local Source Input
The AU7008 Local Source Input Similar to the AU7007-XX, the Digital Audio Local Source Input (AU7008-XX) also introduces analog sources into the Digital Audio System. However, it is for localized access within the specific zone where it is connected. Selec- tion of the AU7008 is done at the keypad via the Source Selection button or through the application. -
Page 19: Adding Digital Services - Pandora
Adding Digital Services - Pandora To add the Pandora music service to a Digital Audio System: 1. Select ‘Add a Source’ or the Settings icon. 2. If you are already a Pandora user, select ‘I have an account.’ Otherwise, you can set up a free account at this time. -
Page 20: Adding Digital Services - Tunein
Adding Digital Services - TuneIn To add the TuneIn music service to a Digital Audio System: 1. Select ‘Add a Source’ or the Settings icon. 2. If you are already a TuneIn user, select ‘I have an account.’ Otherwise, you can set up a free account at this time. -
Page 21: Adding Digital Services - Rhapsody
3. Enter the user credentials for your Rhapsody account. 4. Press ‘Done’ and return to the home screen. Your Rhapsody account is now an available source in your Digital Audio System. -
Page 22: Adding Digital Services - Siriusxm
SiriusXM is a paid subscription service. To add a SiriusXM subscription account: To add the SiriusXM music service to a Digital Audio System: 1. Select ‘Add a Source’ or the Settings icon. 2. If you are already a SiriusXM user, select ‘I have an account.’ Otherwise, you can set up a free trial at this time. -
Page 23: Adding Digital Services - Music Libraries
Adding Digital Services - Music Libraries In addition to providing access to digital streaming music services, the Legrand Digital Audio System can access digital files located on the home’s network. Files stored on NAS drives or one or more iTunes, WIndows Media or music folders can be accessed. -
Page 24: Adding Digital Services - Music Libraries
Adding Digital Services - Music Libraries Another method is to enter the path for the folder you wish to access, as shown in steps one through three. -
Page 25: Playing Music With The App
Playing Music with the App Selecting a Zone (Room) to start Music To begin playing music, a zone or room must be selected. To play music: 1. Press and hold your finger on a zone icon to select, as seen in Figure 1 below. -
Page 26: Selecting Music For Your Zone
Selecting music for your zone To play music, press the source pane with your desired zone, then select the desired service or device from the selection pane in the center panel of the app screen (highlighted in red in the image below). To browse all available services or devices, simply slide finger left or right. -
Page 27: Selecting A Global Source Input
Selecting a Global Source Input To select the Digital Audio Global Source Input (AU7007-XX) as your source, begin by dragging the appropriate zone icon to the source pane for the AU7007-XX. -
Page 28: Selecting A Local Source Input
Selecting a Local Source Input To select the Digital Audio Local Source Input (AU7008-XX) as your source, be- gin by dragging the appropriate zone icon to the source pane for the AU7008- XX. Please note this source will only be available in the zone where it is con- nected. -
Page 29: The Control App - Settings
The Control App - Settings Settings The Settings section of the Digital Audio app, represented by the gear icon, provides additional control and customization for your system. This is where music services can be added and removed, zone parameters can be adjusted, status of the system components can be determined, as well as other fea- tures. -
Page 30: Settings - Creating Persistent Groups 1
Settings - Creating Persistent Groups 1 Within Settings, one option for customizing a system is the creation of per- sistent groups. This allows multiple zones to be joined together more per- manently than by simply dragging multiple zones into the same source pane. To create a group: 1. -
Page 31: Settings - Creating Persistent Groups 2
Settings - Creating Persistent Groups 2 Continuing instructions from the previous page: 4. Select an icon for the new group 5. Name the group, then tap ‘Done’ 6. The newly created group will now display on the home page. -
Page 32: Settings - Disbanding Persistent Groups 1
Settings - Disbanding Persistent Groups 1 To disband a persistent group, follow the steps below: 1. Go to Settings, Zones & Groups 2. Select the group you wish to disband 3. Select ‘Ungroup’ 4. Confirm the request... -
Page 33: Settings - Disbanding Persistent Groups 2
Settings - Disbanding Persistent Groups 2 Continuing instructions from the previous page: 5. You will now notice that the group has been disbanded and the individual members are now on their own. 6. Go to he home page to see the individual zones again. -
Page 34: Settings - Zones Settings
Settings - Zones Settings Zones have many settings that can assist with the user experience of how the system operates. To enter the zone settings do the following: 1. Go to Settings, Zones & Groups 2. Select a Zone 3. Adjust your desired setting options, as shown in pictures three and four... -
Page 35: Settings - Naming A Digital Audio Global/Local Source
Settings - Naming a Digital Audio Global/Local Source Sources can be named and it’s suggested to only name Global and Local Source Inputs. These inputs will be attached to known devices such as a Cable Box or the Family Room Cable Box. It is possible to name digital sources but is not recom- mended. -
Page 36: Settings - General/About
Settings - General/About This portion of the application shows details about the Digital Audio Distribu- tion Module or the Digital Audio Input Module. Details such as the current firmware build, IP address can be accessed. This is also where the Distribu- tion Module can be restarted or factory reset. -
Page 37: Settings - General/About/Software Update
Settings - General/About/Software Update In general, if a software update is available for either the AU7000 Digital Au- dio Distribution Module or for the AU7001 Digital Audio Input Module you will be prompted with a splash screen alerting you and asking for permission to proceed with the download.
Need help?
Do you have a question about the Digital Audio System and is the answer not in the manual?
Questions and answers