Table of Contents
Advertisement
VRV W T-series water-cooled system air conditioner
Mode
On/Off
Menu
OK
Fan
Cancel
Speed
Read these instructions carefully before installation.
Keep this manual in a handy place for future reference.
This manual should be left with the equipment owner.
OPERATION MANUAL
MODEL
RWEQ96TATJU
RWEQ96TAYDU
RWEQ120TATJU
RWEQ120TAYDU
RWEQ144TATJU
RWEQ144TAYDU
RWEQ192TATJU
RWEQ192TAYDU
RWEQ216TATJU
RWEQ216TAYDU
RWEQ240TATJU
RWEQ240TAYDU
RWEQ264TATJU
RWEQ264TAYDU
RWEQ288TATJU
RWEQ288TAYDU
RWEQ312TATJU
RWEQ312TAYDU
RWEQ336TATJU
RWEQ336TAYDU
RWEQ360TATJU
RWEQ360TAYDU
RWEQ384TATJU
RWEQ384TAYDU
RWEQ408TATJU
RWEQ408TAYDU
RWEQ432TATJU
RWEQ432TAYDU
RWEQ96TAYCU
RWEQ120TAYCU
RWEQ144TAYCU
RWEQ192TAYCU
RWEQ216TAYCU
RWEQ240TAYCU
RWEQ264TAYCU
RWEQ288TAYCU
RWEQ312TAYCU
RWEQ336TAYCU
RWEQ360TAYCU
RWEQ384TAYCU
RWEQ408TAYCU
RWEQ432TAYCU
Advertisement
Table of Contents

Subscribe to Our Youtube Channel
Related Manuals for Daikin VRV W T-series


Summary of Contents for Daikin VRV W T-series
- Page 1 OPERATION MANUAL VRV W T-series water-cooled system air conditioner MODEL RWEQ96TATJU RWEQ96TAYDU RWEQ96TAYCU RWEQ120TATJU RWEQ120TAYDU RWEQ120TAYCU RWEQ144TATJU RWEQ144TAYDU RWEQ144TAYCU RWEQ192TATJU RWEQ192TAYDU RWEQ192TAYCU RWEQ216TATJU RWEQ216TAYDU RWEQ216TAYCU RWEQ240TATJU RWEQ240TAYDU RWEQ240TAYCU RWEQ264TATJU RWEQ264TAYDU RWEQ264TAYCU RWEQ288TATJU RWEQ288TAYDU RWEQ288TAYCU RWEQ312TATJU RWEQ312TAYDU RWEQ312TAYCU Mode On/Off RWEQ336TATJU...
-
Page 2: Table Of Contents
Following Symptoms are not Air Conditioner Troubles ..33 and fire. Only use accessories made by Daikin that are Trouble Shooting ............... 35 specifically designed for use with the equipment and have them installed by a professional. - Page 3 ● Be sure to establish a ground. f. Locations such as kitchens where oil may splatter or where Do not ground the unit to a utility pipe, arrester, or telephone there is steam in the air. ground. Incomplete grounding may cause electrical shock, or g.
-
Page 4: Specifications
Specifications Model name RWEQ96TAYDU RWEQ120TAYDU RWEQ144TAYDU Power supply Phase — Frequency Voltage Nominal cooling capacity (Btu/h) 96000 120000 144000 Nominal heating capacity (Btu/h) 108000 135000 162000 38-9/16×30-1/8×22-1/16 38-9/16×30-1/8×22-1/16 38-9/16×30-1/8×22-1/16 Dimensions H×W×D (mm) 980×765×560 980×765×560 980×765×560 (Ibs.) Weight (kg) Refrigerant Type —... -
Page 5: What To Do Before Operation
This operation manual is for the following system with standard control. Before initiating operation, contact your Daikin dealer for the operation that corresponds to your system type and mark. If your installation has a customized control system, ask your Daikin dealer for the operation that corresponds to your system. 1. Closed cooling tower 2. -
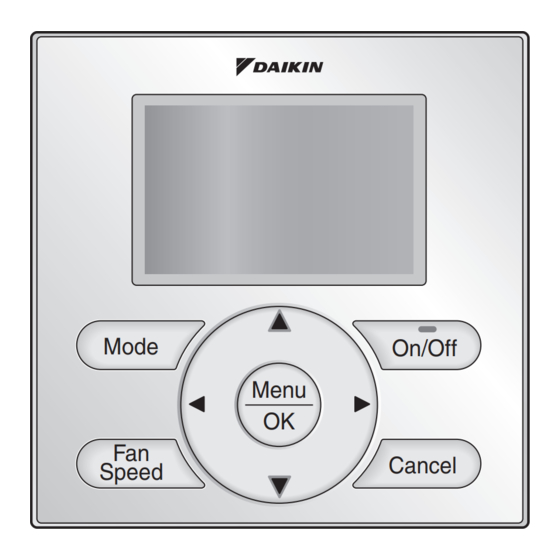
Page 6: Remote Controller And Cool/Heat Selector : Name And Function Of Each Switch And Display
Remote Controller and Cool/Heat Selector : Name and Function of Each Switch and Display Button Locations and Descriptions 1. Operation mode selector button <Remote Controller> 11. LCD (with backlight) 4. Up button ..5. Down button 6. Right button 7. Left button ... 9. - Page 7 1. Operation mode selector button <Cool/Heat selector> ● Press this button to select the operation mode of your preference. (See page 9.) * Available modes vary with the indoor unit model. 2. Fan speed control button ● Press this button to select the fan speed of your preference. (See page 10.) * Available fan speeds vary with the indoor unit model.
-
Page 8: Names And Functions
Names and Functions Liquid Crystal Display ● Two types of liquid crystal display (LCD) are available. The standard display is set by default. ● Detailed display can be selected in the main menu. (See page 25.) ● The displayed contents of the screen vary with the operation mode of the indoor unit model. (The following display will appear when the indoor unit is in automatic operation.) Standard display 10. - Page 9 1. Operation mode 10. Changeover controlled by the master indoor unit “ ” MASTER ● Used to display the current operation CONTROLLED mode: Cool, Heat, Vent, Fan, Dry or Auto. ● Displayed when another indoor unit on the system has the authority to change the operation mode between cool and heat.
-
Page 10: Operation Range
Water flow rate in the outside unit * The entering water temperature range may vary depending on the system or if antifreeze is used. For details, contact your Daikin dealer. ** In case of antifreeze used. *** This value shows a quantity of water per one outside unit. -
Page 11: Basic Operation
Basic Operation Cool/Heat/Auto/Fan Operation Operation procedure Operation button How to follow the operation manual display Explains the sequence of operation for the remote controller. Displays the location of Operate the buttons according to buttons to be operated. the procedure. Operation ●... - Page 12 Basic Operation ● To change the fan speed, press the Fan speed control button and select the desired fan speed from Low, Medium or High. Cool Set to Cool * Only two fan speed adjustment levels, low and high may be available depending on the type of indoor unit. Return Setting * The system may be in automatic fan speed control for equipment protection purposes.
- Page 13 Operation ● Press Mode button several times until the Dry mode is selected. * The dry mode may not be available depending on the type of indoor unit. Return Setting ● Press On/Off button. The Operation lamp (green) will illuminate and the system will start On/Off operating.
- Page 14 Basic Operation Operation ● The setback icon flashes when the unit is turned on under the setback control. Cool Setback Cool Return Setting SETBACK Cool Setback Cool Return Setting Ventilation Mode When the Indoor Unit is Interlocked with Energy Recovery Ventilator Preparation ● For equipment protection purposes, apply power to the outside units at least six hours before starting the operation of the system. Operation ●...
- Page 15 Setting the Cool / Heat Changeover Master Setting Changes See page 14 for an explanation of the cool/heat changeover master indoor unit. ● Press the Operation Mode Selector button on the remote controller of the changeover master indoor unit for at least four seconds while the backlight is Cool Set to Cool...
- Page 16 Basic Operation The other indoor units in the system can be set to When the master indoor unit is set to Cool Heat Cool mode Dry mode Heat mode Fan mode Auto mode (Cooling operation) Auto mode (Heating operation) Precautions for Selecting the Cool / Heat Changeover Master Indoor Unit ●...
-
Page 17: Quick Reference
Quick Reference „The main menu has the following items. Menu item Description Reference page Used to configure air flow direction settings. Air Flow Direction ● The air flow direction louver is automatically operated up and down (left and right). ● The fixed air flow directions are configurable for five positions. * This function is not available on all models. Ventilation Ventilation Rate Used to set “Low”... -
Page 18: Menu Options
Menu Options Moving Within the Main Menu Screen „Display Method for Main Menu Operation ● Press Menu/OK button. Cool Set to Cool Return Setting Basic screen ● The main menu screen is displayed. Main Menu Air Flow Direction Ventilation Schedule Off Timer Celsius / Fahrenheit Instructions for moving within the main menu will appear. - Page 19 Air Flow Direction „Configuring Air Flow Direction Operation ● Display the main menu screen. (See page 16.) Main Menu Air Flow Direction ● Press buttons to select Air Flow Direction on the main menu Ventilation Schedule screen and press the Menu/OK button. Off Timer Celsius / Fahrenheit Maintenance Information...
- Page 20 Menu Options Operational Details and Functions There are two types of air flow direction settings. Air flow direction swing Air flow direction The louvers automatically oscillate up and down. You can select from one of five fixed directions. (This has no relation to the angle of the louvers.) Indoor unit Indoor unit (Automatic) (Automatic) (Desired position)
- Page 21 ● Selecting and confirming the desired ventilation rate will take you back to the basic screen. (Pressing the Cancel button takes you back to the previous screen without changing the ventilation rate.) „Changing the ventilation mode Operation ● Display the ventilation screen. (See page 18.) Ventilation Ventilation Rate ● Press buttons to select Ventilation Mode on the ventilation screen.
- Page 22 Menu Options ● Before setting the schedule , the clock must be set. Schedule Clock has not been set. ● If the clock has not been set, a screen like the one on the left will appear. Would you like to set it now? Press buttons to select and press Menu/OK button.
- Page 23 „Settings Operation ● The schedule screen will appear. Schedule Enable/Disable ● Press buttons to select Settings on the schedule screen. Daily Patterns Settings The settings screen will appear when the Menu/OK button is pressed. Setting ● Press buttons to select the day to be set. Schedule Time Cool...
- Page 24 Menu Options A maximum of five actions per day can be set. Schedule Time Cool Heat ● Press the Menu/OK button when settings for each day are completed. – 6 :00 – 8 :00 The confirmation screen will appear. – 5 :30 – – – – – – :– – – – – –...
- Page 25 Off Timer „Configuring and Confirming the Off Timer settings Operation ● Display the main menu screen. (See page 16.) Main Menu Air Flow Direction ● Press buttons to select the Off Timer on the main menu screen. Ventilation Schedule Press Menu/OK button to display the off timer screen. Off Timer Celsius / Fahrenheit Maintenance Information Setting...
- Page 26 Menu Options Enabling or disabling the off timer Operation ● Navigate to the off timer screen. (See page 23.) Off Timer Enable/Disable ● Press buttons to select Enable/Disable on the off timer screen. Settings Press Menu/OK button to display the enable/disable screen. Setting ● Press buttons to select Enable Disable on the enable/disable Off Timer...
- Page 27 Configuration „Contrast Adjustment Operation ● Display the main menu screen. (See page 16.) Main Menu Configuration ● Press buttons to select Configuration on the main menu screen. Current Settings Clock & Calendar Press Menu/OK button to display the configuration screen. Daylight Saving Time Language Setting ● Navigate to the configuration screen. Configuration ●...
- Page 28 Menu Options Display Item Operation ● Navigate to the display screen. (See page 25.) Display Display Mode Standard ● Press buttons to select Display Item on the display screen. Display Item None Press Menu/OK button to display the display item screen. Setting ●...
- Page 29 Clock & Calendar „Date & Time Operation ● Display the main menu screen. (See page 16.) Main Menu Configuration ● Press buttons to select Clock & Calendar on the main menu screen. Current Settings Clock & Calendar Press Menu/OK button to display the clock & calendar screen. Daylight Saving Time Language Setting...
- Page 30 Menu Options ● Select “Minute” with buttons. Date & Time Year 2009 Change the minute with buttons. Month 10 Holding down the button causes the number to change continuously. Thursday 12:21 ● Press Menu/OK button. Setting The confirmation screen will appear. Note: The date can be set between January 1, 2009 and December 31, 2099.
-
Page 31: Maintenance
Language „Selectable Languages Operation ● Display the main menu screen. (See page 16.) Main Menu Configuration ● Press buttons to select Language on the main menu screen and Current Settings Clock & Calendar press the Menu/OK button. Daylight Saving Time Language Setting ●... -
Page 32: Reference Information
Two remote controllers control one indoor unit (in case of group control system, one group of indoor units). The unit is individually operated. Note ● Contact your Daikin dealer in case of changing the combination or setting of group control and two remote controller control systems. English... -
Page 33: Optimum Operation
Optimum Operation Observe the following precautions to ensure the system operates properly. ● Prevent direct sunlight from entering a room during cooling operation by using curtains or blinds. ● Do not leave doors and windows open. If the doors and windows remain open, air will flow out of your room causing a decrease in the cooling or heating effect. ● Do not use other heating devices directly beneath the indoor unit. If you do, they might get deformed by the heat. -
Page 34: Following Symptoms Are Not Air Conditioner Troubles
● When the cool/heat selector switch is installed and the display shows “ ”. CONTROLLED This is because cool/heat changeover is controlled by the cool/heat selector. Ask your Daikin dealer where the remote control switch is installed. „Fan operation is possible, but cooling and heating do not work ●... - Page 35 If the interior of indoor unit is extremely contaminated, the temperature distribution inside a room becomes uneven. It is necessary to clean the interior of the indoor unit. Ask your Daikin dealer for details on cleaning the unit. This operation requires a qualified service person. ● Immediately after the cooling operation stops and if the room temperature and humidity are low.
-
Page 36: Trouble Shooting
Refer to page 10 Trouble Shooting If one of the following malfunctions occur, take the measures shown below and contact your Daikin dealer. Warning ● Stop operation and shut off the power if anything unusual occurs, such as a burning smell. -
Page 37: Water Quality
● Check the fan speed setting on your remote controller. Refer to “Operation procedure”. ● Check for open doors or windows. Shut doors and windows to prevent wind from coming in. ● Check if there are too many occupants in the room during cooling operation. ●... -
Page 38: After-Sales Service And Warranty
Water Quality [NOTES] (1) The circle marks in the columns for corrosion or scale to develop. (2) Corrosion has a tendency to occur when water temperature is high (104°F(40°C) or higher), and if metals with no protective coating whatever are directly exposed to water, it is advisable to take effective measures against corrosion such as adding a corrosion inhibitor or deaeration treatment. (3) In a condenser water circuit that uses a closed cooling tower, the closed circuit circulating water and makeup water must satisfy its water quality standards for the hot water system, and passing water and makeup water must satisfy those for the circulation type cooling water system. - Page 39 ● Recommended inspection and maintenance cycles [Note: The maintenance cycle is not the same as the warranty period.] Table 1 assumes the following usage conditions. 1. Normal use without frequent starting and stopping of the machine. (Although it varies with the model, we recommend not starting and stopping the machine more than 6 times/hour for normal use.) 2.
- Page 40 After-Sales Service and Warranty „Recommended replacement cycle of wear-out parts [The cycle is not the same as the warranty period.] ● Table 2 “Replacement Cycle” Lists Name of Main Part Inspection Cycle Replacement Cycle Air filter 5 years High efficiency filter 1 year (Optional accessory) 1 year Fuse...
- Page 44 5151 San Felipe St., Suite 500, Houston, TX 77056 www.daikincomfort.com 4P540121-1 2018.07 4P540121-1 0000000B...
Need help?
Do you have a question about the VRV W T-series and is the answer not in the manual?
Questions and answers