Table of Contents
Advertisement
Advertisement
Table of Contents

Summary of Contents for ECOWITT DS-102
- Page 1 USB Temperature and Humidity Data Logger Instruction Manual Model: DS-102...
-
Page 2: Table Of Contents
Contents 1. Introduction................. 4 1.1 Package Contents...........4 1.2 Features..............5 2. Installation................5 2.1 Insert battery............5 2.2 Wall mount............... 6 3. Button Function..............6 4. Program Mode..............7 4.1 Quick Display Mode..........7 4.2 Setting Mode............7 4.3 MAX/MIN Mode............8 4.4 Sleep Mode.............. 8 4.5 Calibration Mode............. - Page 3 1. Display 2. Set key 3. + key 4. - key 5. USB port...
-
Page 4: Introduction
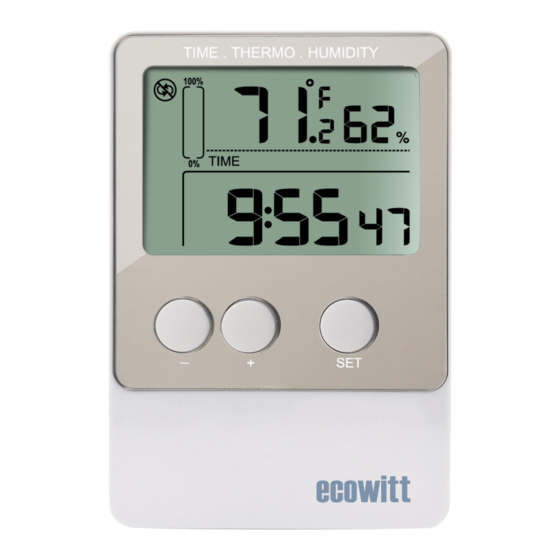
1. Temperature 2. MAX/MIN value 3. Humidity 4. Memory status 5. Logging mode icon 6. Time period icon 7. Time/Date/Interval/year 8. Low battery indicator 1. Introduction Thank you for choosing this item for your data logging requirement. Small, simple and affordable, our DS102 Data Logger can measure and record temperature and humidity data at specified intervals ranging from once every 8 seconds to once every 4 hours. -
Page 5: Features
1.2 Features Water resistance Measure and log temperature and humidity data Instant data download with PC/laptop USB interface for set-up and data download Easily re-configurable using included software Selectable logging intervals from 8 seconds to 4 hours ... -
Page 6: Wall Mount
2.2 Wall mount You can mount this item on a wall by using a screw (not included) 3. Button Function "SET" BUTTON: In normal display, press “SET” button to alternate the display of time, date and logging intervals In normal display, press ”SET” button for 2 seconds to enter ... -
Page 7: Program Mode
4. Program Mode There are six program modes: Quick Display Mode, Setting Mode, Max/Min mode, Sleep Mode, Calibration mode and Data Logging mode. 4.1 Quick Display Mode In Normal Mode, press the “SET” button to enter the Quick Display Mode as follows Display time Display date Logging interval... -
Page 8: Max/Min Mode
Note: In the setting mode, press”+” or ”-” buttons to change or scrolls the value. Hold the button for 2 seconds can change fast. Note: The setting mode will return to normal display while idle 30s. 4.3 MAX/MIN Mode In Normal mode, press ”+” button to enter the MAX mode, and the Max icon and maximum records will display Press ”+”... -
Page 9: Calibration Mode
4.5 Calibration Mode While in Normal Mode, press “SET” and “+” buttons at the same time for 5 seconds to enter Calibration Mode. The temperature value will begin flashing. Press the “+” button or “-“ button to increase or decrease the temperature bias to match the calibrated source. -
Page 10: Cycle Mode
4.6.1 Cycle Mode If Cycle Mode selected, the icon will display. In Cycle mode, when the memory is full, the oldest data sets stored will be overwritten by the new ones entered. 4.6.2 Acyclic Mode If Acyclic Mode selected, the icon will display In Acyclic Mode, when the memory is full, logging stops. -
Page 11: Other Features
will be displayed During the logging period, the time period icon inside will be flashing If memory is full or out of the period range, the time period icon will be displayed Note: If the logging mode is changed, the history data in data logger will be cleared automatically. -
Page 12: Low Battery Condition
4.7.3 Low Battery Condition When the battery voltage is under proper operation requirement symbol will show on the LCD and the battery need to be replace with new one. 5. Software 5.1 System requirements To install the software onto your PC, the minimum requirements are as follows: Operating System: Windows XP, Windows Vista, windows7, windows 8, windows 10... - Page 13 Insert the Data Logger into the USB port of your computer. While data logger connected to PC successfully, the data will be uploaded to PC automatically and the icon of will be displayed. Otherwise the will be displayed. It will generate a unique Device ID for each data logger. Tool Bar: The tool bar at the top of the screen has 4 options;...
- Page 14 Interval: 8 Seconds to 240 minutes Time display: Set Time display as 12 hours or 24 hours mode. Mode: Set the logging mode among Cycle Mode, Acyclic Mode, and Segmented Mode.. Temperature unit: Set the device to read in either Celsius (°C)
- Page 15 or Fahrenheit (°F) Date Format: Set the date format in DM or MD. LCD: If LCD “AUTO OFF” function was chosen, the device will automatically enter sleep mode while no button is pressed for 10 minutes to save battery life. Press any button to exit sleep mode.
- Page 16 device history data from the Device ID pull-down menu. Click Exit button to exit the History Menu. Click Graph button to enter Graph Menu This screen allows the viewing of the history data plotted in graph format and also provides a path to export the data to a .jpeg file.
- Page 17 Management option Click management button, enters the Management menu...
- Page 18 Click “Delete database records” button to delete the history data on the PC. The user should disconnect the device from the PC to stop the data transfer before they click “Delete database records” button. Click “Delete device record” button to delete the data record on the device.
-
Page 19: Specification
Help option About information All the settings from the base unit is mirrored into the PC software, so once you have done your setting on the base unit, then you don’t need to make any setting changes on the PC software. -
Page 20: Warranty Information
Battery Life : 1 year typical (Depends on sample rate, ambient temperature) Dimensions : 92x62x18mm 7. Warranty Information We disclaim any responsibility for any technical error or printing error, or their consequences. All trademarks and patents are recognized. We provide a 1-year limited warranty on this product against manufacturing defects in materials and workmanship.
Need help?
Do you have a question about the DS-102 and is the answer not in the manual?
Questions and answers