Table of Contents
Advertisement
Quick Links
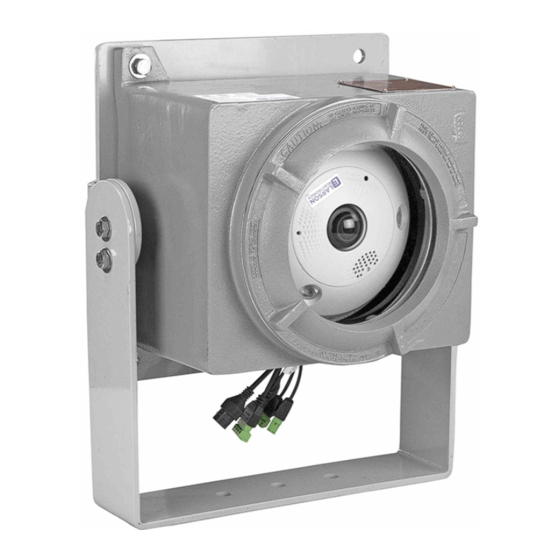
EXPCMR-IP-POE-DPTZ 6MP 360° PTZ
IP Camera Quick Installation Guide
This document guides you through the basic steps to install and configure the EXPCMR-IP-POE-DPTZ cameras.
The camera features:
1/1.8" progressive scan CMOS
•
6 mega-pixel image sensor
•
Up to 3072 x 2048 resolution, 30 fps
•
360° fisheye panoramic view
•
Multiple viewing modes
•
Internal MicroSD card slot for storage up to 64 GB (card not provided)
•
Virtual PTZ mode
•
50 ft IR range
•
Built-in microphone and speaker
•
For more information about the software features of this camera, please refer to the Camera
Software User Manual .
Fisheye Lens
Step 1.
Before installing the camera ...
The EXPCMR-IP-POE-DPTZ camera can be installed on a ceiling, wall or table.
1.
Check the package contents and make sure that the device in the package is in good condition and
all the assembly parts are included.
2.
Make sure the mounting surface and fasteners are strong enough to withstand at least three times
the weight of the camera assembly and the mounting bracket (if used). For concrete or cement
block walls, use an expansion screw to secure the camera or mounting bracket.
3.
if possible.
4.
5.
damage.
6.
7.
clean soft cloth and isopropyl alcohol.
1
www.larsonelectronics.com
Audio
OUT
RS-485
12 Vdc
connector
Power
RJ-45 LAN
connector
Cover Removal
To lamp or relamp, the cover must be unscrewed. In most cases, a rectangular steel bar about 0.75
inch (19 mm) x 0.50 inch (13 mm) x about 30.00 inch (762 mm), can be placed between the lugs
provided on the face of the cover and rotated counter clockwise to accomplish the removal. See Figure
3. Excessive force must not be used as the bar may slip and cause injury.
Handle lamps with care when removing and replacing. The lamps are vacuum jacketed and may
implode if broken. Wear safety glasses and gloves when removing and replacing a lamp.
When relamping, clean the reflector and cover glass to maintain efficiency. The glass may be cleaned
with any non-abrasive conventional glass cleaner. The reflector should be cleaned with a soft cloth
and soapy water.
Cover Replacement
Before replacing the cover, thoroughly clean the threads in both the cover and shell (Item 1 in repair
parts illustration), then lubricate these threads liberally with a non-drying grease or petrolatum. This
will enable the cover to be turned more easily and will facilitate its removal later for relamping.
Thread the cover onto the shell by hand until the cover contacts the shell o-ring. Use the rectangular
steel bar to rotate the cover another 1/12 to 1/10 of a turn or between 2.50 inches (64 mm) and 3.00
inches (76 mm) measured on the outside diameter.
Cover Glass Replacement
If the cover glass (Item 13 in repair parts illustration on page 5) is to be replaced, first loosen the
retaining ring (Item 12) by turning it counterclockwise with a hammer and drift punch applied to the
lugs on the ring. Once loose, it may be rotated out by hand. Remove the cover glass and cover o-ring
Audio
(Item 16) which should also be replaced.
LINE IN
Alarm
Threads in the cover, the retaining ring and the shell should be thoroughly cleaned and then lubricated
IN/OUT
liberally with a non-drying grease or petrolatum to facilitate assembly and disassembly and to inhibit
corrosion. After replacement of the cover, o-ring and the cover glass, the retaining ring must be
tightened against the glass with the hammer and the drift punch until the clearance between the
cover glass and the cover is such that a 0.0015 inch (0.04 mm) feeler will not enter the joint more
than 1/8 inch (3 mm) at any point.
Figure 3
loosen
How to Setup Multiple Views (video)
https://youtu.be/r1H3Mi_eTp8
loosen
EXPCMR-IP-POE-DPTZ
Advertisement
Table of Contents

Related Manuals for Larson Electronics EXPCMR-IP-POE-DPTZ


Summary of Contents for Larson Electronics EXPCMR-IP-POE-DPTZ
- Page 1 IP Camera Quick Installation Guide Cover Removal This document guides you through the basic steps to install and configure the EXPCMR-IP-POE-DPTZ cameras. The camera features: To lamp or relamp, the cover must be unscrewed. In most cases, a rectangular steel bar about 0.75 inch (19 mm) x 0.50 inch (13 mm) x about 30.00 inch (762 mm), can be placed between the lugs...
- Page 2 For wall mount installation, the camera must be oriented so the “UP ” label on the face of the NOTE MicroSD card camera is at the top. installed “UP” label Install screws into the screw hole until the screw head is at least ¼” over the surface. www.larsonelectronics.com EXPCMR-IP-POE-DPTZ...
- Page 3 Unzip and open the SADPTool.exe file on the Microsoft Windows computer you will use to access your camera on the LAN. Modify the network settings to values compatible with the subnet where it is installed. Enter the admin admin user password for cameras is ChangeMeN0w zero Click the Save www.larsonelectronics.com EXPCMR-IP-POE-DPTZ...
- Page 4 Click Next to install WebComponents. Allow the plug-in installation to complete. When the following window appears, click Finish. In the Compatibility View Settings window, ensure that the IP address of your camera is in the Add this website Add. www.larsonelectronics.com EXPCMR-IP-POE-DPTZ...
- Page 5 Wait until the format process completes before continuing. When formatting completes successfully, the HDD status will change to Normal. Edit the percentages of the HDD allocated for Picture and Record data as needed. Click Save. Step 9. Setup PTZ video streams In the Live View www.larsonelectronics.com EXPCMR-IP-POE-DPTZ...
- Page 6 64 Kbps (G.711) / 16 Kbps (G.726) / 64 Kbps (MP2L2) Microphone Built-In Features Motion Detection Support Backlight Compensation Support High Light Compensation Support Alarm Output, Email, FTP Privacy Mask Support Video Analytics Tamper Detection, Dynamic Analysis Interface Ethernet RJ-45 10/100 BASE-T www.larsonelectronics.com EXPCMR-IP-POE-DPTZ...
- Page 7 Intel® Pentium 4 3.0 GHz or later Memory 1 GB or above RAM Display 1024 x 768 resolution or higher Web Browser Internet Explorer 6.0 or above, Apple Safari 5.02 or above, Mozilla Firefox 3.5 or above, Google Chrome 8 or above www.larsonelectronics.com EXPCMR-IP-POE-DPTZ...
Need help?
Do you have a question about the EXPCMR-IP-POE-DPTZ and is the answer not in the manual?
Questions and answers