Table of Contents
Advertisement
CC2 Electric Barbecue Cooktop
Part numbers 1005; 1006
+61 3 9708 2999
dachristie.com
Installation and User Manual
This user manual is an integral part of the appliance
and must therefore be kept in its entirety and in
an accessible place. Read this user manual
carefully before using the appliance.
Installation Manual 6838_03
Advertisement
Table of Contents

Related Manuals for Christie CC2


Summary of Contents for Christie CC2
- Page 1 CC2 Electric Barbecue Cooktop Installation and User Manual Part numbers 1005; 1006 This user manual is an integral part of the appliance and must therefore be kept in its entirety and in an accessible place. Read this user manual carefully before using the appliance.
-
Page 2: Table Of Contents
Table 1, 1.7.1 Circuit Diagram Description Disposal 1.10 Boxed contents | Figure 3 INSTALLATION Design guidelines for installing a CC2 cooktop | Figure 4, 5, 6 Instructions for installing a CC2 cooktop | Figure 7, 8, 9 Installation requirements OPERATION Figure 10... -
Page 3: General Information
General information | GENERAL INFORMATION Installation Manual 6838_03... -
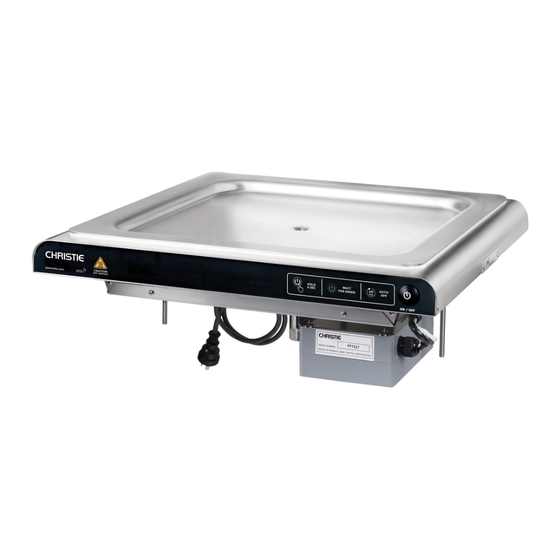
Page 4: Product Diagram | Figure
| General information 1.1 Product diagram FIG 1 FIG 2 CC2 Electric Barbecue Cooktop (Part numbers 1005; 1006) -
Page 5: Safety Instructions
• Where the underside is not fully • Any variation from the original Product enclosed, a Christie Open Bench Specification, including the use of Installation Kit must be used different components, may result in injury and will void the Safety Certification and •... -
Page 6: How To Read This Manual
Use of non-original spare parts • Use of the appliance other than as intended • Tampering with any part of the appliance • Non-observance of instructions contained in this Installation and User Manual CC2 Electric Barbecue Cooktop (Part numbers 1005; 1006) -
Page 7: Conditions Of Use
• All repairs under Warranty must first be approved by Christie. No responsibility will be accepted for repairs made without authorisation 1.6 Declaration of conformity This appliance has been tested and certified to Australian Standards (RCM) and European standards (CE) declaration of conformity certificate available on request. -
Page 8: Specifications | Table 1, 1.7.1 Circuit Diagram
BLACK YELLOW GREEN BLUE BLACK CONTROLLER BROWN BROWN PUSH BUTTON WHITE 12VDC 200mA RELAY GREEN YELLOW GREEN LED 12VDC 20mA RED LED 12VDC 20mA ON / OFF SWITCH BLACK GRAY HEATING ELEMENT CC2 Electric Barbecue Cooktop (Part numbers 1005; 1006) -
Page 9: Description
It is designed to be dropped into place • The CC2 is provided with 15A rated moulded plug on a 1-meter long supply cord. For countries outside of Australia and New Zealand, CC2 is provided with a 1.8 m power supply cord only. -
Page 10: Boxed Contents | Figure
CC2 Electric Appliance • Preassembled 240v, 15A power supply cord with three pin plug • For countries outside of Australia and New Zealand, the CC2 is provided with a 1.8 m power supply cord only • 2 x Anti rotation brackets (attached to hold down bracket, remove prior to installation) •... -
Page 11: Installation
Installation | INSTALLATION Installation Manual 6838_03... -
Page 12: Design Guidelines For Installing A Cc2 Cooktop | Figure
| Installation 2.1 Design guidelines for installing a CC2 cooktop Christie barbecue cooktops are designed to be installed into structures that meet minimum design specifications to ensure their safe operation. Despite all measures to make our product safe to use, it is a cooking appliance capable of reaching temperatures in excess of 200°C. - Page 13 Installation | 2.1 Design guidelines for installing a CC2 cooktop Note: For installing the cooktop into a pre-fabricated Christie barbecue surround, please refer to instructions for installing a CC2 cooktop on page 15. FIG. 4 Allow at least 130 mm of clear bench around cut-out on all sides...
- Page 14 2.1 Design guidelines for installing a CC2 cooktop The appliance must be fixed into an enclosed structure to prevent access to its underside. Where the underside is not fully enclosed, a Christie Open Bench Installation Kit must be used. Christie Open Bench Installation Kit FIG.
- Page 15 2.2 Instructions for installing a CC2 cooktop STEP 1 Open box and remove cardboard packers. Locate the Packing List and check that all listed parts are present. Contact Christie immediately if any discrepancies are noted. FIG. 7 Installation Manual 6838_03...
- Page 16 495mm cut out in the bench top at the 247.5mm mark. Mark this point and drill a 10mm diameter hole. Repeat on the other side. Secure as above, alternatively any two holes can be used if preferred. CC2 Electric Barbecue Cooktop (Part numbers 1005; 1006)
- Page 17 Installation | 2.2 Instructions for installing a CC2 cooktop STEP 4 With two people, lift the appliance out of the carton and turn so that the cooking surface faces upwards. Position over the cut out in the bench, ensuring that the front is orientated correctly.
-
Page 18: Installation Requirements
30 mA • In Australia and New Zealand, the CC2 is provided with 15A rated, moulded plug with oversize earth pin on a 1-meter long supply cord. For other countries CC2 is provided with a 1.8 m power supply cord only. An appropriate 15A rated and approved plug must be attached by a suitably qualified person •... -
Page 19: Operation
Operation | OPERATION Installation Manual 6838_03... - Page 20 | Operation The CC2 Cooktop is designed to function automatically without further operator input after the initial start. To commence operation, press and hold the START/STOP button for at least 6 seconds The appliance will enter a pre-heat/sterilisation mode, indicated by an audible beep and a red flashing START/STOP button.
-
Page 21: Cleaning And Maintenance
Cleaning and maintenance | CLEANING AND MAINTENANCE Installation Manual 6838_03... -
Page 22: Safety Considerations
Rinse the hotplate with water or wipe with a clean cloth or paper towel Note: If using the Christie pH neutral or other enzyme-based cleaners, no heat is required. Skip steps 2 and 3. -
Page 23: Cleaning The Waste Container | Figure
Baffled waste container A baffled waste container is supplied as standard with all Christie barbecues. It is recommended for use in locations where the barbecue hotplate is exposed to rain, sprinklers, or other sources of significant water ingress. - Page 24 Bagged waste container An optional bagged waste container is available for locations where the hotplate is not prone to excessive water ingress i.e. where barbecues are installed under a shelter, or where a Christie Barbecue Hood has been fitted to the cooktop.
-
Page 25: General Cleaning And Maintenance
Cleaning and maintenance | 4.5 General cleaning and maintenance To ensure the lasting safety, reliability, and energy efficiency of your Christie barbecue, we recommend that it be serviced and inspected at least every 12 months. The Servicing Procedure is detailed in our Technical Service Manual, available upon request from Christie. -
Page 26: Frequently Asked Questions
| Frequently asked questions FREQUENTLY ASKED QUESTIONS CC2 Electric Barbecue Cooktop (Part numbers 1005; 1006) - Page 27 To identify the error and how to resolve any issues, please consult the Trouble Shooting chapter of this guide, or contact Christie Support on +61 3 9708 2999 and quote the unit serial number for assistance.
- Page 28 The barbecue is not working and is still under warranty. What should I do? Contact Christie support on +61 3 9708 2999 and quote the unit serial number. Warranty repairs must not be undertaken without prior authorisation from Christie.
-
Page 29: Trouble Shooting
Troubleshooting | TROUBLE- SHOOTING Installation Manual 6838_03... -
Page 30: Diagnostic Codes | Table
Open the access door under the appliance and ensure the power outlet is turned on If the fault persists, contact Christie customer support or your local technician for assistance, providing details of the fault and the appliance serial number. The CC2 electric cooktop barbecue has an automatic diagnostic system indicated by green/red flashing of the START/STOP button. -
Page 31: Options And Accessories
Options and accessories | OPTIONS AND ACCESSORIES Installation Manual 6838_03... - Page 32 | Options & accessories Christie offers a range of options and accessories. Contact us on +61 3 9708 2999 or visit our website at https://dachristie.com/barbecues/cooktops/ CLEANING KIT 1 x handle, 1 x 500ml pH neutral cleaning concentrate, 6 x medium grain buffing pads.
-
Page 33: Warranty And Customer Care
Warranty and customer care | WARRANTY AND CUSTOMER CARE Installation Manual 6838_03... - Page 34 (including the Competition and Consumer Act 2010) and which by law cannot be excluded, restricted, or modified. D.A. CHRISTIE PTY. LTD. (“the Company”) warrants that the products manufactured by it are of merchantable quality. It does not cover faults which arise from negligent use or accident or misuse or damage or normal wear and tear or the use of the product for any purpose not intended by the Company, or improperly installed, stored or maintained.
- Page 35 Warranty and customer care | This warranty is in addition to and not in substitution for any warranty given by Law. WARRANTY CLAIM PROCEDURE Warranty service may be obtained by contacting the Company Any claim for warranty must be accompanied by appropriate documentation that provides proof of purchase, details of the alleged defect and serial number The freight to the Company will be at the purchaser’s expense but return freight will be at the Company’s expense...
- Page 36 +61 3 9708 2999 dachristie.com Installation Manual 6838_03...
Need help?
Do you have a question about the CC2 and is the answer not in the manual?
Questions and answers