
Related Manuals for CRU RTX430-3QR


Summary of Contents for CRU RTX430-3QR
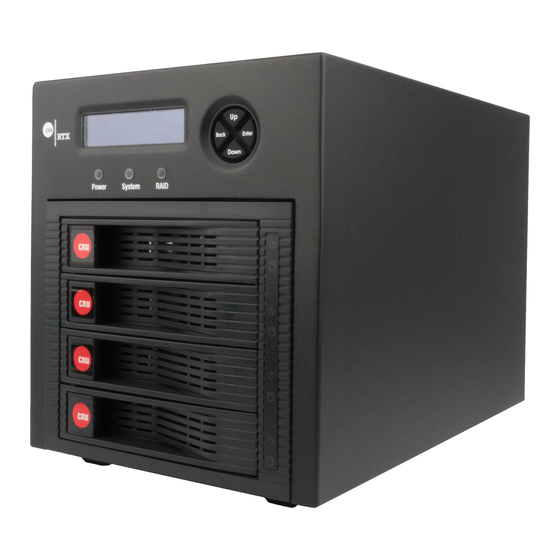
- Page 1 RTX430-3QR User Manual Features • Robust data storage in a portable RAID tower • TrayFree™ bays for fast drive swaps • Multiple connection types including USB 3.0 • Support for any capacity 3.5-inch SATA hard drive...
-
Page 2: Table Of Contents
6.1.1 Format a Drive 6.1.2 Mount and Unmount Volumes 6.2 Usage with macOS 6.2.1 Format a Drive 6.2.2 Mount and Unmount Volumes 6.2.3 Create a Boot Drive 7 Using CRU Configurator for Advanced Customization 8 RAID is Not a Backup Technical Specifications... -
Page 3: General Information
RTX430-3QR User Manual 1 General Information 1.1 Package Contents The following list contains the items that are included in the complete configuration for this device. Please contact CRU if any items are missing or damaged. Item Quantity RTX430-3QR Enclosure Power Cord USB 3.0 Cable... -
Page 4: Led Behavior
Ports (x2) Port 1.3 LED Behavior Color State Description Unit Power Green Solid The RTX430-3QR is powered on. Green Solid The System is performing as expected The internal temperature inside the RTX is approaching the preset Amber Solid System warning temperature. -
Page 5: Warnings And Notices
General Care • The main circuit board of the RTX430-3QR enclosure is susceptible to static electricity. Proper grounding is strongly recommended to prevent electrical damage to the enclosure or other con- nected devices, including the computer host. Avoid all dramatic movement, tapping on the unit, and vibration. -
Page 6: Introduction To Raid
2.1 Summary of RAID Levels The RTX430-3QR enclosure supports RAID Levels 0, 1, 5, and 10. RAID Level 5 is most commonly used by those seeking an optimal balance of speed and data safety. -
Page 7: Initial Rtx Setup
If you are installing your own drives, follow the steps in Section 5.1, “Create a New RAID.” 3.3.2 Changing the Pre-Configured RAID Type The RTX430-3QR ships with RAID 5 as the default mode. To use a different RAID mode instead, follow the steps in Section 5.2, “Change the RAID Type.”... -
Page 8: Raid Configuration
RTX430-3QR User Manual 5 RAID Configuration If you purchased your RTX430-3QR with drives pre-installed, you do not need to modify the RTX’s RAID configuration. The RTX430-3QR ships with RAID 5 as the default mode. There are four options for RAID configuration. See Section 2.1 for details on the available RAID levels. -
Page 9: Add A New Drive To An Existing Raid
RTX430-3QR User Manual The LCD will display “Select RAID Type”. Press Up or Down to cycle through to your desired RAID type and then press Enter to confirm your selection. The screen will display “Will Erase all Data OK?” Pressing Enter will result in the loss of all data on the drives. - Page 10 RTX430-3QR User Manual c. To format the volume, right-click the Drive Properties Box of the drive (highlighted yellow in Figure 1) and select New Simple Volume... d. Unless you wish to customize the settings in these dialog prompts, click Next on the Select Partition, Specify Volume/Partition Size, and Assign Drive Letter or Path dialog prompts, leaving the default settings.
- Page 11 RTX430-3QR User Manual d. Unless you wish to customize the settings in these dialog prompts, click Next on the Select Partition, Specify Volume/Partition Size, and Assign Drive Letter or Path dialog prompts, leaving the default settings. e. You will now see a window that allows selection of a file system. Choose NTFS and enter a name for the new volume.
-
Page 12: Mount And Unmount Volumes
RTX430-3QR User Manual d. Unless you wish to customize the settings in these dialog prompts, click Next on the Select Partition, Specify Volume/Partition Size, and Assign Drive Letter or Path dialog prompts, leaving the default settings. e. You will now see a window that allows selection of a file system. Choose NTFS and enter a name for the new volume. -
Page 13: Usage With Macos
RTX430-3QR User Manual find the correct icon. Windows will indicate when it is safe to disconnect the RTX enclo- sure. Disconnecting the RTX enclosure while Windows is actively reading or writing to the volume can result in data loss. Unmount an eSATA Volume Many eSATA hosts do not support hotswapping, but third-party software utilities are avail- able that will provide the functionality. -
Page 14: Mount And Unmount Volumes
This is useful if you are sporadically booting from the RTX enclosure. Figure 5. CRU Configurator allows you to customize your RTX enclosure’s alarms, set up e-mail and SMS alerts, set a PIN number, and more. -
Page 15: Using Cru Configurator For Advanced Customization
Without an effective backup strategy, recovering data may be impossible, or the cost of data recovery may be quite expensive. The CRU warranty does not cover costs associated with data loss (nor do the warranties of other data storage manufacturers). -
Page 16: Technical Specifications
CRU or its suppliers be liable for any costs of procurement of substitute products or services, lost profits, loss of information or data, computer mal- function, or any other special, indirect, consequential, or incidental damages arising in any way out of the sale of, use of, or inability to use any CRU product or service, even if CRU has been advised of the possibility of such damages.
Need help?
Do you have a question about the RTX430-3QR and is the answer not in the manual?
Questions and answers